RDS PostgreSQL (Ephemeral Lab - Part 2 - Configuration)
Prerequisites
projectx-prod-vpchas been created with subnets configured.projectx-prod-jumpboxEC2 instance exists and is accessible.projectx-prod-websvrEC2 instance exists.My-Desktop-Key-Pairkey pair exists.- AWS CLI configured with appropriate credentials.
- RDS PostgreSQL instance (
projectx-prod-rds) has been provisioned but not configured (from Part 1).
Network Topology
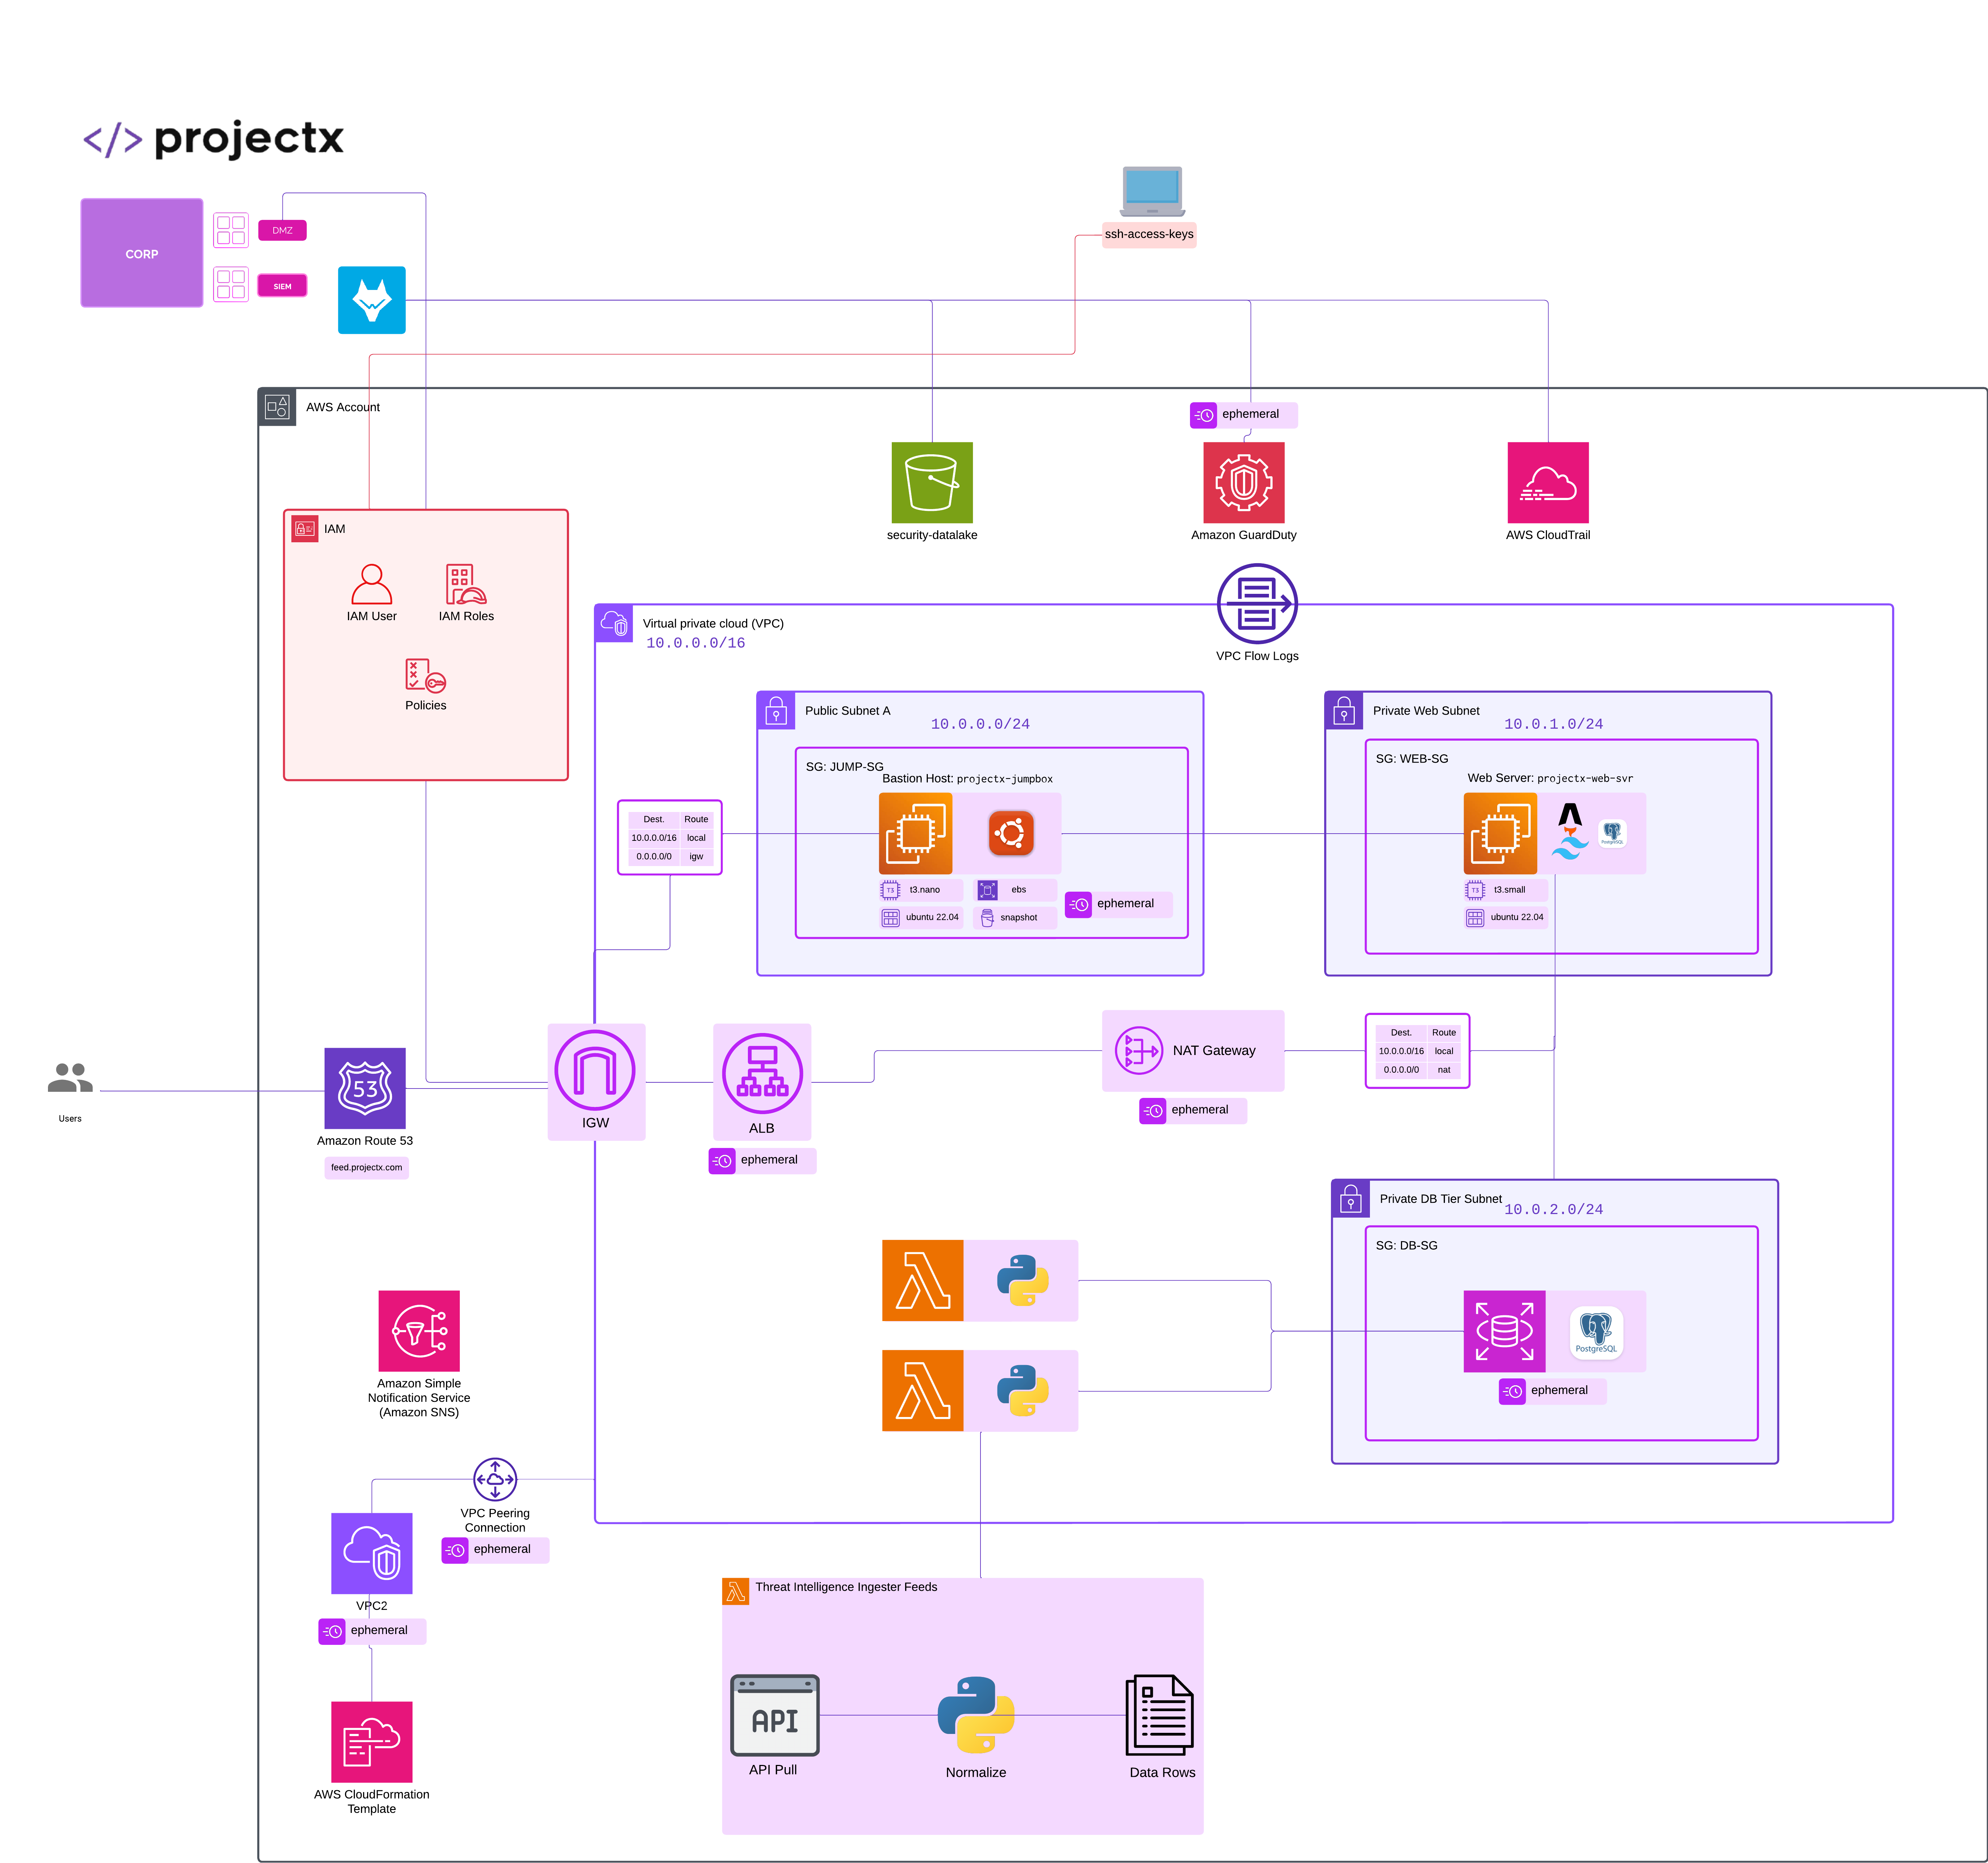
Ephemeral Lab Environment
This guide is for ephemeral lab environments only. After completing this exercise, delete the RDS instance immediately to avoid ongoing charges. All data will be lost when the instance is terminated. For production workloads, see ec2_postgres.md for a cost-effective PostgreSQL setup on EC2.
Gather Connection Metadata
Recall this information from Part 1.
-
In the AWS console, open RDS > Databases > projectx-prod-rds.
-
Copy the following items into your password vault:
-
Endpoint (e.g.,
projectx-prod-rds.abc123.us-east-1.rds.amazonaws.com). - Port:
5432 - DB Name:
projectxdb -
Master Username:
projectx_dbadmin -
Security > VPC security groups:
projectx-prod-rds-SG
SSH to the Web Server via Jumpbox
# From your host device
ssh -i ~/.ssh/My-Desktop-Key-Pair.pem ec2-user@<jumpbox-public-ip>

# From the jumpbox
ssh ubuntu@projectx-prod-websvr
Confirm you are on the projectx-prod-websvr:
Install PostgreSQL Client Utilities
Note
You will need Internet access to the projectx-prod-websvr EC2 instance. Create a temporary NAT Gateway, edit the private route table, then issue the update commands.
Let's install the client CLI for PostgreSQL.
PostgreSQL 17's client package is not available on Ubuntu's official repository, we will need to download the package manually. Follow the bellow steps:
curl -fsSL https://www.postgresql.org/media/keys/ACCC4CF8.asc | sudo gpg --dearmor -o /etc/apt/trusted.gpg.d/postgresql.gpg
echo "deb http://apt.postgresql.org/pub/repos/apt $(lsb_release -cs)-pgdg main" | \
  sudo tee /etc/apt/sources.list.d/pgdg.list
Test Connectivity from the Web Server
Let's temporarily test the connectivity from projectx-prod-websvr to projectx-prod-rds.
We will first create a .pgpass file so we won't be prompted for the database password every time. Each line in the .pgpass is a connection entry with the format below.
Create a temporary .pgpass file for convenience (optional):
projectx-prod-rds.abc123.us-east-2.rds.amazonaws.com:5432:projectxdb:projectx_dbadmin:<MASTER_PASSWORD>
👉 projectx-prod-rds.abc123.us-east-2: Is your RDS endpoint name.
<MASTER_PASSWORD>: Is your secure master password you created.
Add chmod 600 permissions.
chmod 600 ~/.pgpass
Run a simple connection test:
psql -h projectx-prod-rds.abc123.us-east-2.rds.amazonaws.com -U projectx_dbadmin -d postgres -c "select now();"
If this command times out, re-check Step 2 (security groups and routing).
Create Application Database Objects
Log into the database:
Now let's create a Database called projectxdb, a table called dashboard.panel_feed with a few template columns.
We are also going to create a new user called webapp_rw which will eventually allow the web application to access the data from the dashboard.panel_feed.
Inside the prompt:
CREATE SCHEMA dashboard AUTHORIZATION projectx_dbadmin;

CREATE TABLE dashboard.panel_feed (
    id bigserial PRIMARY KEY,
    panel_name text NOT NULL,
    source_feed text NOT NULL,
    payload jsonb NOT NULL,
    collected_at timestamptz NOT NULL DEFAULT now()
);

CREATE USER webapp_rw WITH PASSWORD '<STRONG_RANDOM_PASSWORD>';
GRANT CONNECT ON DATABASE projectxdb TO webapp_rw;
GRANT USAGE ON SCHEMA dashboard TO webapp_rw;
GRANT SELECT, INSERT, UPDATE, DELETE ON ALL TABLES IN SCHEMA dashboard TO webapp_rw;
ALTER DEFAULT PRIVILEGES IN SCHEMA dashboard GRANT SELECT, INSERT, UPDATE, DELETE ON TABLES TO webapp_rw;
👉 '<STRONG_RANDOM_PASSWORD>': Generate a new*, strong random password.
This table will eventually store the output of each open-source threat feed for the dashboard panels.
- Security News Articles RSS Feed
- Top 100 Domains
- Top IPs
- Top 10 Countries by IP
- Top Malware Hashes
- Top IOCs
We can adjust the table schema as time goes on.
Seed Reference Data
Let's add a bit of sample data into the table so we do not have empty rows.
INSERT INTO dashboard.panel_feed (panel_name, source_feed, payload)
VALUES
('security_news_rss', 'placeholder', '{"items": []}'),
('top_100_domains', 'placeholder', '{"items": []}'),
('top_ips', 'placeholder', '{"items": []}'),
('top_10_countries_by_ip', 'placeholder', '{"items": []}'),
('top_malware_hashes', 'placeholder', '{"items": []}'),
('top_iocs', 'placeholder', '{"items": []}');
Store Credentials Securely on the Web Server
We will need to store the credentials for projectx-dbadmin and webapp_rw user in a secure way. We are going to setup AWS Secrets manager so the EC2 instance can retrieve these secrets when needed. We will add the logic for retrieving these secrets within the web application (Astro) in a later guide.
For now, let's add these secrets to AWS Secrets Manager console, create an IAM role, and attach a IAM policy to this role that will allow the EC2 instance to retrieve both of these secrets. Then we can attach the IAM role to the projectx-prod-websvr EC2 instance.
Create Secrets in Secrets Manager
Go to AWS Console ➔ Secrets Manager.
Click Store a new secret.
Under Secret type, choose: Other type of secret
Key: username ➔ Value: projectx_dbadmin
Key: password ➔ Value: some-strong-password
Key: username ➔ Value: webapp_rw
Key: password ➔ Value: another-strong-password
Next.
Under Secret name, use:
projectx-prod/rds/projectx-dbadmin
projectx-prod/rds/webapp-rw
For Encryption key, you can use the default aws/secretsmanager KMS key for now.
For Rotation, you can disable rotation initially (you can set it up later).
Click through Next and then Store to create the secret.
After saving, note the Secret ARN for each secret; you’ll need that for IAM.
Create Customer Managed IAM Policy
We need a customer-managed IAM policy that allows GetSecretValue & DescribeSecret on your two secrets.
Go to IAM ➔ Policies ➔ Create policy.
Choose the JSON tab.
Paste something like the following (update YOUR_ACCOUNT_ID and region):
{
  "Version": "2012-10-17",
  "Statement": [
    {
      "Sid": "ReadProjectXDbSecrets",
      "Effect": "Allow",
      "Action": [
        "secretsmanager:GetSecretValue",
        "secretsmanager:DescribeSecret"
      ],
      "Resource": [
        "arn:aws:secretsmanager:us-east-1:YOUR_ACCOUNT_ID:secret:projectx-prod/rds/projectx-dbadmin-*",
        "arn:aws:secretsmanager:us-east-1:YOUR_ACCOUNT_ID:secret:projectx-prod/rds/webapp-rw-*"
      ]
    }
  ]
}
Click Next, give it a name like: projectx-secrets-rds-readonly
Create IAM Role projectx-iam-websvr for EC2
Go to IAM ➔ Roles ➔ Create role.
Trusted entity type: AWS service
Use case: Choose EC2.
Click Next.
{
  "Version": "2012-10-17",
  "Statement": [
    {
      "Sid": "",
      "Effect": "Allow",
      "Principal": {
        "Service": "ec2.amazonaws.com"
      },
      "Action": "sts:AssumeRole"
    }
  ]
}
projectx-secrets-rds-readonly
Select it and click Next.
Name the role: projectx-iam-websvr
Optionally add a description: EC2 web server role for reading ProjectX RDS secrets
Click Create role.
Now bind projectx-iam-websvr to your Astro EC2 instance.
Go to EC2 ➔ Instances.
Select your web server instance.
Click Actions ➔ Security ➔ Modify IAM role.
From the dropdown, choose: projectx-iam-websvr
Click Update IAM role.
From this point on, code running on that instance can call GetSecretValue for those two secrets using the instance profile. This way we don't need to hardcode secrets into the application stack.
Hardening and Housekeeping
Let's clean up.
Remove temporary .pgpass once testing is complete.
sudo rm -rf ~/.pgpass
If you would like, rotate the webapp_rw password in the secret manager and update the app.
Clean Up - Delete RDS Instance
IMPORTANT: Delete RDS Instance Now
Since this is an ephemeral lab environment, you must delete the RDS instance after completing this exercise:
- Navigate to RDS ➔ Databases
- Select
projectx-prod-rds - Click Actions ➔ Delete
- Uncheck "Create final snapshot" (not needed for labs)
- Type
delete meto confirm - Click Delete
This will prevent ongoing charges. All data will be lost, which is expected for ephemeral lab environments.
Next Steps
- Build Lambda/job workers to ingest the threat intelligence feeds (Security News RSS, Top 100 Domains, Top IPs, Top 10 Countries by IP, Top Malware Hashes, Top IOCs) and write to
dashboard.panel_feed. - Integrate health checks into your CI/CD pipeline to catch database connectivity regressions before deployment.
Production Alternative
For production workloads, use the PostgreSQL on EC2 setup described in ec2_postgres.md, which provides similar functionality at approximately 40% lower cost than RDS.