PostgreSQL on EC2 (Production Configuration)
Prerequisites
projectx-prod-vpchas been created with subnets configured.projectx-prod-websvr-publicEC2 instance exists and is accessible.My-Desktop-Key-Pairkey pair exists.- AWS CLI configured with appropriate credentials.
Network Topology
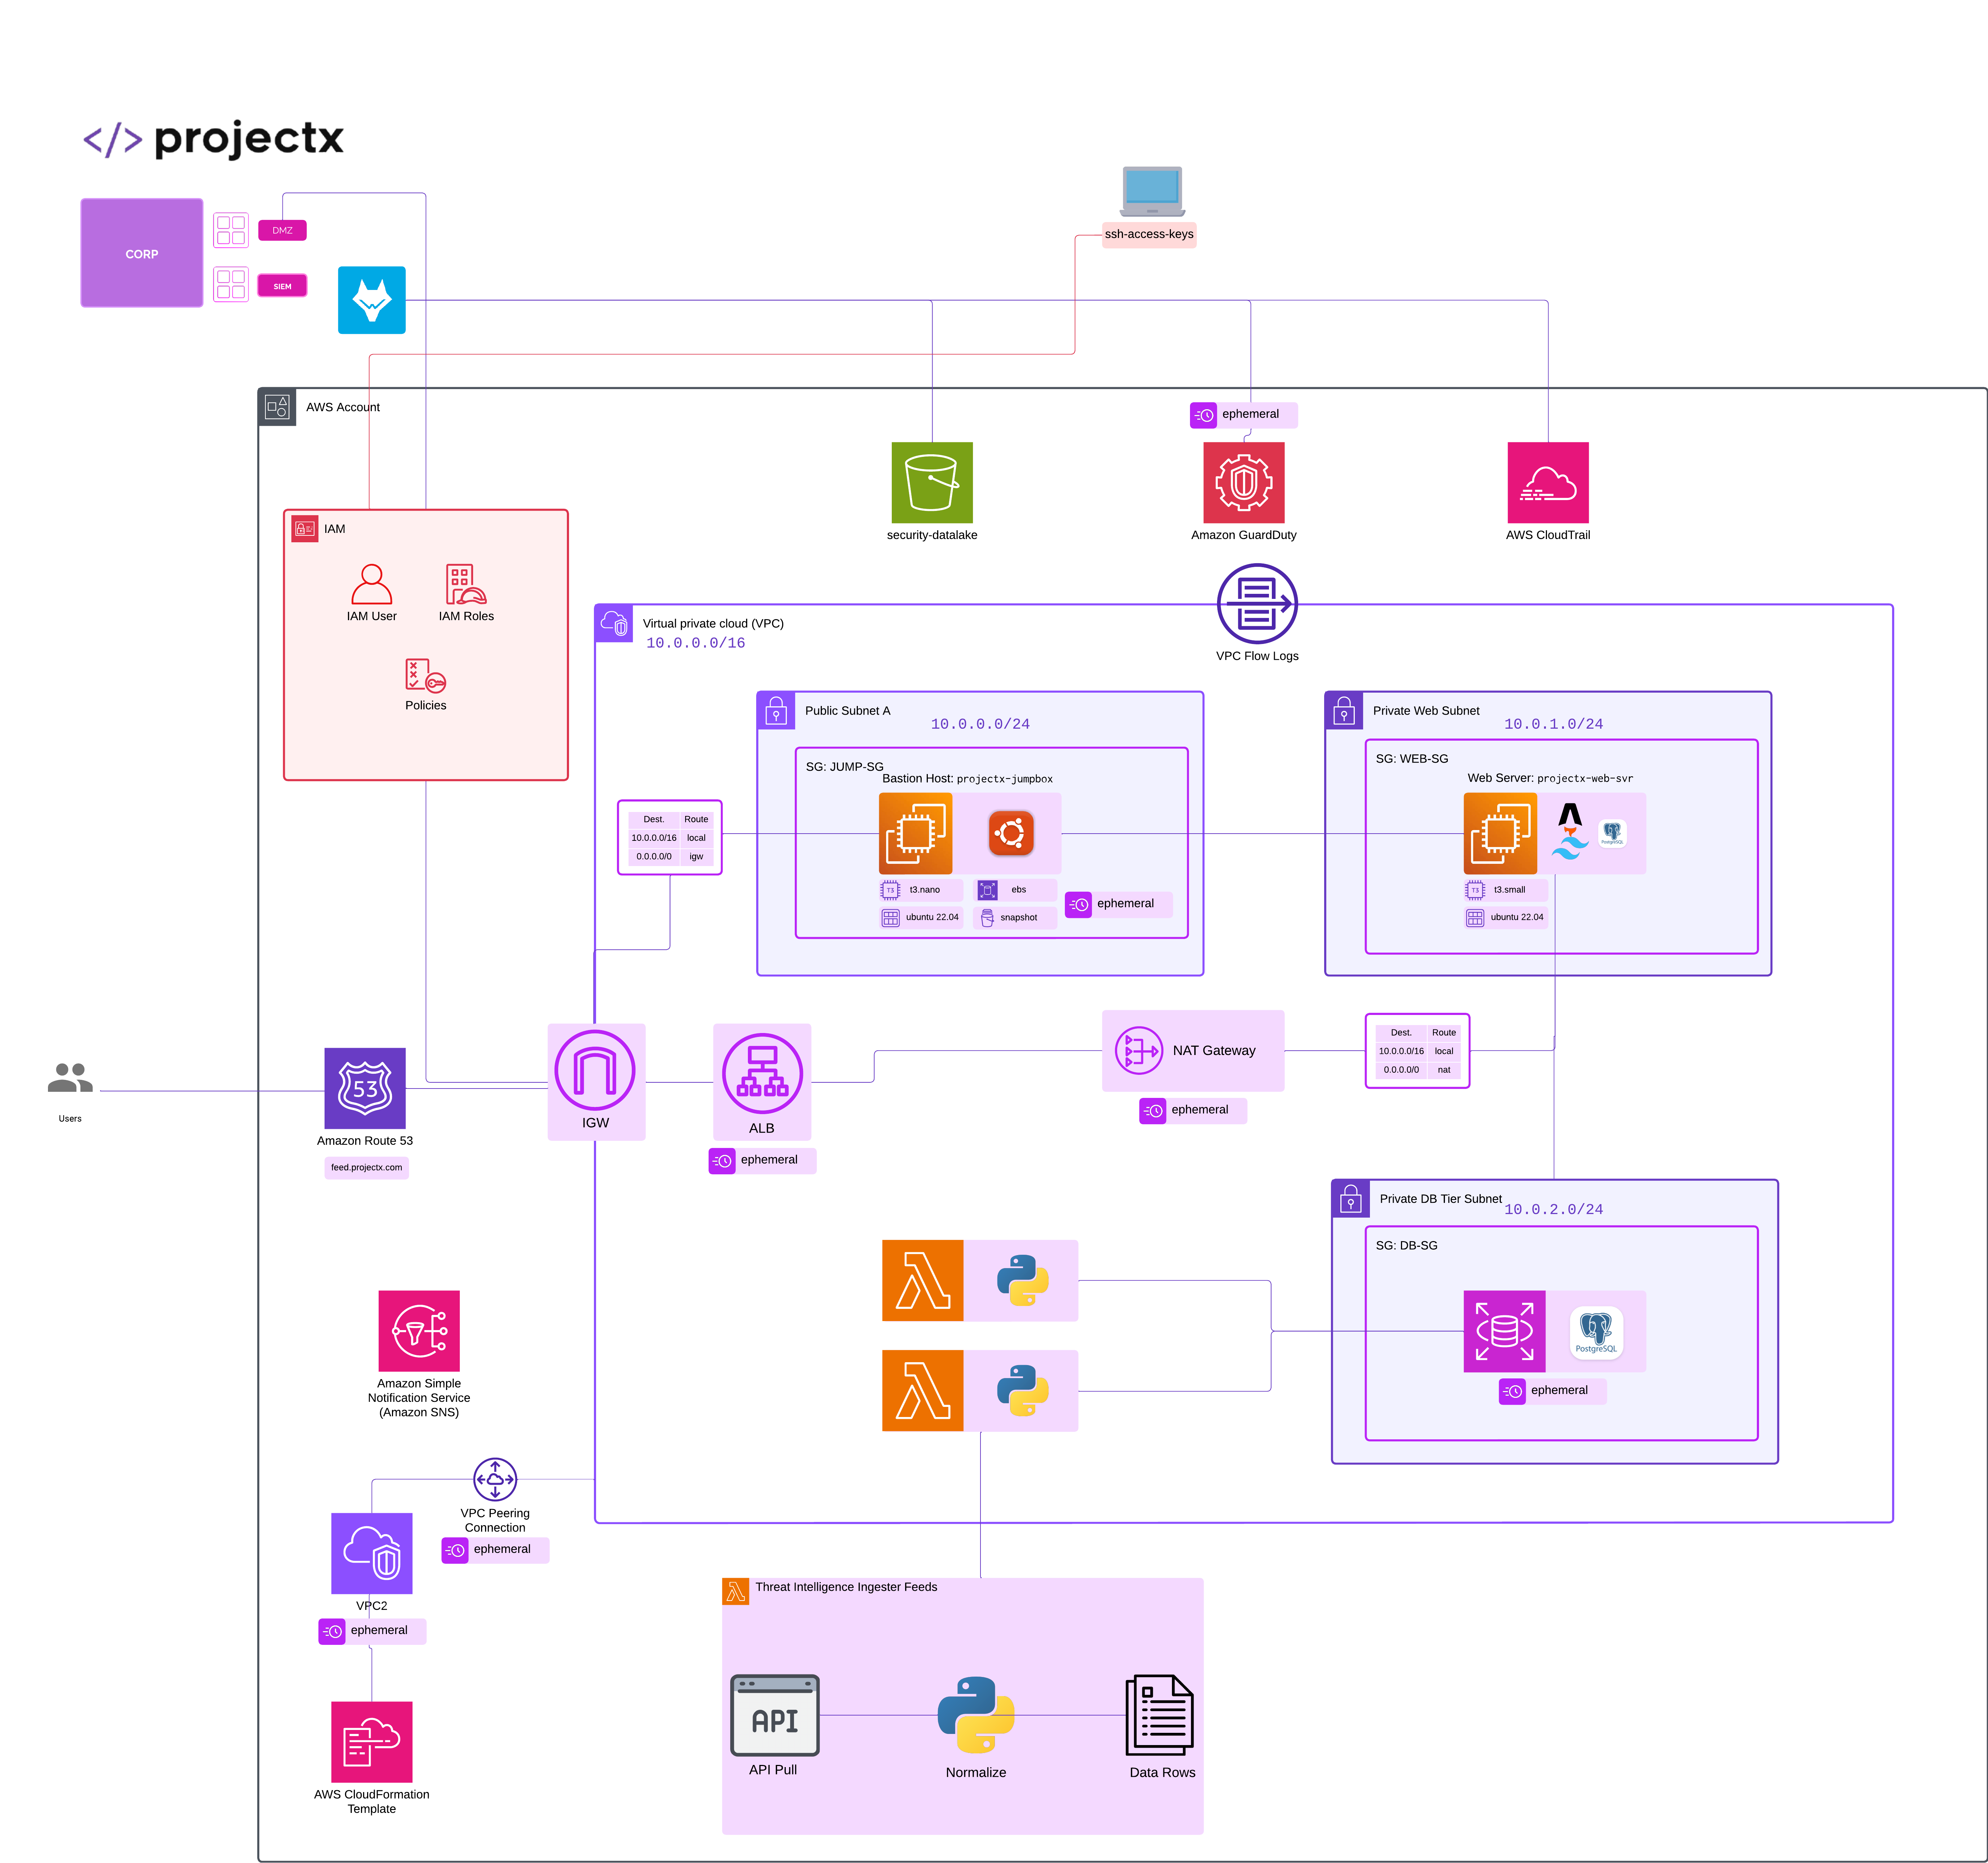
Overview
This setup uses PostgreSQL installed directly on the EC2 web server, providing a cost-effective alternative to RDS for production workloads.
While you'll need to manage backups and maintenance yourself, this approach can save significant costs compared to managed RDS instances.
Given that most of us are on a budget, we we install PostgreSQL onto our projectx-prod-websvr-public.
SSH to the Web Server
Connect to your public web server using SSH.
Install PostgreSQL Server
This process is copied over from the RDS instance guides with a few changes.
Let's install PostgreSQL server and client utilities. We'll use PostgreSQL 17 from the official PostgreSQL repository.
First, add the PostgreSQL repository:
curl -fsSL https://www.postgresql.org/media/keys/ACCC4CF8.asc | sudo gpg --dearmor -o /etc/apt/trusted.gpg.d/postgresql.gpg
echo "deb http://apt.postgresql.org/pub/repos/apt $(lsb_release -cs)-pgdg main" | \
  sudo tee /etc/apt/sources.list.d/pgdg.list
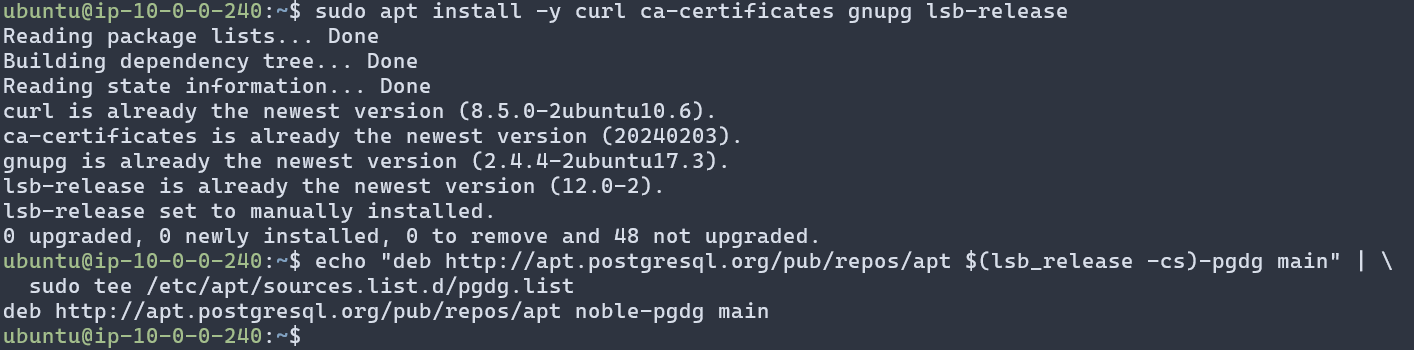
Now install PostgreSQL 17 server:
Verify PostgreSQL is running:

If it's not running, start it:

Configure PostgreSQL
PostgreSQL creates a default superuser postgres. We'll use this user to set up our database and application user. We will then provision a dedicated user, webapp_rw (READ + WRITE permissions). This dedicated account will be used to connect from the Lambda functions to the Postgres database.
Switch to the postgres user and test the connection:

You should see PostgreSQL version information. If successful, PostgreSQL is installed and running correctly.
Create Application Database Objects
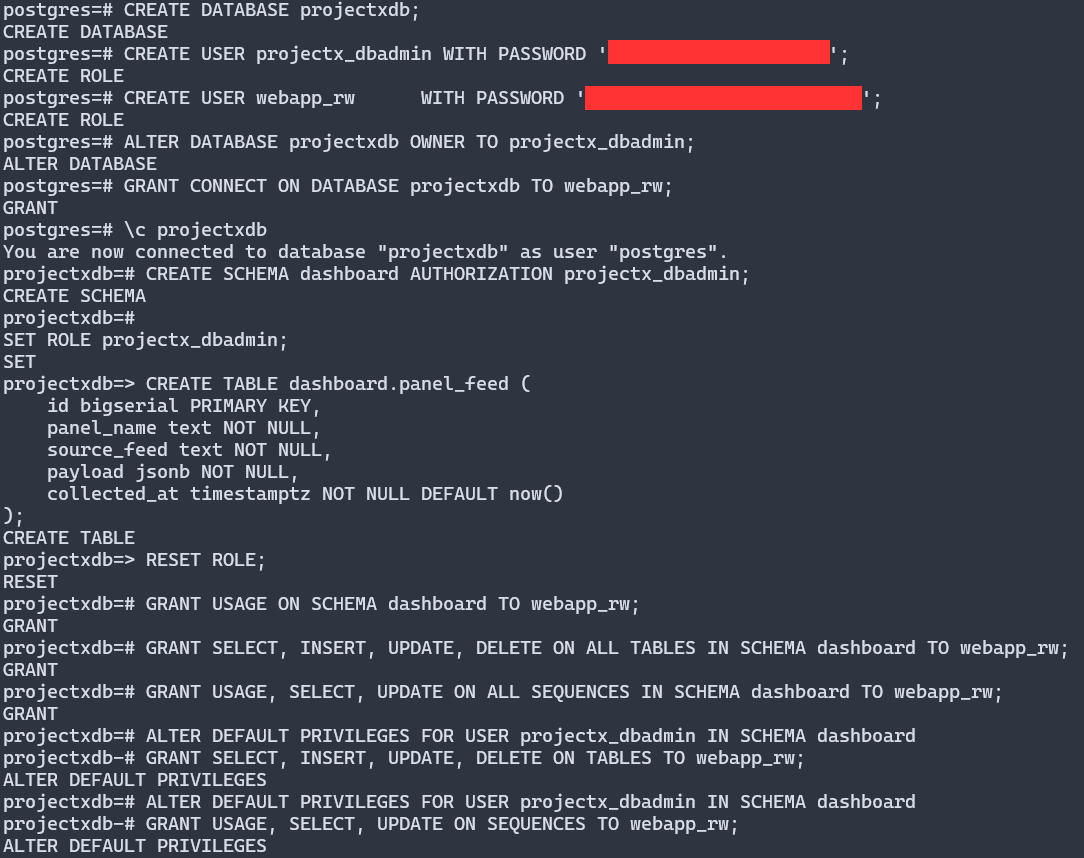
Log into PostgreSQL as the postgres superuser:
Now let's create a database called projectxdb, a database admin user projectx_dbadmin, and a table called dashboard.panel_feed with a few template columns.
We are also going to create a new user called webapp_rw which will eventually allow the web application to access the data from the dashboard.panel_feed.
Inside the PostgreSQL prompt, run the following commands:
-- As postgres
CREATE DATABASE projectxdb;

CREATE USER projectx_dbadmin WITH PASSWORD '<STRONG_PASSWORD>';
CREATE USER webapp_rw      WITH PASSWORD '<STRONG_PASSWORD>';

ALTER DATABASE projectxdb OWNER TO projectx_dbadmin;
GRANT CONNECT ON DATABASE projectxdb TO webapp_rw;

-- Change to the new DB.
\c projectxdb

CREATE SCHEMA dashboard AUTHORIZATION projectx_dbadmin;

SET ROLE projectx_dbadmin;

CREATE TABLE dashboard.panel_feed (
    id bigserial PRIMARY KEY,
    panel_name text NOT NULL,
    source_feed text NOT NULL,
    payload jsonb NOT NULL,
    collected_at timestamptz NOT NULL DEFAULT now()
);

RESET ROLE;

GRANT USAGE ON SCHEMA dashboard TO webapp_rw;
GRANT SELECT, INSERT, UPDATE, DELETE ON ALL TABLES IN SCHEMA dashboard TO webapp_rw;
GRANT USAGE, SELECT, UPDATE ON ALL SEQUENCES IN SCHEMA dashboard TO webapp_rw;

ALTER DEFAULT PRIVILEGES FOR USER projectx_dbadmin IN SCHEMA dashboard
GRANT SELECT, INSERT, UPDATE, DELETE ON TABLES TO webapp_rw;

ALTER DEFAULT PRIVILEGES FOR USER projectx_dbadmin IN SCHEMA dashboard
GRANT USAGE, SELECT, UPDATE ON SEQUENCES TO webapp_rw;

-- Exit psql
\q
👉 '<STRONG_RANDOM_PASSWORD>': Generate strong, random passwords for both projectx_dbadmin and webapp_rw users.
👉 MAKE SURE TO STORE BOTH PASSWORDS IN STATIC FILE.
This table will eventually store the output of each open-source threat feed for the dashboard panels.
- Security News Articles RSS Feed
- Top 100 Domains
- Top IPs
- Top 10 Countries by IP
- Top Malware Hashes
- Top IOCs
Seed Reference Data
Let's add a bit of sample data into the table so we do not have empty rows.
Connect to the database as the admin user, this time we use our new projectx-dbadmin user:

You'll be connected to the database. Once connected, run:
INSERT INTO dashboard.panel_feed (panel_name, source_feed, payload)
VALUES
('security_news_rss', 'placeholder', '{"items": []}'),
('top_100_domains', 'placeholder', '{"items": []}'),
('top_ips', 'placeholder', '{"items": []}'),
('top_10_countries_by_ip', 'placeholder', '{"items": []}'),
('top_malware_hashes', 'placeholder', '{"items": []}'),
('top_iocs', 'placeholder', '{"items": []}');
You should see an INSERT 0 6 output.
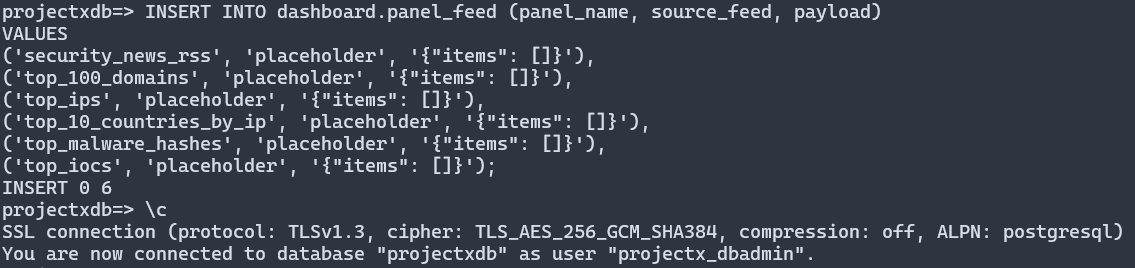
Exit the psql prompt:
Store Credentials Securely
Production Requirement
In production, credentials must be stored securely. We used AWS Secrets Manager in the RDS labs to store secret passwords for the webapp_rw and projectx-dbadmin. We will do the same here. Never hardcode database credentials in application code or configuration files.
We will store the credentials for projectx_dbadmin and webapp_rw users securely using AWS Secrets Manager. This allows the EC2 instance to retrieve these secrets when needed without hardcoding them in the application. We will add the logic for retrieving these secrets within the web application (Astro) in a later guide.
Create Secrets in Secrets Manager
Go to AWS Console ➔ Secrets Manager.
Click Store a new secret.
Under Secret type, choose: Other type of secret
For the first secret (database admin):
- Click Plaintext tab
- Add key-value pairs:
- Key: username ➔ Value: projectx_dbadmin
- Key: password ➔ Value: <your-projectx_dbadmin-password>
Click Next.
Under Secret name, use: projectx-prod/postgres/projectx-dbadmin
For Encryption key, you can use the default aws/secretsmanager KMS key for now.
For Rotation, you can disable rotation initially (you can set it up later).
Click through Next and then Store to create the secret.
Repeat the process for the webapp user:
- Secret type: Other type of secret
- Plaintext key-value pairs:
- Key: username ➔ Value: webapp_rw
- Key: password ➔ Value: <your-webapp_rw-password>
- Secret name: projectx-prod/postgres/webapp-rw

After saving, note the Secret ARN for each secret; you'll need that for IAM.
Create Customer Managed IAM Policy
We need a customer-managed IAM policy that allows GetSecretValue & DescribeSecret on your two secrets.
Go to IAM ➔ Policies ➔ Create policy.
Choose the JSON tab.
Paste something like the following (update YOUR_ACCOUNT_ID and region):
{
  "Version": "2012-10-17",
  "Statement": [
    {
      "Sid": "ReadProjectXDbSecrets",
      "Effect": "Allow",
      "Action": [
        "secretsmanager:GetSecretValue",
        "secretsmanager:DescribeSecret"
      ],
      "Resource": [
        "arn:aws:secretsmanager:us-east-1:YOUR_ACCOUNT_ID:secret:projectx-prod/postgres/projectx-dbadmin-*",
        "arn:aws:secretsmanager:us-east-1:YOUR_ACCOUNT_ID:secret:projectx-prod/postgres/webapp-rw-*"
      ]
    }
  ]
}
Click Next, give it a name like: projectx-secrets-postgres-readonly
Create IAM Role projectx-iam-websvr for EC2
Go to IAM ➔ Roles ➔ Create role.
Trusted entity type: AWS service
Use case: Choose EC2.
Click Next.
On the Permissions page, search for the policy you just created: projectx-secrets-postgres-readonly
Select it and click Next.
Name the role: projectx-iam-websvr
Optionally add a description: EC2 web server role for reading ProjectX PostgreSQL secrets
Click Create role.
Now bind projectx-iam-websvr to your EC2 instance.
Go to EC2 ➔ Instances.
Select your web server instance.
Click Actions ➔ Security ➔ Modify IAM role.

From the dropdown, choose: projectx-iam-websvr
Click Update IAM role.
From this point on, code running on that instance can call GetSecretValue for those two secrets using the instance profile. This way we don't need to hardcode secrets into the application stack.
Configure PostgreSQL for Local Connections
By default, PostgreSQL is configured to allow local connections. However, if you need to connect from the application using password authentication, you may need to adjust the pg_hba.conf file.
The default configuration typically allows: - Local connections using peer authentication (Unix socket) - Local connections using password authentication
To verify or modify authentication settings:
For local connections, ensure you have a line like:
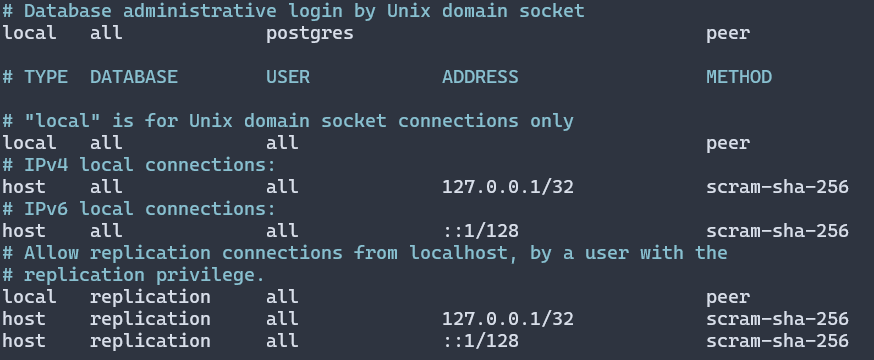
After making changes, restart PostgreSQL:
Test Database Connection
Test the connection as the webapp_rw user:
PGPASSWORD='<webapp_rw_password>' psql -h localhost -U webapp_rw -d projectxdb -c "SELECT COUNT(*) FROM dashboard.panel_feed;"
You should see the count of rows (should be 6 from the seed data).
Success! We now have a PostgreSQL database we can use to store the data from our Lambda feed functions.