Prerequisites
projectx-prod-vpchas been created with subnets configured.My-Desktop-Key-Pairkey pair exists.- AWS CLI configured with appropriate IAM credentials.
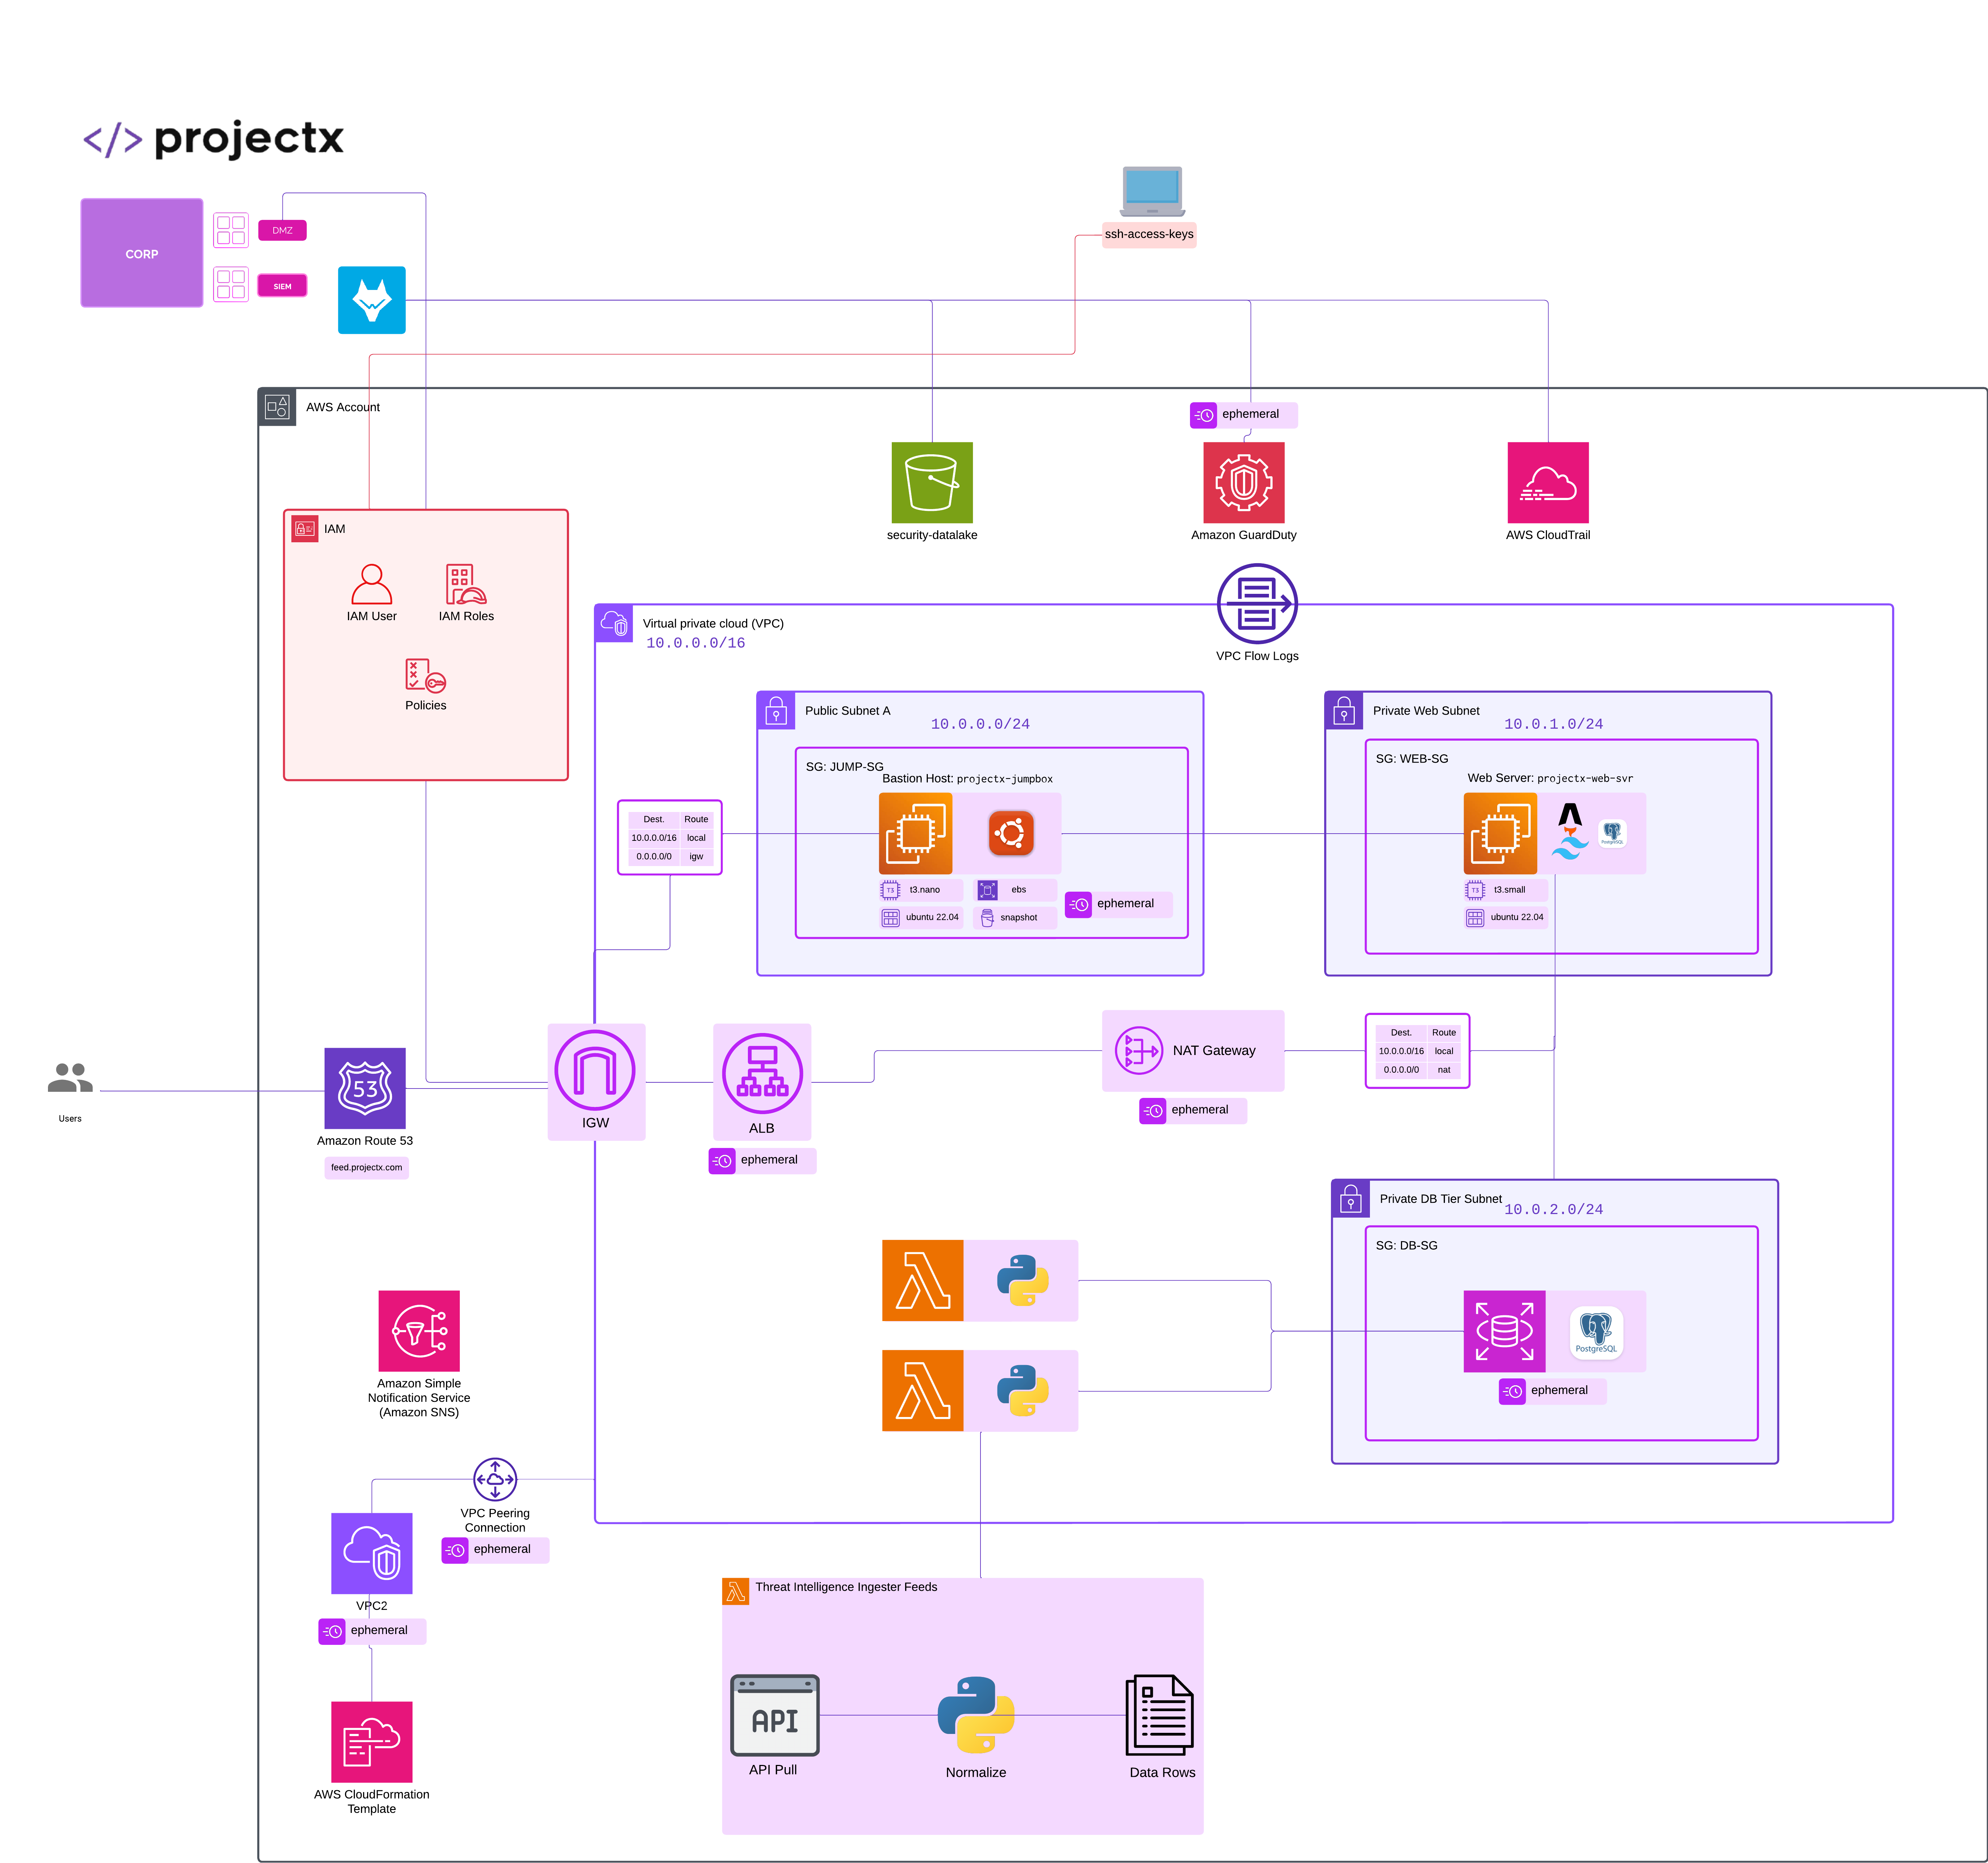
Network Topology
Overview
This guide demonstrates how to identify and exploit a Server-Side Request Forgery (SSRF) vulnerability in a web application running on an EC2 instance to access the EC2 Instance Metadata Service (IMDS).
SSRF attacks occur when a web application makes requests to URLs provided by users without proper validation. When this vulnerability exists on an EC2 instance, attackers can leverage it to access the instance metadata service, which may contain sensitive information such as IAM credentials, security tokens, and instance configuration details.
In this scenario, we'll deploy a deliberately vulnerable web application that accepts URLs and fetches their content without validation, then demonstrate how an attacker can exploit this to access the EC2 metadata service and extract sensitive credentials.
What is SSRF?
Server-Side Request Forgery (SSRF) is a web security vulnerability that allows an attacker to induce the server-side application to make HTTP requests to an arbitrary domain of the attacker's choosing.
EC2 Instance Metadata Service (IMDS)
The EC2 Instance Metadata Service provides information about the instance, including:
- Instance metadata: Instance ID, instance type, AMI ID, region, availability zone
- IAM credentials: Temporary security credentials associated with the instance's IAM role
- User data: Data passed to the instance during launch
- Network information: MAC addresses, security groups, subnet information
The metadata service is accessible at http://169.254.169.254/latest/meta-data/ and is only accessible from within the instance itself.
👉 IMDSv1 vs IMDSv2: IMDSv1 allows direct access, while IMDSv2 requires a session token. IMDSv2 is more secure but requires application changes. Many instances still use IMDSv1, making them vulnerable to SSRF attacks.
What Makes an Application Vulnerable to SSRF?
SSRF vulnerabilities typically occur when:
- No URL validation: Applications accept user-provided URLs without checking if they point to internal or restricted resources
- Overly permissive network access: Applications can make requests to any IP address or domain
- Missing allowlists: Applications don't restrict which domains or IPs can be accessed
- Metadata service accessible: The instance metadata service is accessible (IMDSv1 enabled or IMDSv2 with insufficient protections)
👉 In production environments, applications should validate all user-provided URLs, use allowlists for permitted domains, and restrict access to internal services like metadata endpoints.
Deploy SSRF Vulnerable EC2 Instance
Run CloudFormation Template
Navigate to the CloudFormation service in the AWS Console.
Select Create stack → Choose an existing template.
Choose Upload a template file and select the metadata-ssrf-ec2.yaml template from https://github.com/projectsecio/exercise-files/tree/main/cloud-attacks-101/attacks_cf_templates
Stack name: metadata-ssrf-ec2
Configure Parameters
- InstanceName:
delete-me-ssrf-ec2(or leave default) - KeyPairName: Select
My-Desktop-Key-Pair - VpcId: Select
projectx-prod-vpc - SubnetId: Select a public subnet (e.g.,
Public Subnet)
Leave everything else default.
Submit
Wait for the stack creation to complete. You can monitor the progress in the CloudFormation console.
👉 The CloudFormation template deploys an EC2 instance with: - A vulnerable Flask web application that accepts URLs and fetches their content - IMDSv1 enabled (allows direct metadata access) - Security group allowing HTTP (port 80) and SSH (port 22) access - An IAM role with S3 read permissions (to demonstrate credential access)
Get Instance Public IP
Once the stack is created, get the public IP address of the instance:
Option 1: AWS Console
1. Navigate to EC2 → Instances
2. Find the instance named delete-me-ssrf-ec2
3. Note the Public IPv4 address
Option 2: AWS CLI
# Get the instance ID from CloudFormation outputs
INSTANCE_ID=$(aws cloudformation describe-stacks \
  --stack-name metadata-ssrf-ec2 \
  --query 'Stacks[0].Outputs[?OutputKey==`InstanceId`].OutputValue' \
  --output text)

# Get the public IP address
aws ec2 describe-instances \
  --instance-ids $INSTANCE_ID \
  --query 'Reservations[0].Instances[0].PublicIpAddress' \
  --output text
👉 Important: Ensure the subnet you selected has "Auto-assign public IPv4 address" enabled. If it doesn't, the instance won't have a public IP. This will prevent the user data from downloading and installing the web application.
Verify Application Deployment
Wait 2-3 minutes for the user data script to complete and the web application to start.
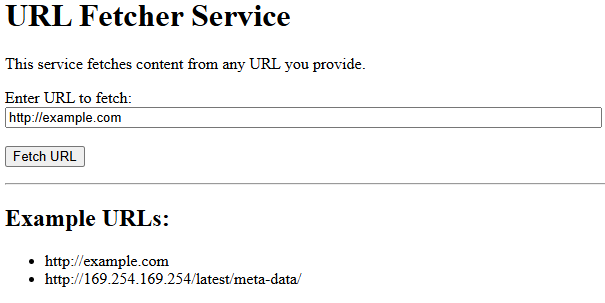
Verify the application is running by accessing it in a web browser:
Replace <InstancePublicIP> with the public IP address you retrieved above.
You should see a simple web form with a URL input field.
👉 If the page doesn't load, SSH into the instance and check the service status: sudo systemctl status ssrf-app.service
Discovery
Identify the Vulnerable Application
Time to put our attacker hat or lens on.
How do attackers discover SSRF vulnerabilities?
Through various different methods.
Reconnaissance: Identifying web applications that accept URLs as input, such as: - Image or file upload services - Webhook endpoints - URL shortening services - PDF generators - Link preview services - API endpoints that fetch external resources
Error messages: Applications may reveal internal IP addresses or network structure in error messages when invalid URLs are provided.
Parameter fuzzing: Testing various parameters that might accept URLs, such as url, link, target, endpoint, fetch, etc.
Code analysis: Reviewing application source code (if available) for functions that make HTTP requests based on user input.
For this scenario, assume you've discovered a web application at http://<InstancePublicIP> that appears to fetch content from URLs.
Test Basic SSRF Vulnerability
First, test if the application accepts URLs and makes requests:
-
Open the application in a web browser:
http://<InstancePublicIP> -
Try fetching a public URL to verify the functionality:
-
The application should display the content from example.com, confirming it makes HTTP requests.
Test Internal Network Access
Test if the application can access internal IP addresses:
Try accessing common internal IP ranges:
If the application successfully fetches content from these addresses, it confirms SSRF vulnerability and potential access to internal services.
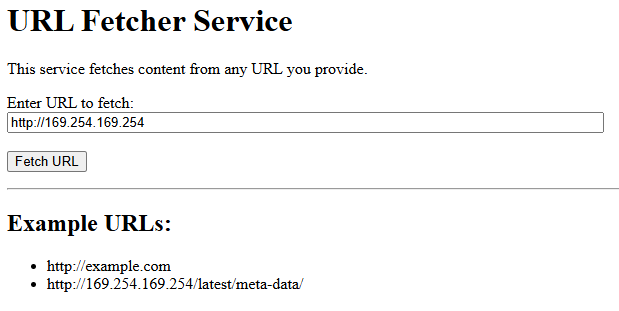
👉 The 169.254.169.254 IP address is the link-local address used by AWS EC2 Instance Metadata Service. If this is accessible, you can potentially extract instance metadata.
Enumeration Phase
Access EC2 Metadata Service
The EC2 Instance Metadata Service provides a hierarchical structure of information. Start by accessing the root endpoint:
Enter this URL in the vulnerable application's form and submit it.
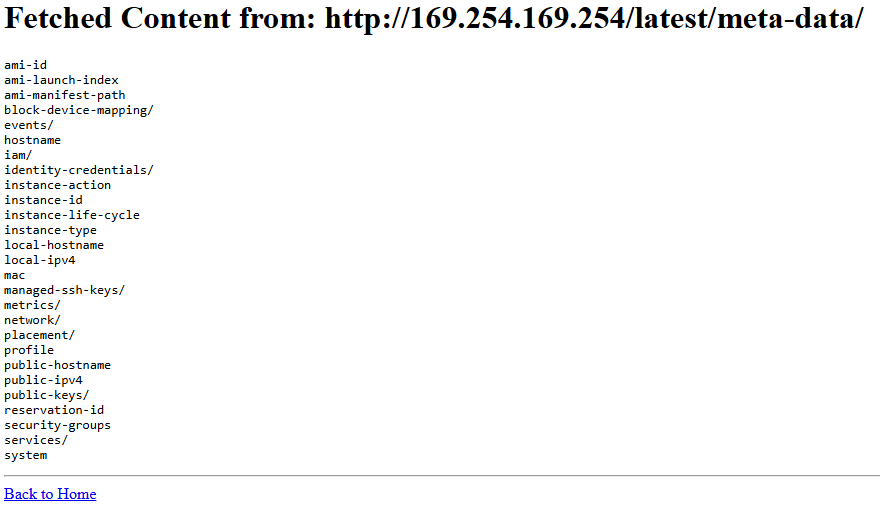
You should see a list of available metadata paths. Common paths include:
ami-id: The AMI ID used to launch the instanceinstance-id: The instance IDinstance-type: The instance typeiam/: IAM role and security credentialsnetwork/: Network interface informationplacement/: Availability zone and region informationsecurity-groups: Security group names
Enumerate Instance Information
Explore various metadata endpoints to gather information about the instance:
Basic Instance Information
http://169.254.169.254/latest/meta-data/instance-id
http://169.254.169.254/latest/meta-data/instance-type
http://169.254.169.254/latest/meta-data/ami-id
http://169.254.169.254/latest/meta-data/placement/availability-zone
http://169.254.169.254/latest/meta-data/placement/region
Network Information
http://169.254.169.254/latest/meta-data/network/interfaces/macs/
http://169.254.169.254/latest/meta-data/public-ipv4
http://169.254.169.254/latest/meta-data/local-ipv4
Security Groups
Identify IAM Role
Check if the instance has an IAM role attached:
This will return the name of the IAM role associated with the instance (if any).

Exploitation Phase
Extract IAM Credentials
If an IAM role is attached, access the security credentials:
Replace <role-name> with the role name discovered in the previous step.
This will return a JSON response containing:
- AccessKeyId: Temporary AWS access key
- SecretAccessKey: Temporary AWS secret key
- Token: Session token for the credentials
- Expiration: When the credentials expire

👉 These are temporary credentials that rotate automatically. They have the same permissions as the IAM role attached to the instance.
Use Extracted Credentials
Once you have the credentials, you can use them to access AWS services with the permissions granted to the IAM role.
You can add a new profile inside the ~/.aws/credentials file or set a new profile with --profile.
aws configure --profile ssrf
Configure AWS CLI with Stolen Credentials
Then enter the following from the exposed metadata service.
aws configure set aws_access_key_id <AccessKeyId>
aws configure set aws_secret_access_key <SecretAccessKey>
aws configure set aws_session_token <Token>
aws configure set region us-east-2
Test Credential Access
Verify the credentials work and check what permissions they have:
# Get caller identity
aws sts get-caller-identity

# List S3 buckets (if the role has S3 permissions)
aws s3 ls

# Try other AWS service operations based on the role's permissions

👉 In this scenario, the IAM role has AmazonS3ReadOnlyAccess, so you can list and read S3 buckets, we don't want individuals probing for this temporary instance and finding additional information.
Potential Impact
Based on the extracted credentials, an attacker could then use this access.
- Access AWS Services: Use the credentials to access any AWS service the IAM role has permissions for
- Lateral Movement: Use the credentials to access other resources in the AWS account
- Data Exfiltration: Read data from S3 buckets, databases, or other services
- Privilege Escalation: If the role has high privileges, escalate access within the account
- Persistence: Create new IAM users or access keys for long-term access
👉 In a real attack, the attacker would likely use these credentials to explore the AWS environment and identify high-value targets.
Extract User Data
The instance user data may contain sensitive information such as API keys, database credentials, or configuration secrets:
This returns the user data script that was executed when the instance was launched. Review it for any hardcoded credentials or sensitive information.
Cleanup
Warning
After completing this exercise, choose Delete on the CloudFormation stack to remove all resources.
Wait for the stack deletion to complete:
👉 Ensure you've removed any AWS credentials configured from the exercise before continuing with other work.