Prerequisites
projectx-prod-vpchas been created with subnets configured.projectx-prod-jumpboxEC2 instance exists and is accessible.- AWS CLI configured with appropriate credentials.
- Your AWS username for the bucket naming convention.
Network Topology
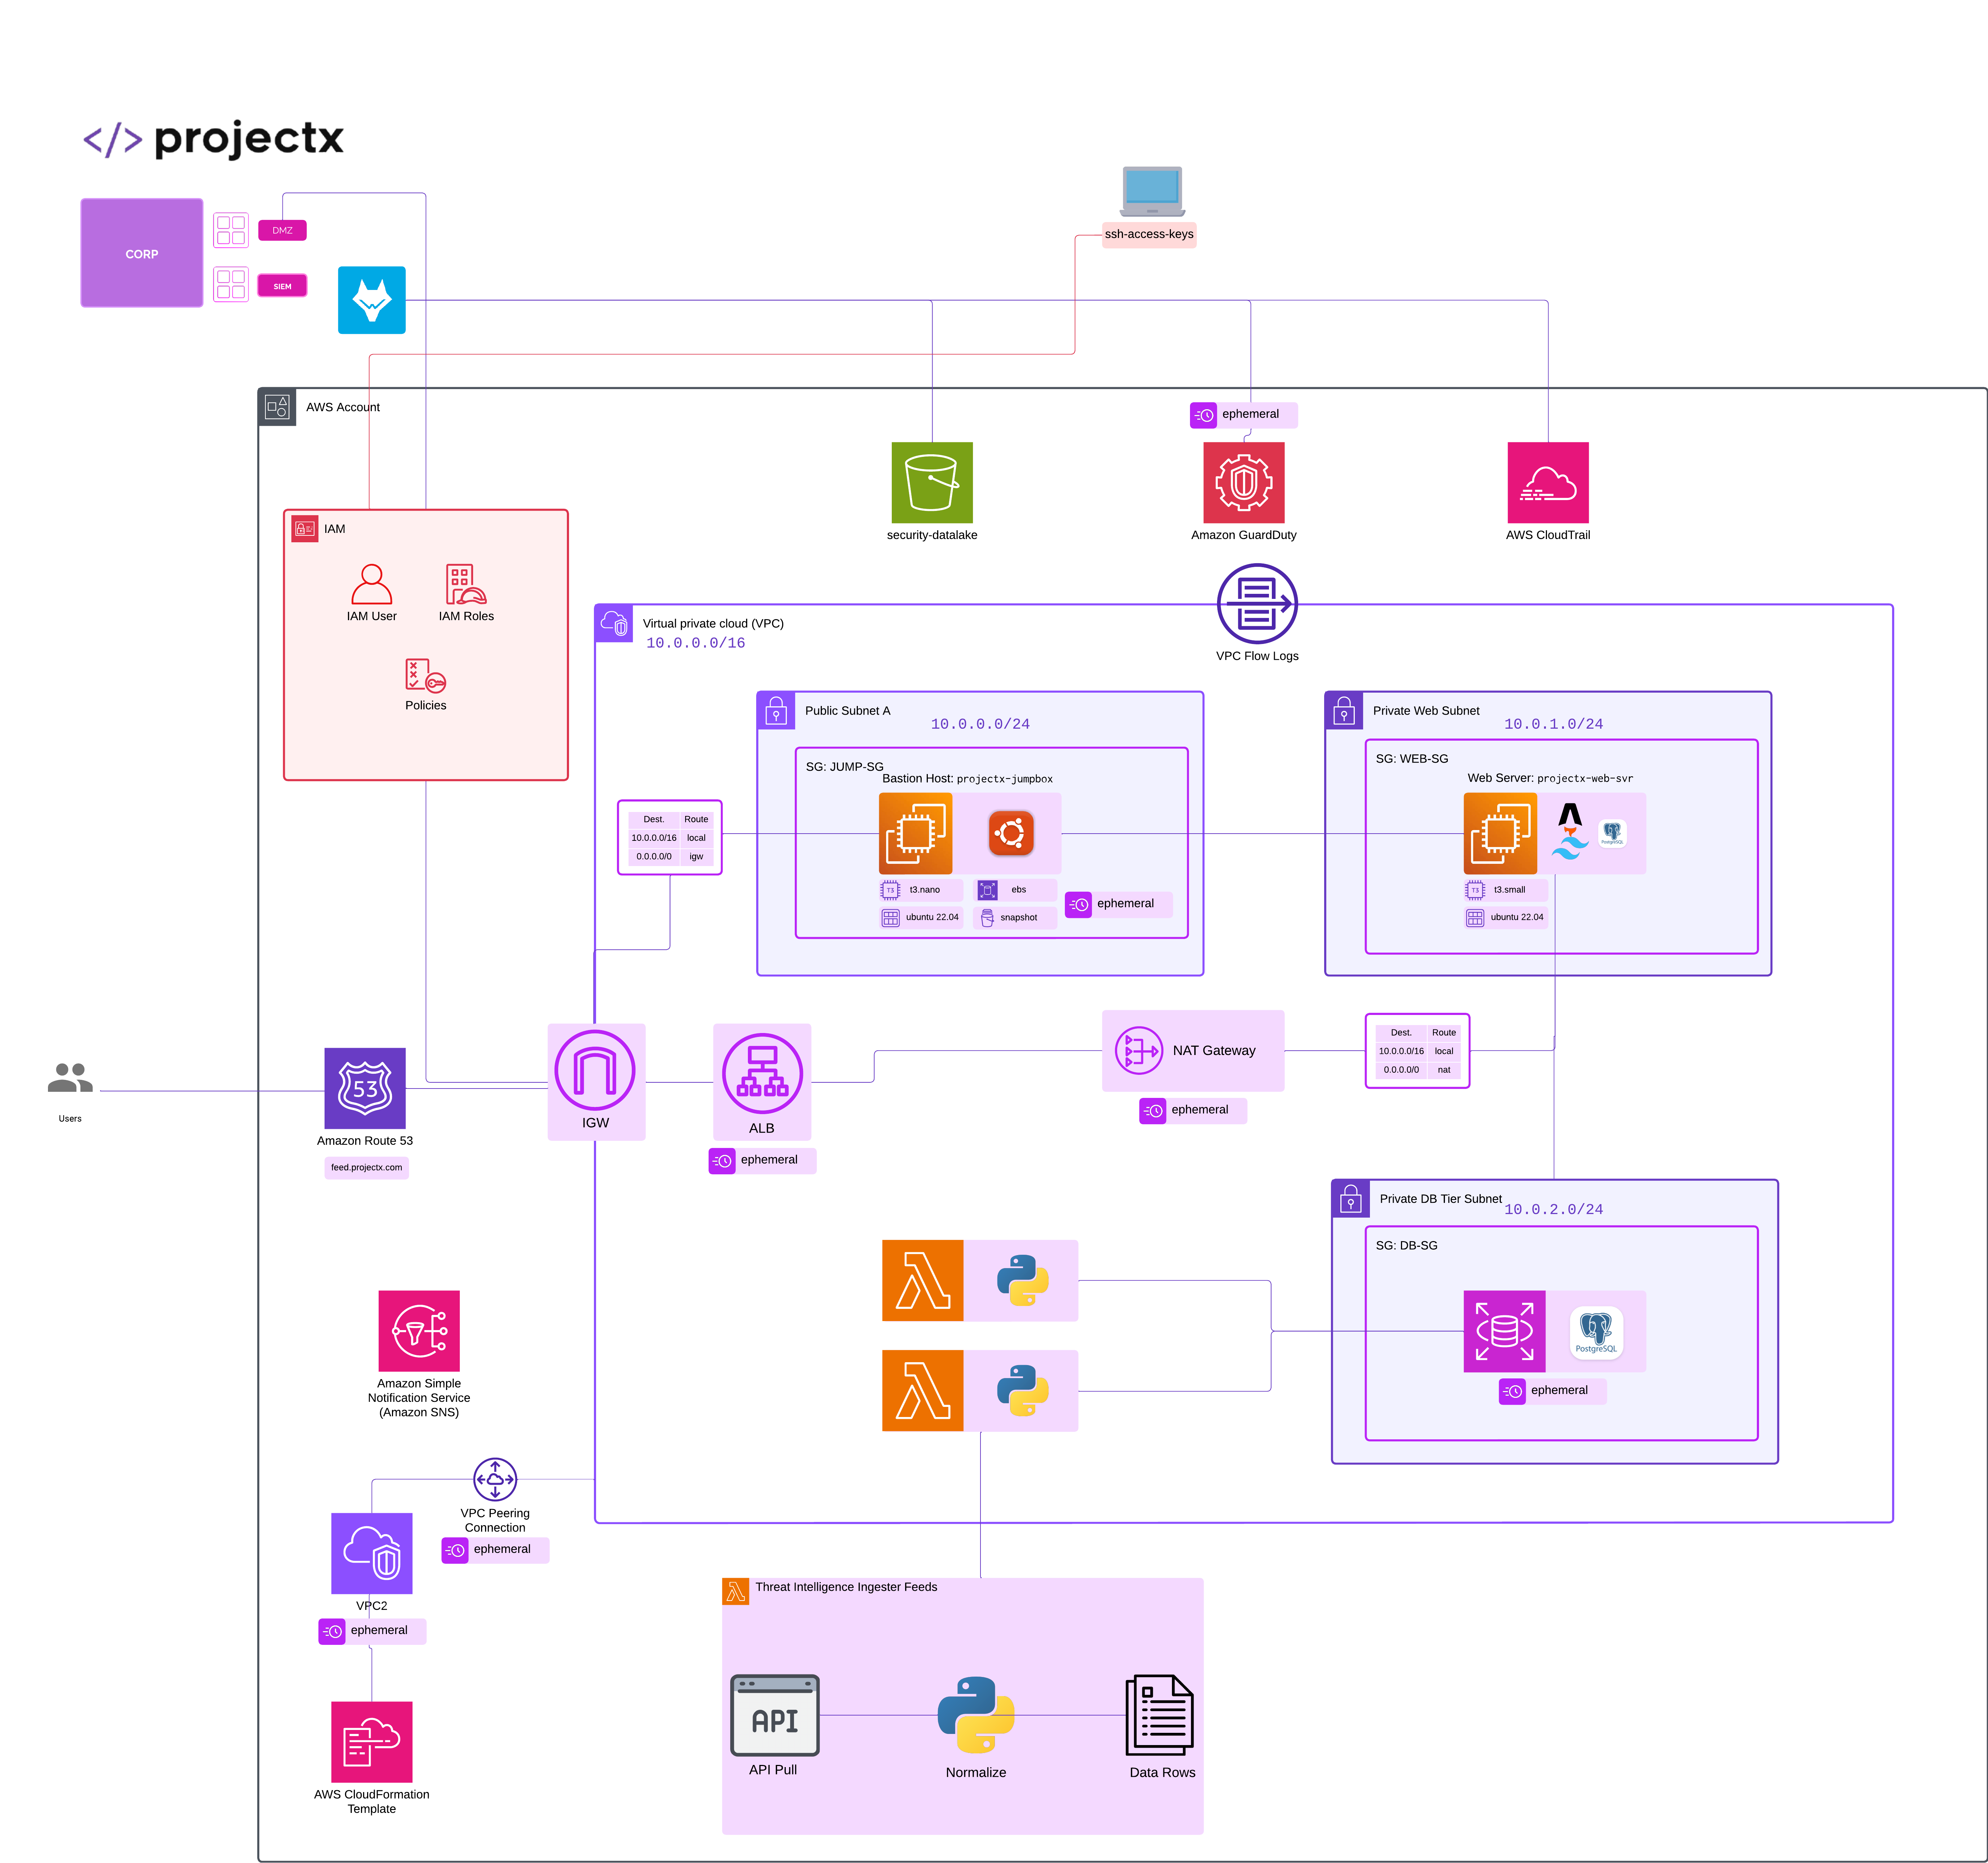
Overview
What is Amazon S3?
Amazon Simple Storage Service (S3) is an object storage service that offers scalability, data availability, security, and performance.
S3 is designed to store and retrieve any amount of data from anywhere on the web.
About Security Datalakes
A security datalake is a centralized repository for security logs and events.
An organization may deploy a security datalake for one or more of the following reasons:
-
Centralize Security Data: Aggregate security logs from multiple AWS services in one location
-
Enable Analytics: Use services like Athena, Glue, or Wazuh to analyze security events
-
Long-term Retention: Store logs for compliance and forensic analysis
-
Cost-effective Storage: Use S3 lifecycle policies to move data to cheaper storage tiers over time
This S3 bucket will serve as the destination for GuardDuty findings and CloudTrail logs, which will then be ingested by Wazuh for security monitoring and analysis where we will create Detections in the Defenses section.
Create S3 Bucket
Navigate to S3
Open the S3 service in the AWS Console.
In the left navigation pane, select Buckets.
Click Create bucket.
Configure General Settings
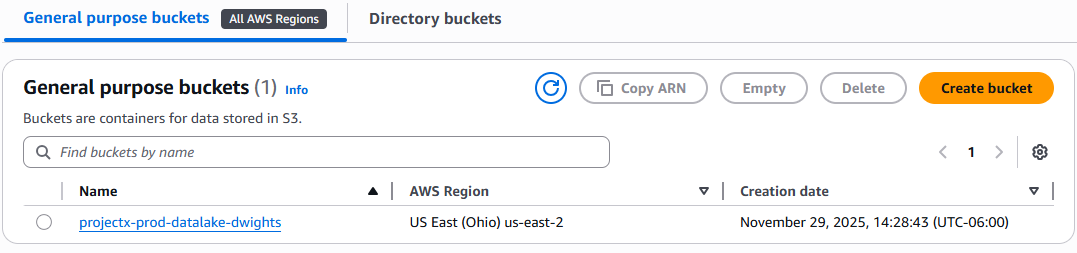
Bucket Name
-
Bucket name:
projectx-prod-datalake-[username] -
👉 Replace
[username]with your actual AWS username (e.g.,projectx-prod-datalake-johnsmith) -
👉 Important: S3 bucket names must be globally unique across all AWS accounts. If your chosen name is taken, add a suffix or use a different identifier.
AWS Region
- AWS Region: Select the same region as your VPC (e.g.,
us-east-2) - 👉 Keep resources in the same region to minimize data transfer costs and latency.

Configure Object Ownership
-
Object Ownership: Select ACLs disabled (recommended)
-
👉 Using bucket owner enforced simplifies access management and is the recommended approach.
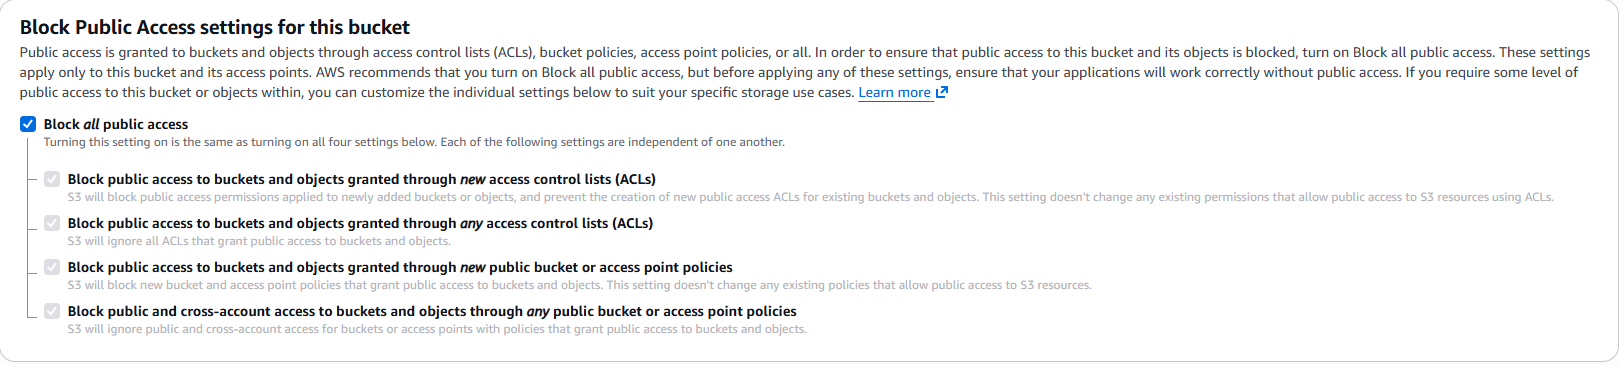
Configure Block Public Access Settings
For a security datalake, we want to ensure the bucket is private:
- Block all public access: Keep all settings enabled ✓
- Block public access to buckets and objects granted through new access control lists (ACLs)
- Block public access to buckets and objects granted through any access control lists (ACLs)
- Block public access to buckets and objects granted through new public bucket or access point policies
- Block public and cross-account access to buckets and objects through any public bucket or access point policies
👉 Security Best Practice: Security logs should never be publicly accessible. Keep all public access blocked.
Configure Bucket Versioning
- Bucket Versioning: Select Disable
- 👉 Versioning helps protect against accidental deletion or overwrites. Important for security logs that may be needed for compliance or forensics. We are keeping this disabled for cost savings.
Configure Default Encryption
- Default encryption: Select Enable
- Encryption type: Select AWS managed keys (SSE-S3)
- 👉 For production environments, consider using AWS KMS (SSE-KMS) for more control over encryption keys. For this lab, SSE-S3 is sufficient and cost-effective.

Configure Advanced Settings
Object Lock
- Object Lock: Leave disabled for this lab
- 👉 Object Lock provides WORM (Write Once Read Many) protection. Useful for compliance but adds complexity. We'll skip this for now.

Create Bucket
Review your configuration:
- Bucket name:
projectx-prod-datalake-[username] - Region: Same as your VPC
- Object Ownership: ACLs disabled
- Block Public Access: All enabled
- Versioning: Enabled
- Encryption: SSE-S3 enabled
- Tags: Name, Environment, Purpose
Click Create bucket.
Wait for the bucket to be created. This typically takes a few seconds.
Configure Bucket Structure
Create Folder Structure
For better organization, create folders to separate different log types:
Navigate to your bucket: projectx-prod-datalake-[username]
Click Create folder.
Create the following folders:
- Folder name:
guardduty/ -
👉 This will store GuardDuty findings
-
Folder name:
cloudtrail/ - 👉 This will store CloudTrail logs
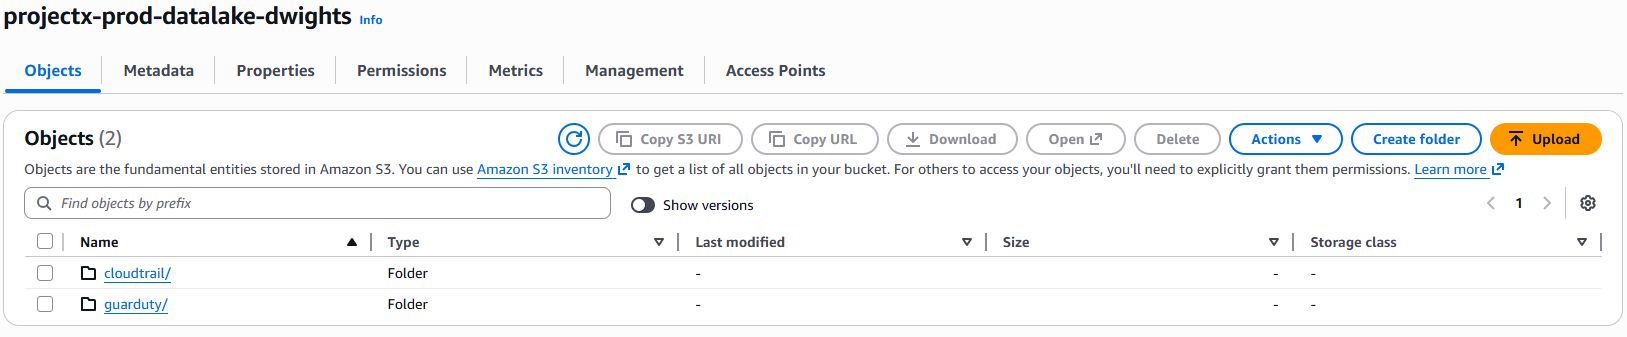
👉 Note: S3 doesn't actually have folders - they're just prefixes in object keys. However, using them helps organize and manage your data, especially when configuring lifecycle policies or access controls.
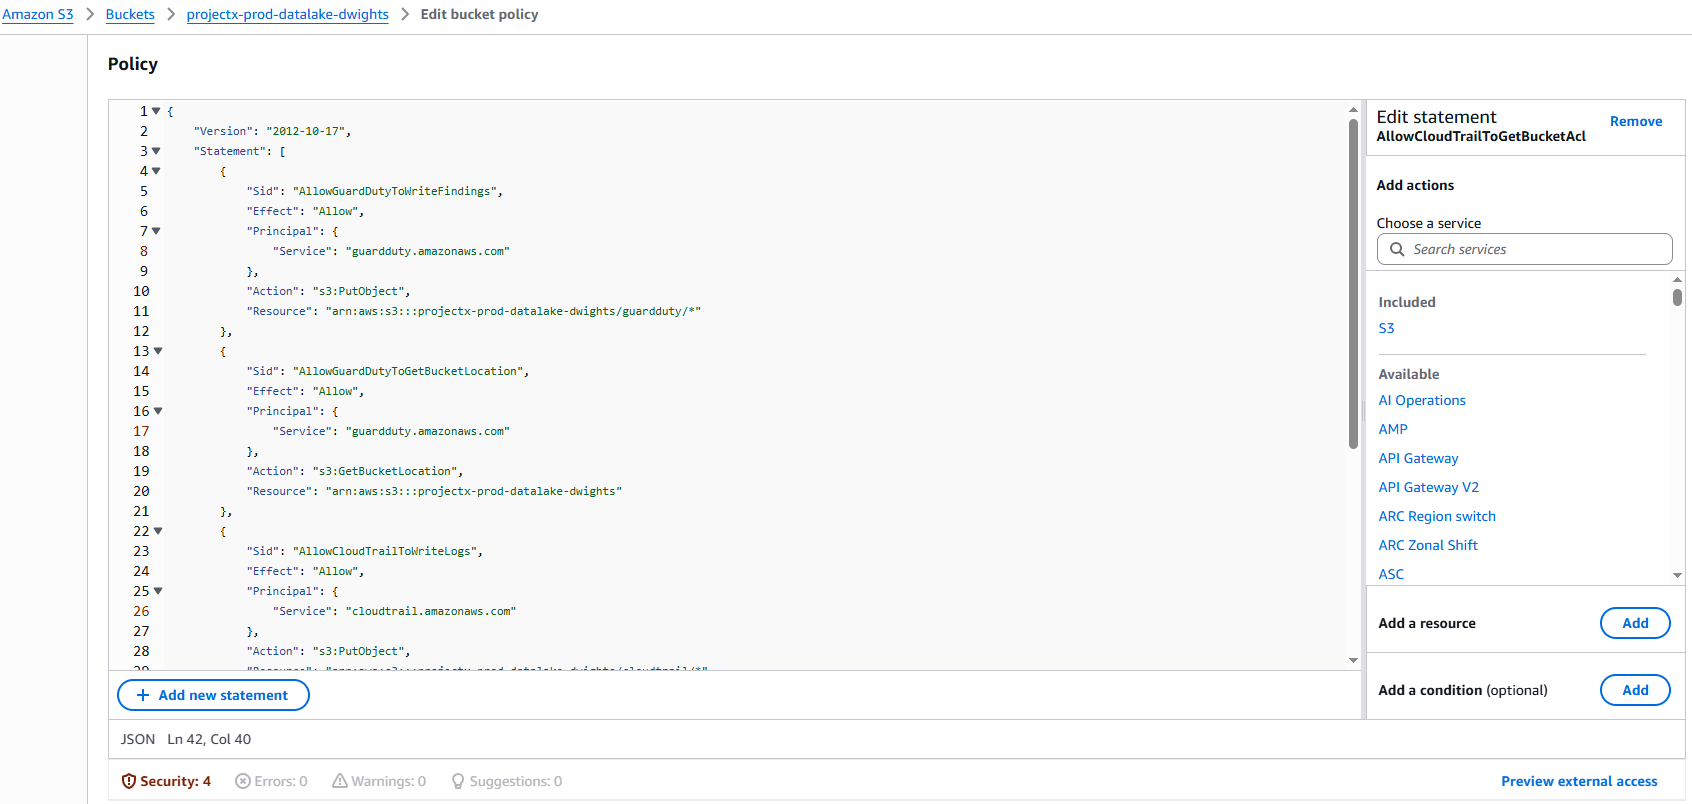
Configure Bucket Policy for GuardDuty & CloudTrail
GuardDuty and CloudTrail need permission to write findings to your S3 bucket. We'll create a bucket policy that allows GuardDuty and CloudTrail to put objects in the guardduty/ or cloudtrail/ prefix.
Navigate to Bucket Permissions
Select your bucket: projectx-prod-datalake-[username]
Go to the Permissions tab.
Scroll down to Bucket policy.
Click Edit.
{
    "Version": "2012-10-17",
    "Statement": [
        {
            "Sid": "AllowGuardDutyToWriteFindings",
            "Effect": "Allow",
            "Principal": {
                "Service": "guardduty.amazonaws.com"
            },
            "Action": "s3:PutObject",
            "Resource": "arn:aws:s3:::[bucket-name]/guardduty/*"
        },
        {
            "Sid": "AllowGuardDutyToGetBucketLocation",
            "Effect": "Allow",
            "Principal": {
                "Service": "guardduty.amazonaws.com"
            },
            "Action": "s3:GetBucketLocation",
            "Resource": "arn:aws:s3:::[bucket-name]"
        },
        {
            "Sid": "AllowCloudTrailToWriteLogs",
            "Effect": "Allow",
            "Principal": {
                "Service": "cloudtrail.amazonaws.com"
            },
            "Action": "s3:PutObject",
            "Resource": "arn:aws:s3:::[bucket-name]/cloudtrail/*",
            "Condition": {
                "StringEquals": {
                    "s3:x-amz-acl": "bucket-owner-full-control"
                }
            }
        },
        {
            "Sid": "AllowCloudTrailToGetBucketAcl",
            "Effect": "Allow",
            "Principal": {
                "Service": "cloudtrail.amazonaws.com"
            },
            "Action": "s3:GetBucketAcl",
            "Resource": "arn:aws:s3:::[bucket-name]"
        }
    ]
}
👉 Note: The CloudTrail policy includes a condition requiring bucket-owner-full-control ACL, which ensures you maintain full control over the objects CloudTrail creates.
Click Save changes.
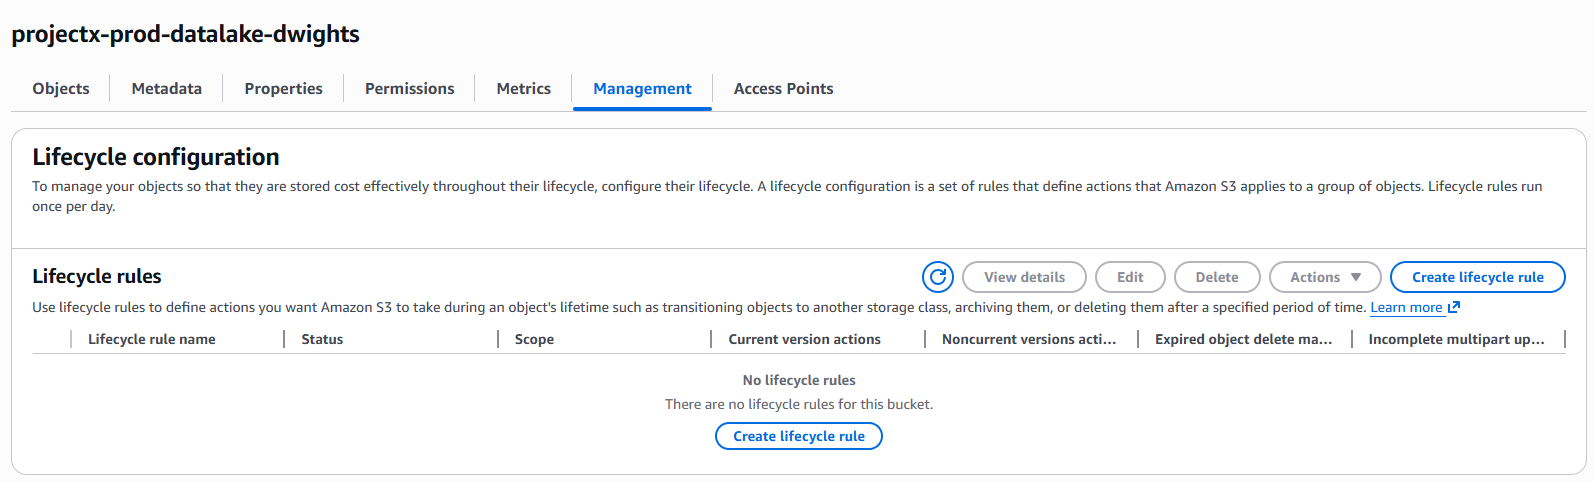
Configure Lifecycle Policies (Optional)
To manage costs over time, you can configure lifecycle policies to automatically transition objects to cheaper storage classes or delete old objects.
Navigate to Lifecycle Rules
Select your bucket: projectx-prod-datalake-[username]
Go to the Management tab.
Scroll down to Lifecycle rules.
Click Create lifecycle rule.
Create Lifecycle Rule
Basic Configuration
- Lifecycle rule name:
transition-to-ia-after-30-days - Rule scope: Apply to all objects in the bucket
Lifecycle Rule Actions
Select Move current versions of objects between storage classes.
Configure transitions:
- Transition current versions of objects between storage classes:
- Days after object creation:
30 - Transition to:
Standard-IA (Infrequent Access)- 👉 Standard-IA is cheaper for data accessed less frequently but still needs rapid access when needed.
Click Create rule.

👉 Optional: You can create additional rules to transition to Glacier or delete objects after a certain retention period based on your compliance requirements.
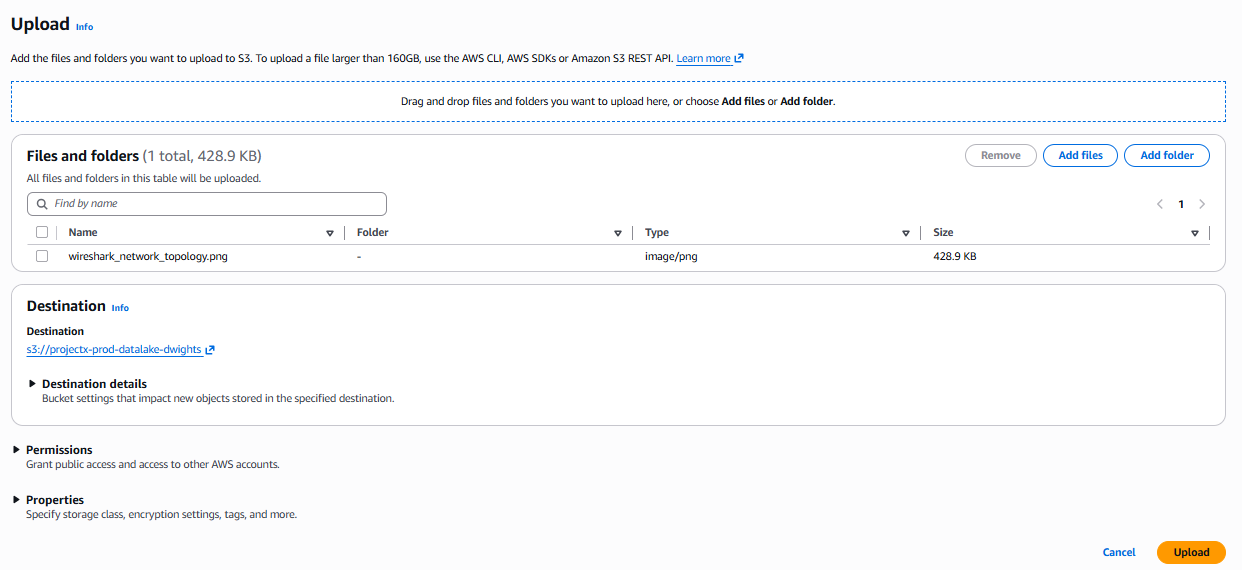
Verify Bucket Configuration
Test Bucket Access (Optional)
You can verify the bucket is accessible by attempting to upload a test file:
Create S3 IAM Service Account User
{
    "Version": "2012-10-17",
    "Statement": [
        {
            "Sid": "WazuhS3Access",
            "Effect": "Allow",
            "Action": [
                "s3:GetObject",
                "s3:ListBucket",
                "s3:DeleteObject"
            ],
            "Resource": [
                "arn:aws:s3:::[AWS-BUCKET-NAME]/*",
                "arn:aws:s3:::[AWS-BUCKET-NAME]"
            ]
        }
    ]
}
Next Steps
Your S3 bucket is now configured and ready to receive logs from GuardDuty and CloudTrail.
Configure GuardDuty
In the GuardDuty console, you'll need to:
- Enable GuardDuty (if not already enabled)
- Configure GuardDuty to export findings to your S3 bucket:
projectx-prod-datalake-[username]/guardduty/
Configure CloudTrail
In the CloudTrail console, you'll need to:
- Create a new trail or edit an existing trail
- Configure the trail to deliver logs to your S3 bucket:
projectx-prod-datalake-[username]/cloudtrail/
Integrate with Wazuh
Once GuardDuty and CloudTrail are writing logs to your S3 bucket, you can configure Wazuh to:
- Monitor the S3 bucket for new log files
- Ingest and parse GuardDuty findings and CloudTrail logs
- Generate alerts and dashboards based on security events
👉 Note: The integration with Wazuh will be covered in a separate guide.
Cost Considerations
Estimated Costs for This Lab
Generated with ChatGPT.
S3 pricing is based on:
- Storage: ~$0.023 per GB/month for Standard storage
- Requests:
- PUT requests: ~$0.005 per 1,000 requests
- GET requests: ~$0.0004 per 1,000 requests
- Data transfer: Free within the same region
For a lab environment with minimal log volume:
- Storage: Minimal cost (pennies per month for small amounts of data)
- Requests: Minimal cost for GuardDuty and CloudTrail writes
- Lifecycle policies: Can reduce costs by 50%+ by moving to Standard-IA after 30 days
👉 Total estimated cost: ~$0.10-1.00/month for typical lab usage
👉 Important: Remember to delete the S3 bucket and its contents when done with the lab to avoid ongoing charges. Note that versioning may create additional storage, so ensure you delete all object versions.
Delete Objects
Before deleting the bucket, you must delete all objects:
- Navigate to your bucket:
projectx-prod-datalake-[username] - Select all objects (including in folders)
- Click Delete
- Confirm deletion
- If versioning is enabled, you may need to delete all versions
👉 Warning: This permanently deletes the bucket and all data. Make sure you've backed up any important logs before deletion.
Verify Cleanup
Success!
Your S3 security datalake is now configured and ready to receive logs from GuardDuty and CloudTrail. This centralized storage will enable comprehensive security monitoring and analysis through Wazuh.