Prerequisites
projectx-prod-vpchas been created with subnets configured.projectx-prod-jumpboxEC2 instance exists and is accessible.projectx-prod-websvrEC2 instance exists and is fully configured with all applications and tools.My-Desktop-Key-Pairkey pair exists.- AWS CLI configured with appropriate credentials.
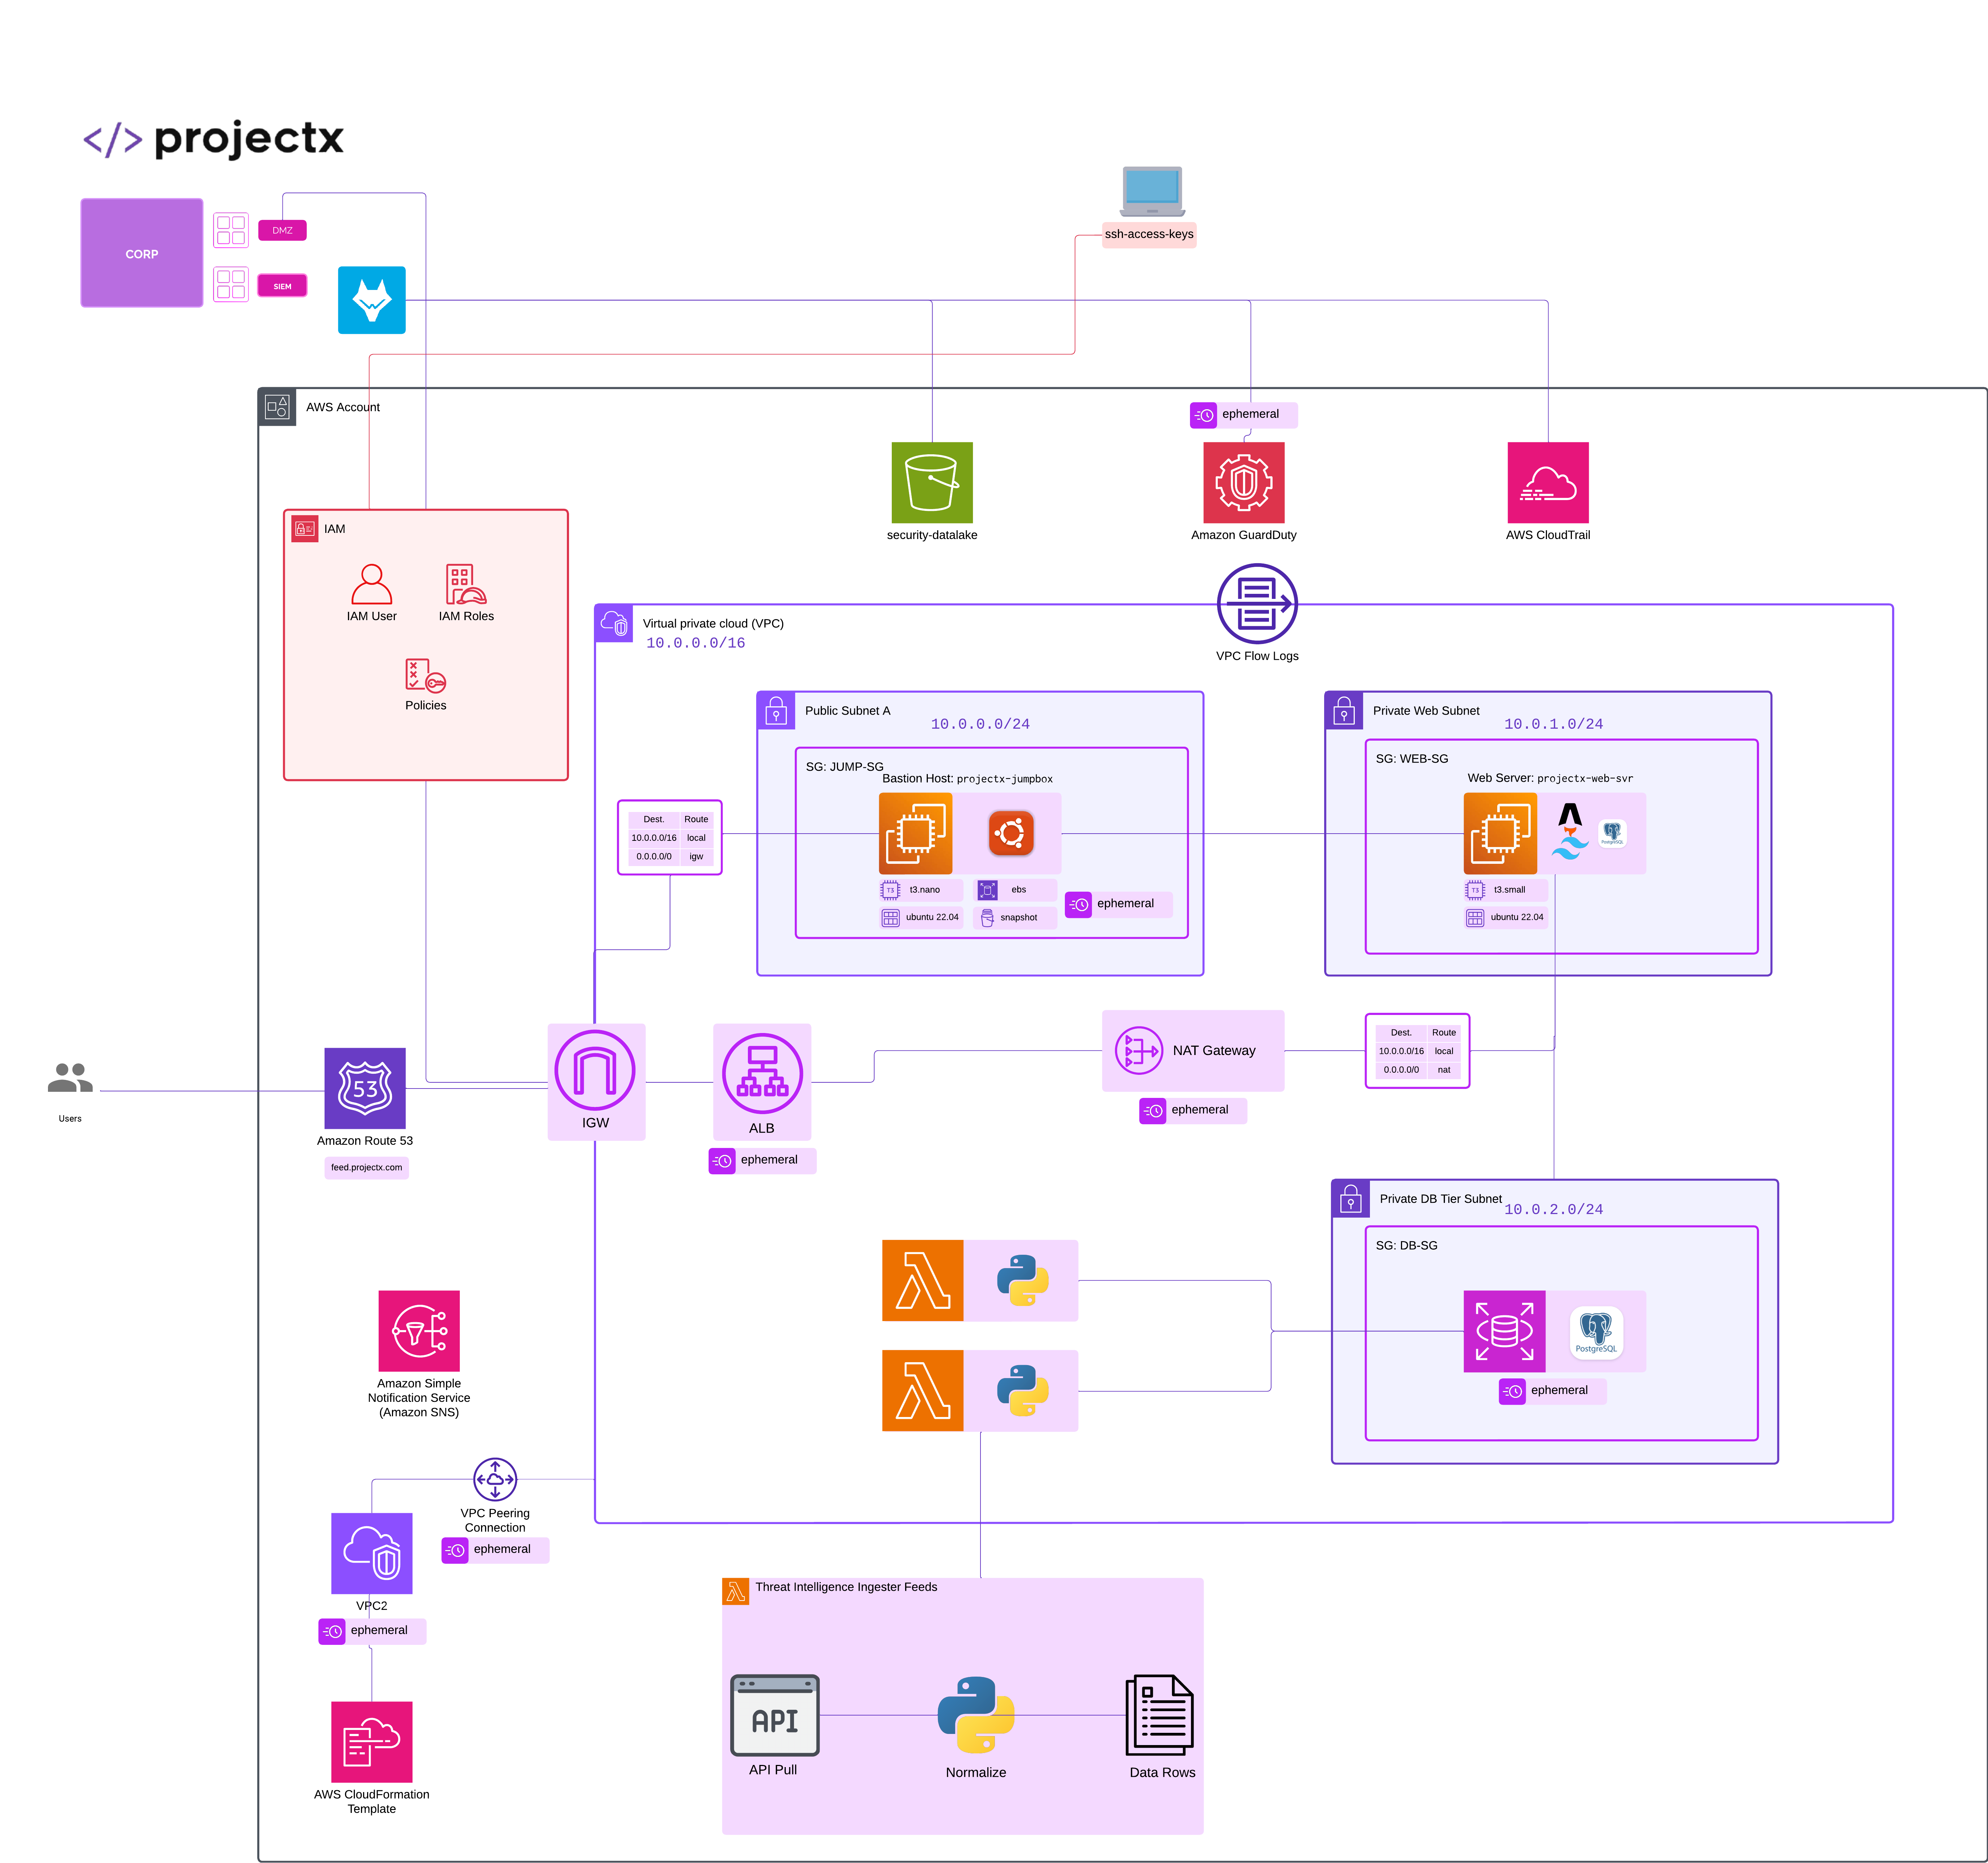
Network Topology
Overview
What is an Amazon Machine Image (AMI)?
An Amazon Machine Image (AMI) is a template that contains the software configuration (operating system, application server, and applications) required to launch an EC2 instance. AMIs are region-specific and can be used to launch multiple instances with the same configuration.
Why Create an AMI?
Creating an AMI from your configured web server allows you to:
-
Preserve Configuration: Capture the current state of your web server with all installed software, configurations, and data
-
Rapid Deployment: Launch new instances with the same configuration quickly
-
Backup: Create a point-in-time backup of your instance
-
Migration: Move your instance to a different subnet, availability zone, or region
-
Disaster Recovery: Quickly restore your server if something goes wrong
In this guide, we'll create an AMI from the existing projectx-prod-websvr instance (currently in the private subnet) and then launch a new instance from that AMI into the public subnet of projectx-prod-vpc. This allows us to make the web server publicly accessible without losing our configuration.
👉 Cost Considerations: AMIs rely on EBS snapshots to maintain the saved configuration state. EBS snapshots are charged hourly for storage costs. With this in mind, once we deploy our new projectx-prod-websvr in the Public Subnet, we will delete the AMI to save money on costs.
Prepare the Web Server
Before creating the AMI, ensure your web server is in a clean, ready state.
Connect to Web Server
Connect to projectx-prod-websvr through the jumpbox:
# From your local machine, connect to jumpbox
ssh -A -i ~/.ssh/My-Desktop-Key-Pair.pem ubuntu@<jumpbox-public-ip>

# From jumpbox, connect to web server
ssh ubuntu@<websvr-private-ip>
Verify Current Configuration
Check that all your applications and configurations are in place:
# Verify hostname
hostnamectl

# Verify Node.js and npm
node --version
npm --version

# Verify Astro installation
cd ~/threat-intel-app
npm list astro

# Check system status
sudo systemctl status
👉 Important: Make sure all your work is saved and the server is in the state you want to preserve in the AMI.
Create AMI from Web Server
Navigate to EC2 Instances
Open the EC2 service in the AWS Console.
In the left navigation pane, select Instances.
Select the projectx-prod-websvr instance.

Create Image
With the instance selected, click Actions ➔ Image and templates ➔ Create image.

Configure AMI Settings
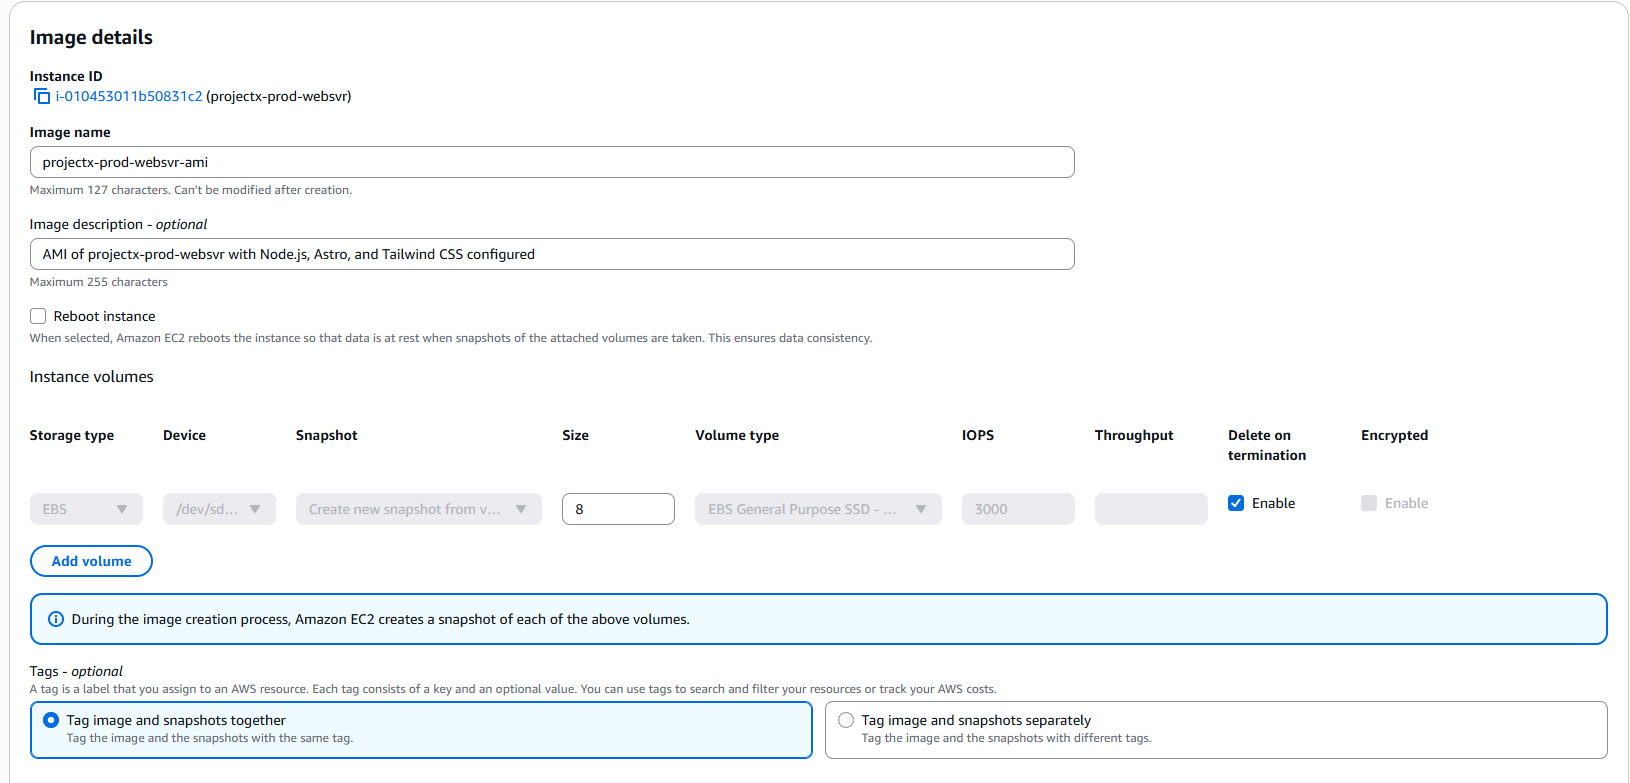
Image Details
- Image name:
projectx-prod-websvr-ami - Image description:
AMI of projectx-prod-websvr with Node.js, Astro, and Tailwind CSS configured
👉 Use a descriptive name and description to easily identify the AMI later.
Instance Configuration
- No reboot: Leave unchecked
- 👉 Important: Unchecking "No reboot" ensures AWS creates a consistent snapshot. AWS will stop the instance briefly to create the AMI, which ensures data integrity.
Create Image
Click Create image.
AWS will begin creating the AMI. This process typically takes several minutes.
👉 Note: The instance will be briefly stopped during AMI creation if "No reboot" was unchecked. The instance will automatically restart after the AMI is created.

Monitor AMI Creation
Check AMI Status
Navigate to EC2 ➔ AMIs (under Images in the left navigation pane).
You should see your AMI: projectx-prod-websvr-ami
The status will progress through: - pending: AMI is being created - available: AMI is ready to use
👉 AMI creation can take 5-15 minutes depending on the size of your instance's root volume.

Verify AMI Details
Once the AMI status is available, select it to view details:
- AMI ID: Note this ID (e.g.,
ami-0123456789abcdef0) - Status:
available - Platform:
Linux/Unix - Root device type:
ebs - Virtualization type:
hvm
👉 Save the AMI ID - you'll need it when launching the new instance.

Launch Instance from AMI in Public Subnet
Now that we have the AMI, we'll launch a new instance from it in the public subnet.
Navigate to Launch Instance
In the EC2 console, select Instances in the left navigation pane.
Click Launch instance.
Configure Instance Details
Name and Tags
- Name:
projectx-prod-websvr-public
Application and OS Images
- AMI: Click Browse more AMIs
- In the search bar, type
projectx-prod-websvr-amior search by the AMI ID you noted earlier - Select your custom AMI:
projectx-prod-websvr-ami

Instance Type
- Instance type: Select
t3.small(same as the original instance)
👉 Use the same instance type to ensure consistent performance.
Key Pair
- Key pair: Select
My-Desktop-Key-Pair
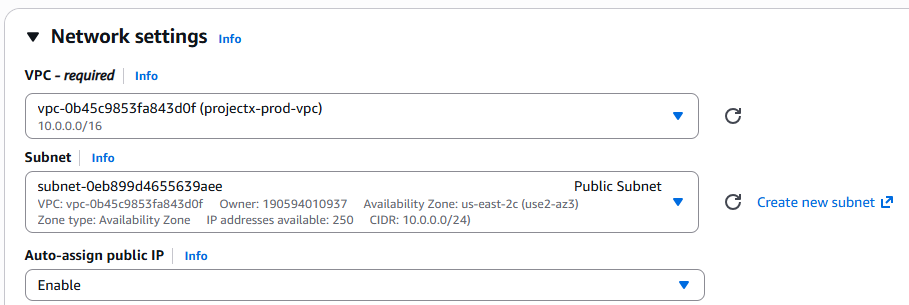
Network Settings
Select Edit to configure network settings.
Configure:
- VPC: Select
projectx-prod-vpc - Subnet: Select
Public Subnet - 👉 Important: This is the key change - we're deploying to the public subnet instead of the private subnet.
- Auto-assign Public IP: Enable
- 👉 Since we're in a public subnet, we want a public IP address.
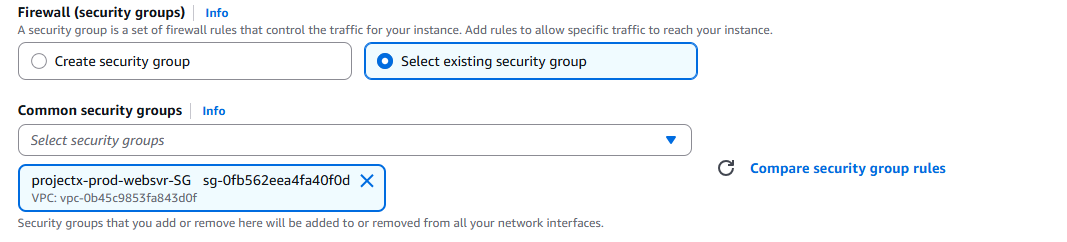
Security Group
Select Select existing security group.
- Security group: Select
projectx-prod-websvr-SG
👉 We'll update the security group rules after launch to allow public access.
Configure Storage
Leave storage settings as default (should match the original instance).
Advanced Details
Leave all other settings as default.
Launch Instance
Review your configuration:
- Name:
projectx-prod-websvr - AMI:
projectx-prod-websvr-ami(your custom AMI) - Instance type:
t3.small - Key pair:
My-Desktop-Key-Pair - VPC:
projectx-prod-vpc - Subnet:
Public Subnet - Auto-assign Public IP: Enabled
- Security group:
projectx-prod-websvr-SG
Click Launch instance.
Wait for the instance to reach Running status.
👉 Note the Public IPv4 address of the new instance. You'll need this to connect directly.

Update Security Group for Public Access
Since the web server is now in a public subnet, we need to update the security group to allow public access while maintaining security.
Navigate to Security Groups
Open the VPC service in the AWS Console.
In the left navigation pane, select Security Groups.
Select projectx-prod-websvr-SG.
Update Inbound Rules
Click Edit inbound rules.
Add HTTP Access
Add a rule to allow HTTP traffic from the internet:
- Type:
HTTP - Protocol:
TCP - Port range:
80 - Source type:
Anywhere-IPv4(or0.0.0.0/0) - Description:
Allow HTTP from internet
👉 For production, consider restricting this to specific IP addresses or use a load balancer.
Add HTTPS Access (Optional)
If you plan to use HTTPS:
- Type:
HTTPS - Protocol:
TCP - Port range:
443 - Source type:
Anywhere-IPv4(or0.0.0.0/0) - Description:
Allow HTTPS from internet
Keep SSH Access
Ensure SSH access is still configured:
- Type:
SSH - Protocol:
TCP - Port range:
22 - Source type:
Custom - Source: Select
projectx-prod-jumpbox-SG(or restrict to your IP for better security) - Description:
SSH access from jumpbox
👉 Security Best Practice: For production, restrict SSH access to specific IP addresses rather than allowing from the jumpbox security group when the instance is publicly accessible.

Click Save rules.
Verify New Instance
Connect to New Instance
You can now connect directly to the instance using its public IP:
On Windows PowerShell:
👉 Replace <new-instance-public-ip> with the public IP address of your new instance.
Verify Configuration
Once connected, verify that all your configurations are preserved:
# Verify hostname
hostnamectl

# Verify Node.js and npm
node --version
npm --version

# Verify Astro installation
cd ~/threat-intel-app
npm list astro

# Check that files are present
ls -la ~/threat-intel-app

Test Web Server (If Configured)
If your web server is configured to run, you can test it:
👉 The development server should start. You can access it via the public IP address if the security group allows it.
Cleanup Original Instance (Optional)
If you're satisfied with the new instance in the public subnet, you can terminate the original instance in the private subnet.
Terminate Original Instance
Navigate to EC2 ➔ Instances.
Select the original projectx-prod-websvr instance (the one in the private subnet).
Click Instance state ➔ Terminate instance.
Confirm termination.
👉 Warning: This permanently deletes the instance. Make sure the new instance is working correctly before terminating the original.
Cost Considerations
Cleanup (Ephemeral Lab)
Since this is an ephemeral lab, clean up all resources to avoid charges.
Delete AMI
- Navigate to EC2 ➔ AMIs
- Select
projectx-prod-websvr-ami - Click Actions ➔ Deregister AMI
- Confirm deregistration
👉 Note: Deregistering the AMI does not delete the underlying snapshot. You must delete the snapshot separately.
Delete AMI Snapshot
- Navigate to EC2 ➔ Snapshots (under Elastic Block Store)
- Find the snapshot associated with your AMI (check the description or creation date)
- Select the snapshot
- Click Actions ➔ Delete snapshot
- Confirm deletion
Terminate Instance
- Navigate to EC2 ➔ Instances
- Select
projectx-prod-websvr - Click Instance state ➔ Terminate instance
- Confirm termination
Success!
You've successfully created an AMI from your web server and deployed it to the public subnet. This process preserves all your configurations while allowing you to change the network placement of your instance.
Note
Remember: In production environments, regularly create AMIs as backups before making significant changes. Keep multiple AMI versions for disaster recovery. Always test instances launched from AMIs before terminating original instances. Consider using automated AMI creation schedules for critical instances.