Prerequisites
projectx-prod-vpchas been created with subnets configured.projectx-prod-jumpboxEC2 instance exists and is accessible.- AWS CLI configured with appropriate credentials.
- Your AWS username for the bucket naming convention.
project-x-sec-boxconfigured with Wazuh.- S3 security datalake bucket has been created and is receiving logs from CloudTrail and VPC Flow Logs.
Note
This guide is written for Wazuh version 4.9.2. UI elements and navigation paths may differ in other versions.
Network Topology
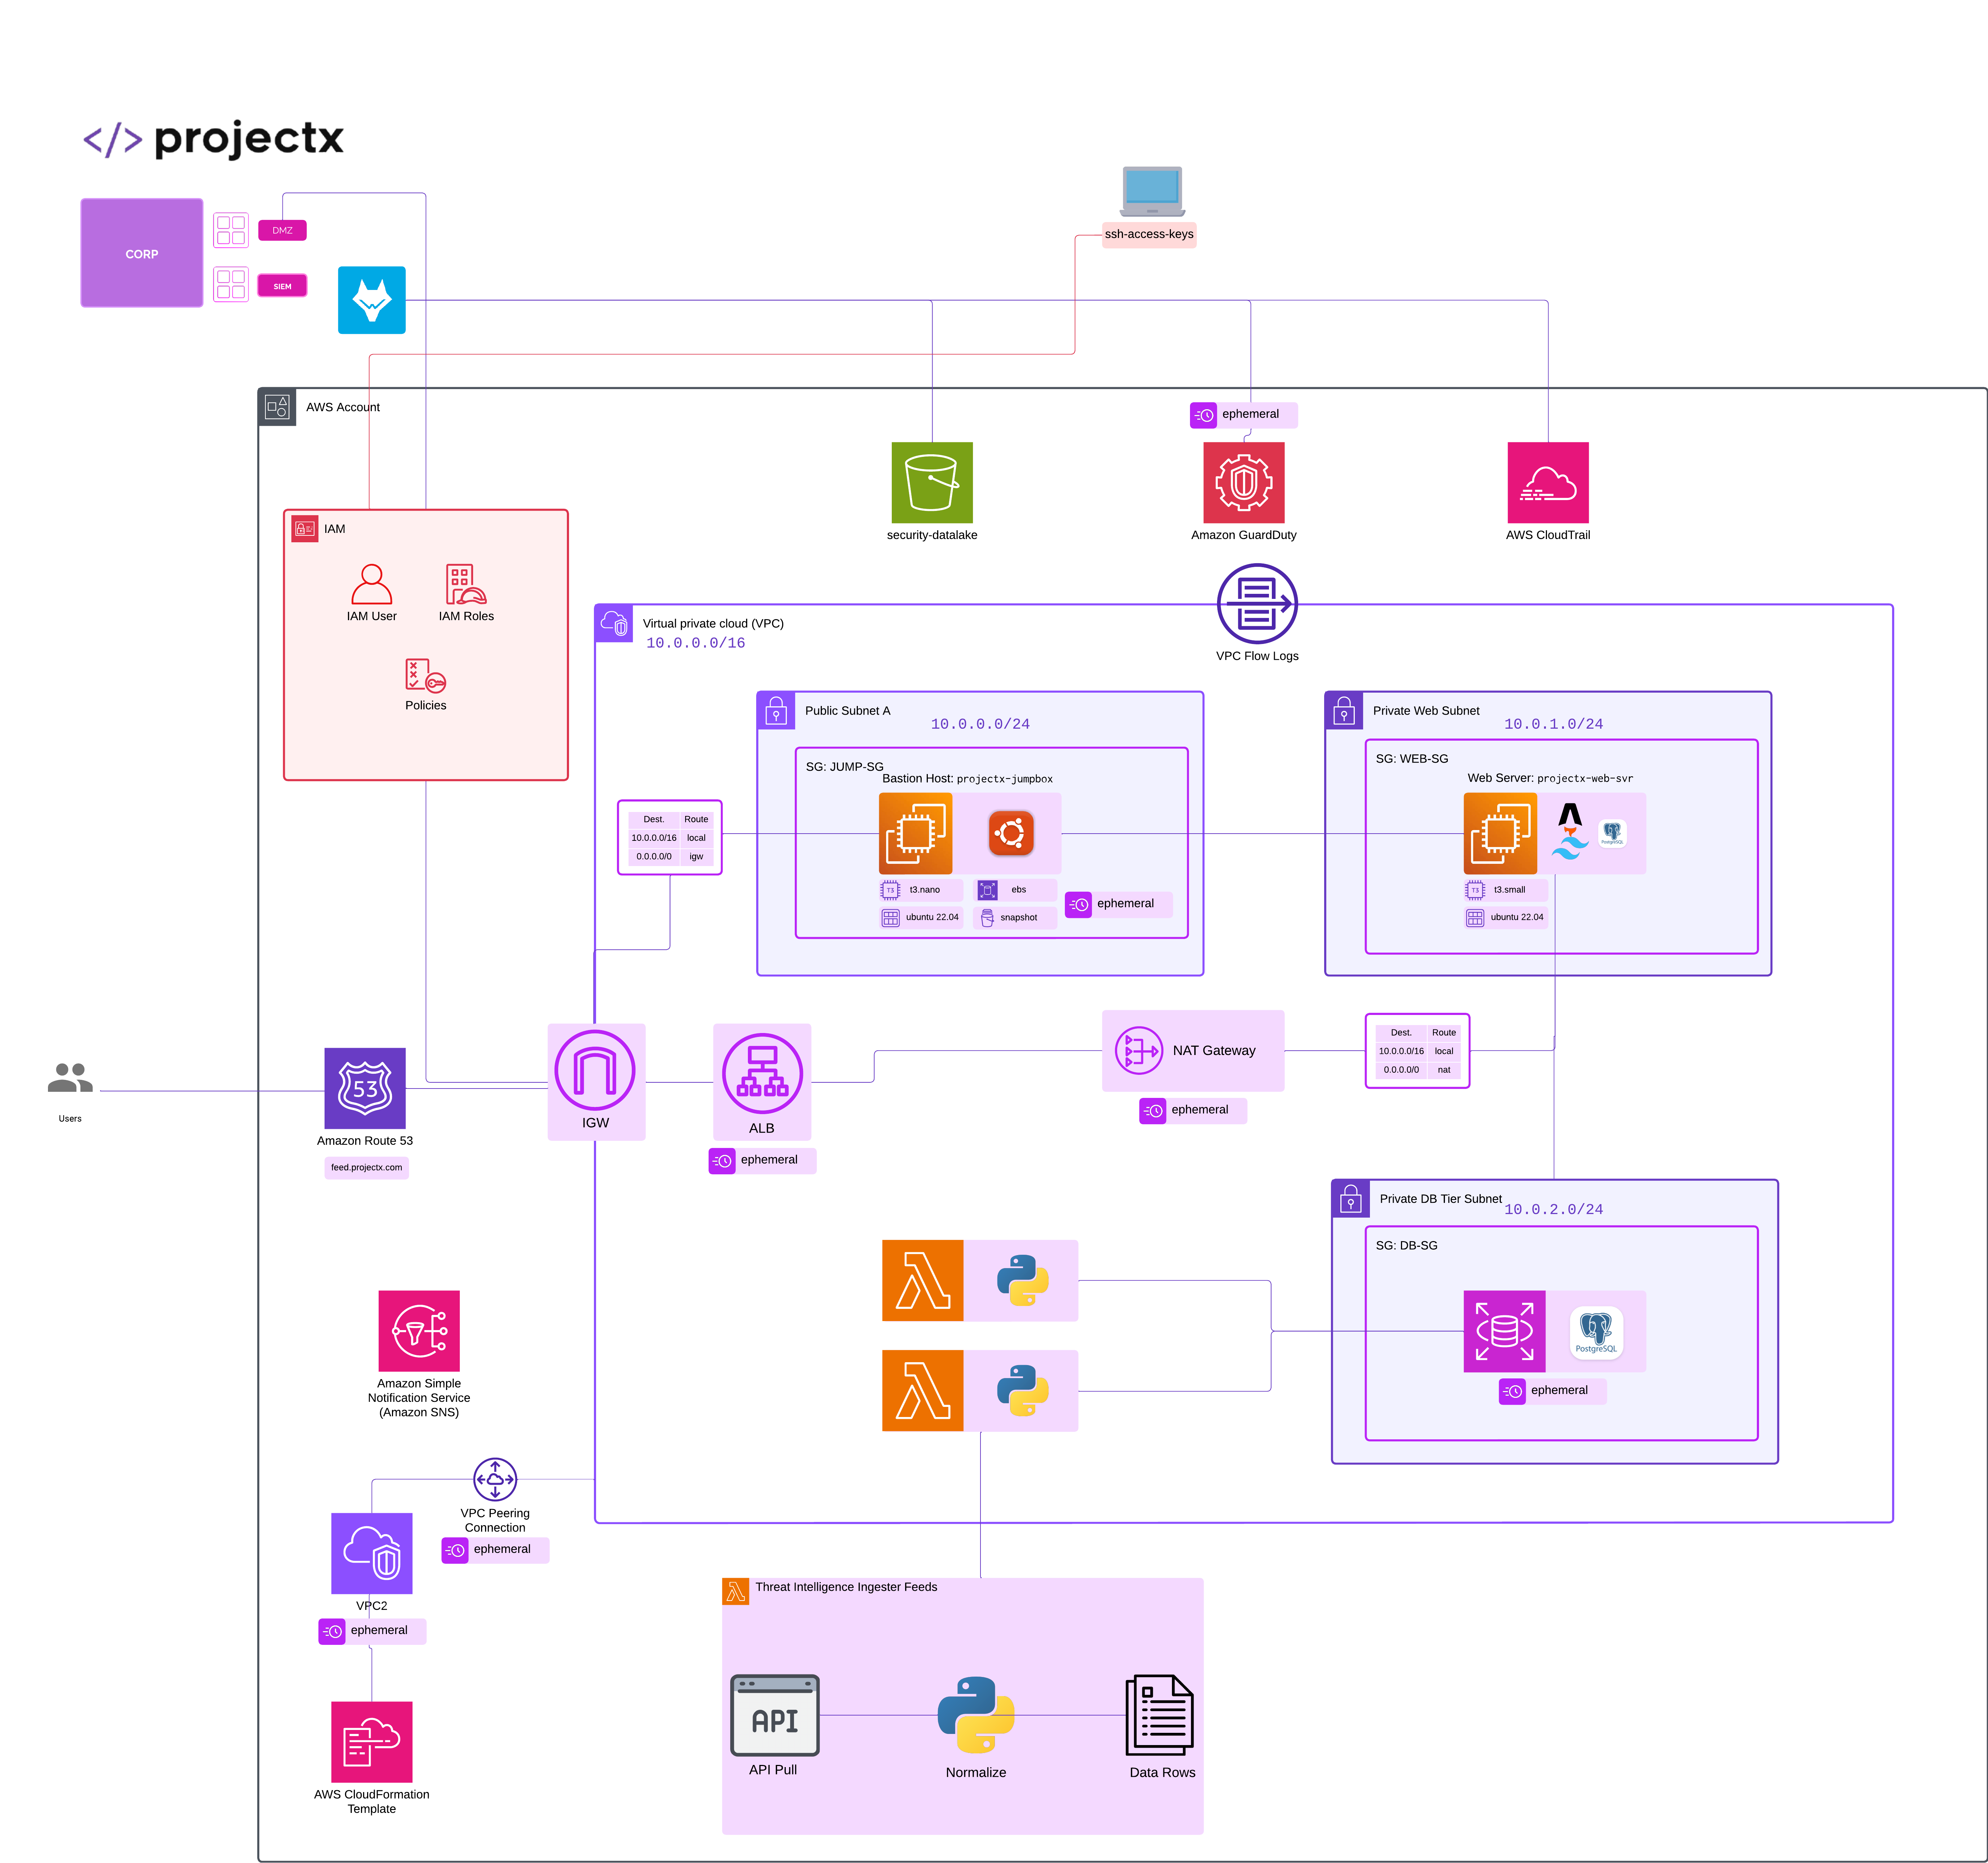
Overview
What is Index State Management (ISM)?
Index State Management (ISM) is a feature in Wazuh (backed by OpenSearch) that allows you to automate routine index management tasks. ISM policies can automatically transition indices through different states based on age, size, or other conditions.
👉 For this guide, we'll create an ISM policy that automatically deletes indices older than 14 days to manage storage limitations on our VM.
Create S3 IAM User for Wazuh
Before configuring Wazuh to ingest logs from your S3 datalake, we need to create an IAM user with appropriate permissions to read from the S3 bucket. This user will be used by Wazuh to access and retrieve log files.
Navigate to IAM
Open the IAM service in the AWS Console.
In the left navigation pane, select Users.
Click Create user.
Configure User Details
User Name
- User name:
projectx-wazuh-s3-user
👉 Use a descriptive name that indicates this user is for Wazuh S3 access.
Set Permissions
Select Attach policies directly.
Click Create policy.
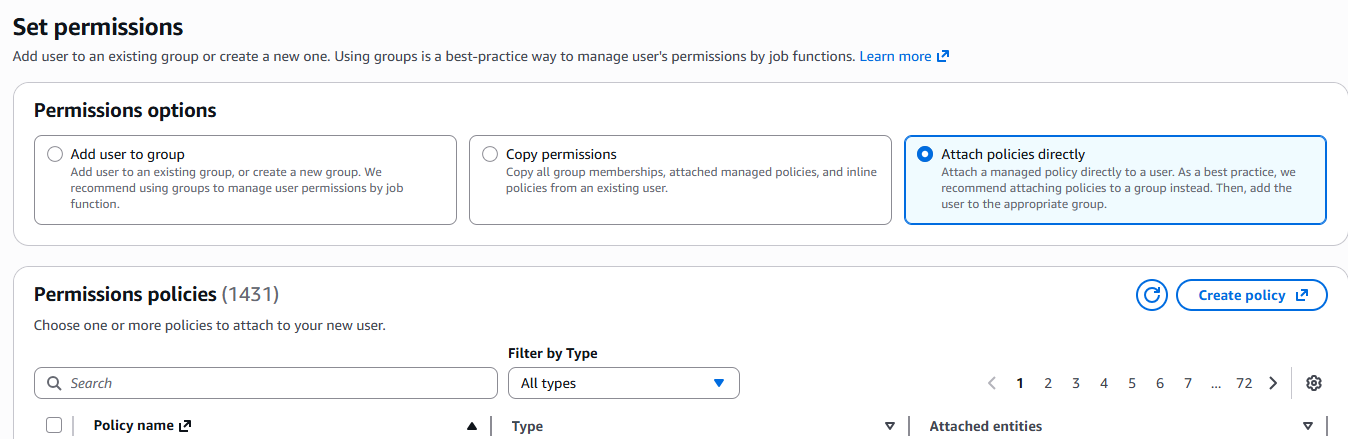
Configure Policy
In the policy editor, select the JSON tab.
Paste the following policy, replacing [AWS-BUCKET-NAME] with your actual S3 bucket name (e.g., projectx-prod-datalake-[username]):
{
    "Version": "2012-10-17",
    "Statement": [
        {
            "Sid": "WazuhS3Access",
            "Effect": "Allow",
            "Action": [
                "s3:GetObject",
                "s3:ListBucket"
            ],
            "Resource": [
                "arn:aws:s3:::[AWS-BUCKET-NAME]/*",
                "arn:aws:s3:::[AWS-BUCKET-NAME]"
            ]
        }
    ]
}
👉 Replace [AWS-BUCKET-NAME] with your S3 bucket name. For example, if your bucket is projectx-prod-datalake-johnsmith, the ARN would be arn:aws:s3:::projectx-prod-datalake-johnsmith.
👉 Security Note: This policy grants read-only access (GetObject and ListBucket) to the S3 bucket. This is sufficient for Wazuh to read log files but prevents modification or deletion.
Click Next.
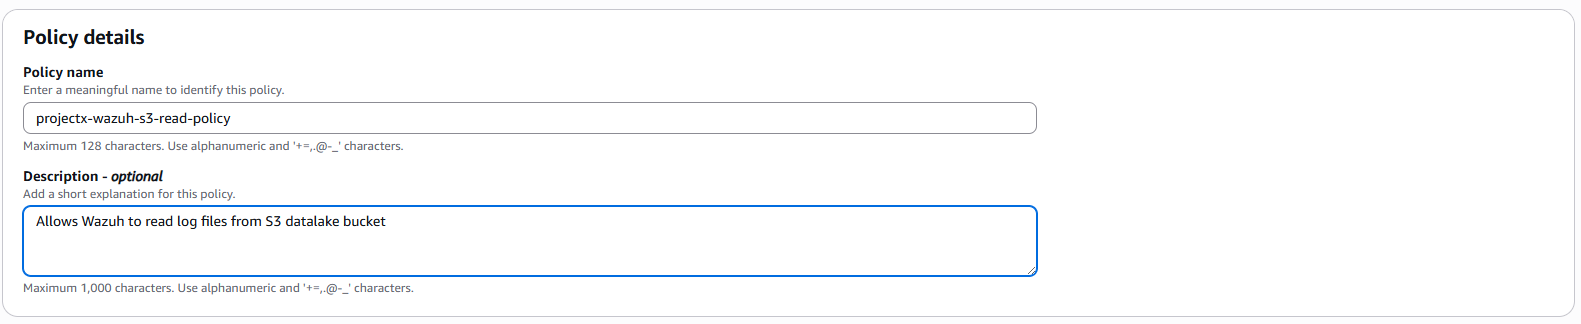
Name the Policy
-
Policy name:
projectx-wazuh-s3-read-policy -
Description:
Allows Wazuh to read log files from S3 datalake bucket
Click Create policy.
Attach Policy to User
Navigate back to the user creation page.
In the Set permissions section, click the refresh icon or search for projectx-wazuh-s3-read-policy.
Select the policy you just created.
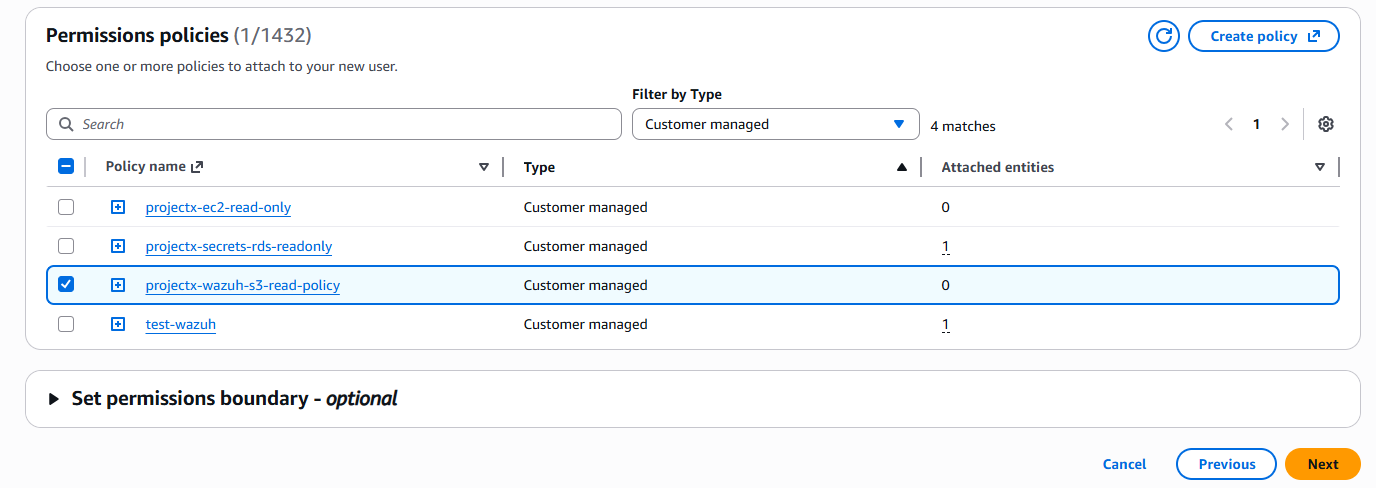
Click Next.
Review and Create User
Review the user configuration:
- User name:
projectx-wazuh-s3-user - Permissions:
projectx-wazuh-s3-read-policy
Click Create user.
Create Access Keys
After the user is created, you'll need to create access keys for programmatic access.
Click on the user name projectx-wazuh-s3-user.
Navigate to the Security credentials tab.
Scroll down to Access keys.
Click Create access key.
Select Application running outside AWS as the use case.
👉 This use case is appropriate for Wazuh running on an EC2 instance or on-premises server.
Click Next.
Click Create access key.
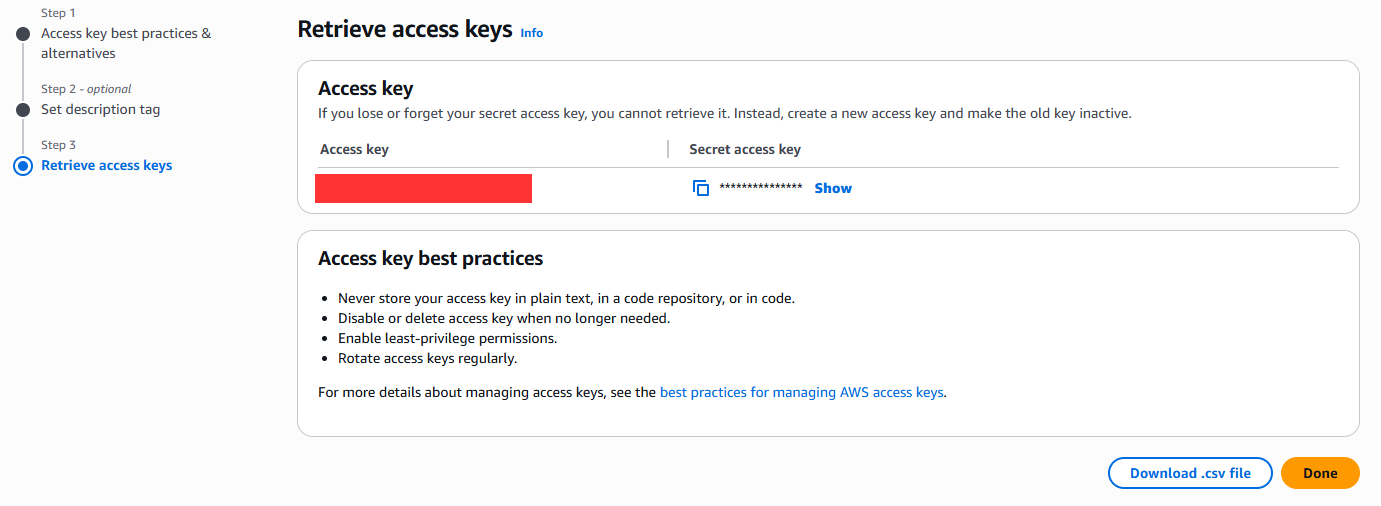
Save Credentials
👉 Important: Copy both the Access key ID and Secret access key immediately. The secret access key will only be shown once and cannot be retrieved later.
👉 Security Best Practice: Store these credentials securely. You'll need them when configuring Wazuh to connect to S3. Consider using AWS Secrets Manager or a secure password manager.
Click Done.
Verify User Configuration
Navigate back to IAM ➔ Users.
Select projectx-wazuh-s3-user.
Verify that:
- The user has the
projectx-wazuh-s3-read-policyattached - Access keys have been created (you'll see "2" under Access keys if you created one)
You now have an IAM user with S3 read permissions that Wazuh can use to access your security datalake bucket.
Install and Configure AWS CLI
To enable Wazuh to access your S3 bucket, we need to install the AWS CLI on the [project-x-sec-box] VM and configure it with the IAM user's access keys.
Connect to project-x-sec-box
Install AWS CLI
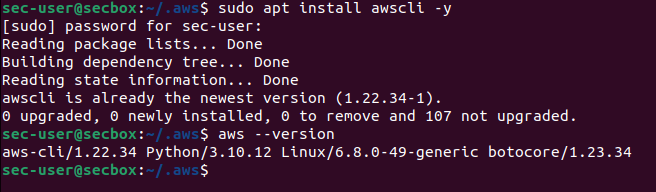
Update the package list:
Install the AWS CLI:
👉 The -y flag automatically answers "yes" to prompts during installation.
Verify the installation:
You should see output showing the AWS CLI version (e.g., aws-cli/2.x.x).
Configure AWS Credentials
Configure the AWS CLI with the access keys from the IAM user you created earlier.
root permissions are required for Wazuh <wodle> integrations to work.
Change to the root user first.
Run the AWS configure command:
You will be prompted for the following information:
AWS Access Key ID
Enter the Access key ID you saved when creating the IAM user:
👉 Paste the Access key ID you copied from the IAM user creation step.
AWS Secret Access Key
Enter the Secret access key:
👉 Paste the Secret access key you saved. The characters will not be displayed as you type for security reasons.
Default Region Name
Enter your AWS region (e.g., us-east-2):
👉 Use the same region where your S3 bucket is located.
Default Output Format
Press Enter to accept the default JSON format, or specify json:
Configure AWS Profile for Wazuh
Wazuh uses the AWS profile named default by default. The credentials you just configured are stored in the default profile.
Verify the credentials are stored correctly:
You should see:
[default]
aws_access_key_id = AKIAIOSFODNN7EXAMPLE
aws_secret_access_key = wJalrXUtnFEMI/K7MDENG/bPxRfiCYEXAMPLEKEY
👉 The credentials file is located at ~/.aws/credentials for the current user. If Wazuh runs as a different user, you may need to configure credentials for that user as well.
Check the AWS config file:
You should see:
Access Wazuh Dashboard
Connect to [project-x-sec-box]
Log in with your Wazuh credentials.
👉 If you don't remember your credentials, you can retrieve them from the wazuh-passwords.txt file on the Wazuh server.
Create Index State Management Policy
ISM policies automate index lifecycle management. We'll create a policy that automatically deletes indices starting from the default wazuh-alerts-* index after they reach 14 days of age. This is to preserve space on our VM.
Navigate to ISM Policies
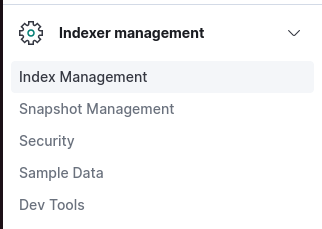
In the Wazuh Dashboard, click the hamburger menu (☰) in the top left corner.
Select Indexer Management ➔ Index Management.
Click Create policy.
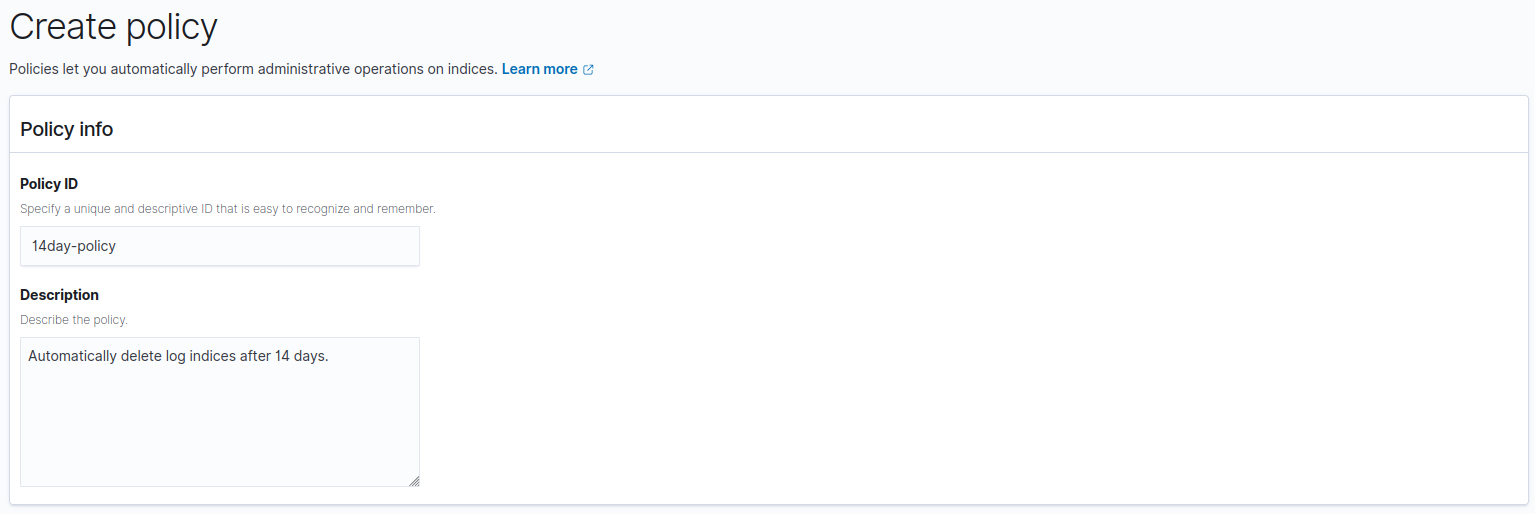
Configure Policy Details
Basic Information
- Policy ID:
14day-policy
👉 Policy IDs must be unique and cannot contain spaces or special characters.
- Description:
Automatically delete log indices after 14 days.
Click Create.
ISM Template
Under ISM Templates, select Add Template.
Add wazuh-alerts-* as the Index pattern to match on.

Configure Policy States
Configure States
ISM policies start with a default state or initial state. We will start with a initial state of default which will do nothing until we reach 14 days. Then we'll configure a state called delete to transition to a delete state after 14 days.
In the States section, select Add state.
Create Default State
-
State name:
default -
Actions: Leave empty.
-
Transitions:
Minimum index age is 14d
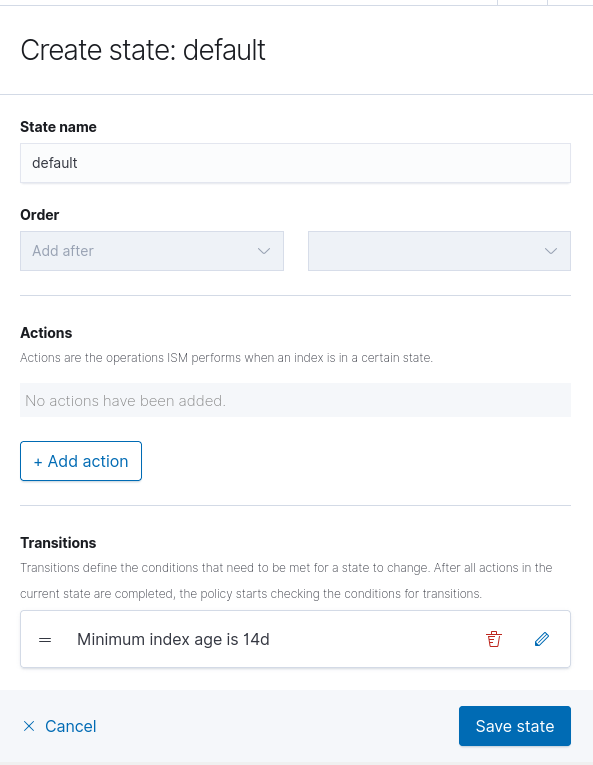
Click Save.
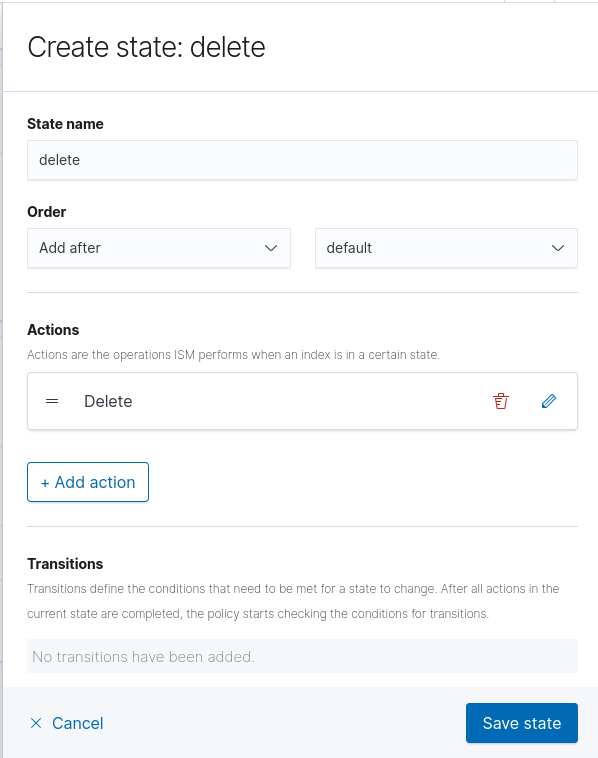
Create Delete State
Select Add state again.
-
State name:
delete -
Order:
Add after default -
Actions:
Delete -
Transitions: Leave empty.
Click Save.
Navigate back to the default state.
Edit the Transition to go to the delete stage.
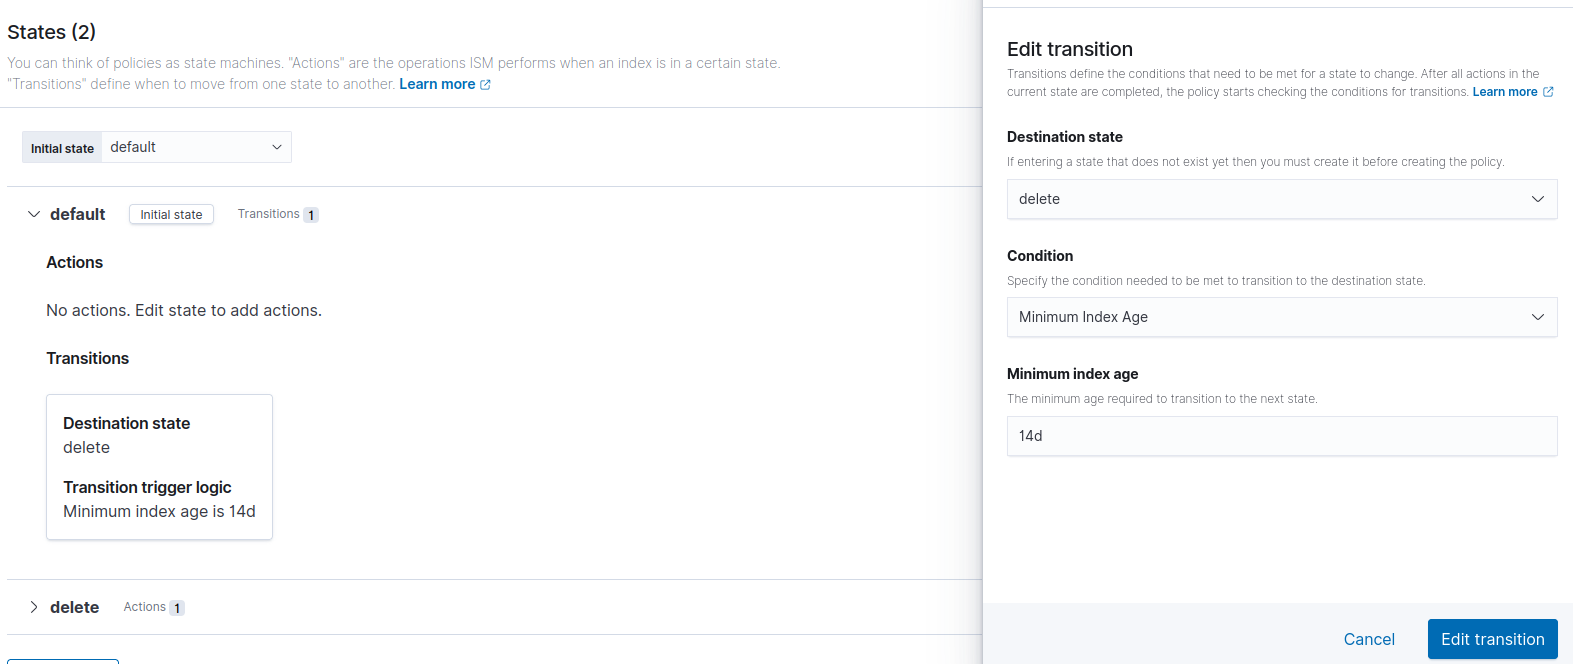
You should now have two states.
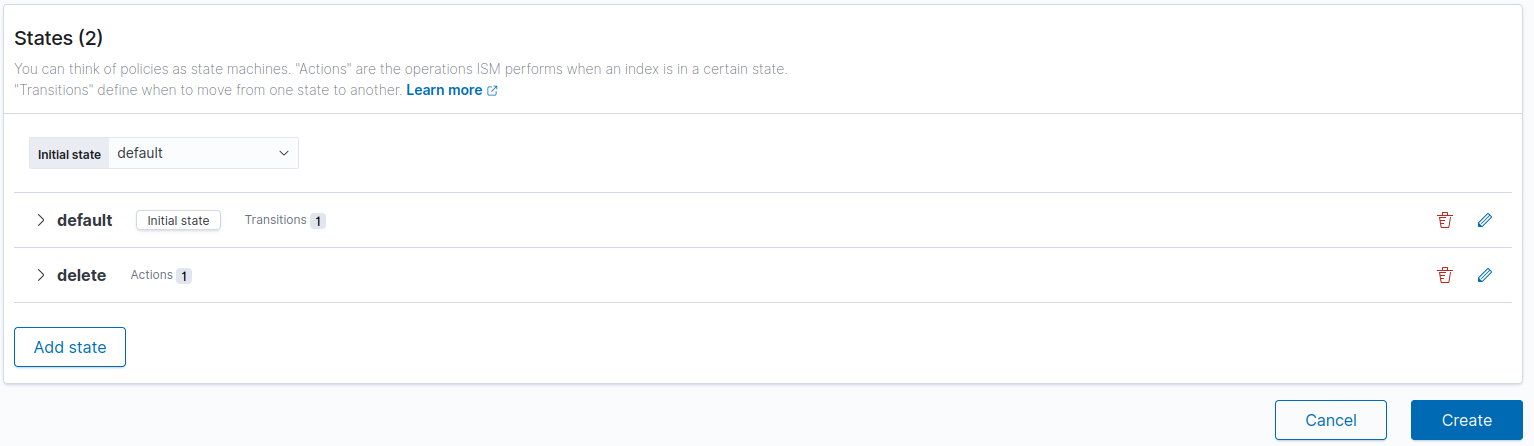
Click Create to create the ISM policy.
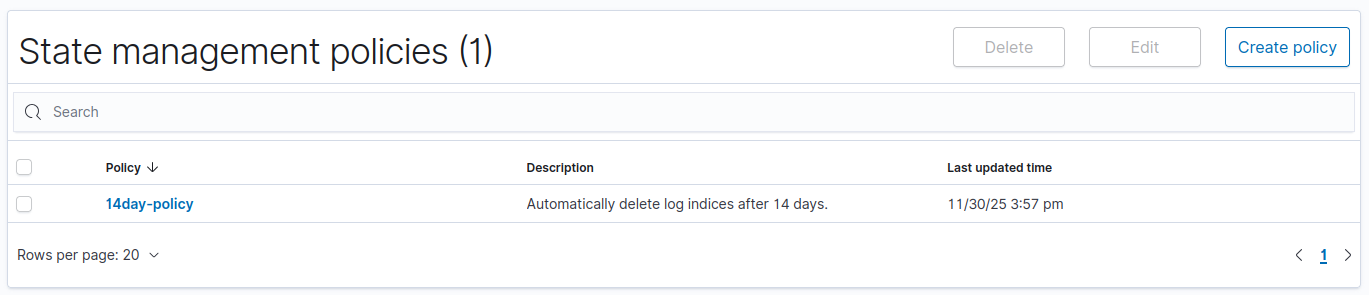
Navigating back to State management policies, you will see the 14day-policy ISM. This will apply to all indices in the wazuh-alerts-* index pattern, which is where all of our logs are being sent to.
Alternative: View JSON Editor
This is what your ISM policy should be in JSON format, if you would like to double check or configured with "View JSON".
{
    "id": "14day-policy",
    "seqNo": 232,
    "primaryTerm": 1,
    "policy": {
        "policy_id": "14day-policy",
        "description": "Automatically delete log indices after 14 days.",
        "last_updated_time": 1764539879054,
        "schema_version": 21,
        "error_notification": null,
        "default_state": "default",
        "states": [
            {
                "name": "default",
                "actions": [],
                "transitions": [
                    {
                        "state_name": "delete",
                        "conditions": {
                            "min_index_age": "14d"
                        }
                    }
                ]
            },
            {
                "name": "delete",
                "actions": [
                    {
                        "retry": {
                            "count": 3,
                            "backoff": "exponential",
                            "delay": "1m"
                        },
                        "delete": {}
                    }
                ],
                "transitions": []
            }
        ],
        "ism_template": [
            {
                "index_patterns": [
                    "wazuh-alerts-*"
                ],
                "priority": 0,
                "last_updated_time": [timestamp]
            }
        ]
    }
}
👉 Timestamp is a sequence of numbers.
Success!
These configurations will help you organize and manage all of our logs as they're ingested. Now when we add more data sources from the S3 datalake into Wazuh, they will automatically be rotated to deletion through the ISM policy to maintain storage.