Suricata IPS
Prerequisites
- VirtualBox or VMware Workstation Pro Installed.
- Virtual Machine
[project-x-sec-work]installed and configured.
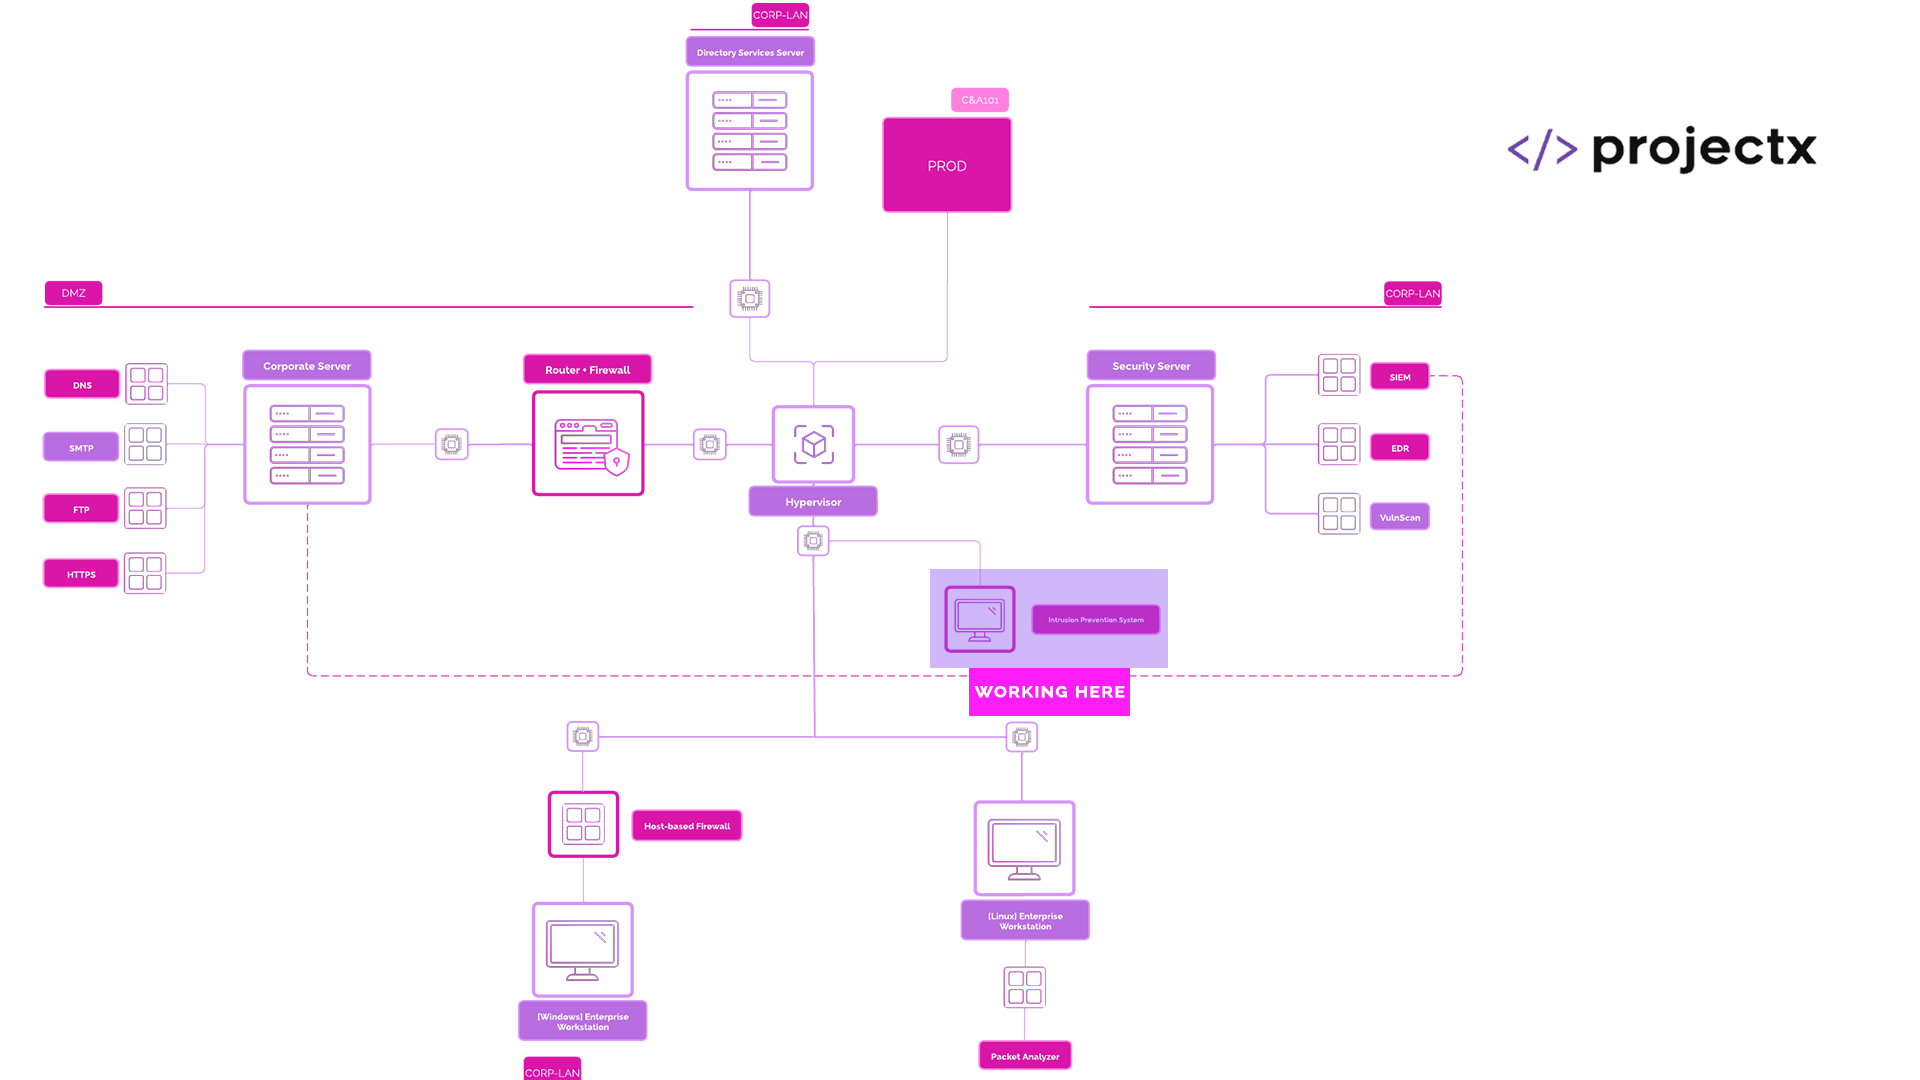
Network Topology
Suricata
Suricata is an open-source, high-performance network threat detection engine capable of real-time intrusion detection (IDS), intrusion prevention (IPS), and network security monitoring (NSM). Yay for the acronyms.
Some key features of Suricata include:
-
Real-time traffic inspection (IDS/IPS capabilities).
-
Multi-threaded engine for high-performance environments.
-
Deep packet inspection of application-layer protocols (e.g., HTTP, DNS, FTP).
-
File extraction and TLS fingerprinting.
-
Protocol-aware traffic analysis.
-
JSON logging (EVE format) for SIEM integration.
-
PCAP capture and flow logging.
Rules
Suricata uses a rule-based detection engine, compatible with Snort-style syntax, to identify malicious traffic patterns and trigger alerts or actions.
Let's take a look at a sample rule and deconstruct it.
alert http any any -> any any (msg:"Potential XSS attack"; content:"<script>"; sid:100001; rev:1;)
-
alertAction: Determines what Suricata does when the rule matches (e.g., alert, drop, reject, pass) -
httpProtocol: The network protocol (e.g., http, tcp, udp) -
any anySource and Destination: IPs and ports, with direction (-> or <->) -
Options (inside parentheses):
msg: Human-readable alert message
content: Specific string to match in the payload
sid: Unique signature ID
rev: Revision number
Additional options: flow, pcre (regex), threshold, etc.
Security Implications
Running an IDS / IPS comes with security benefits and considerations.
-
Improved visibility into network-based threats and suspicious activity.
-
Real-time detection and optional prevention of known attack signatures.
-
Protocol-level anomaly detection helps identify evasive or malformed traffic.
-
Enables detailed forensic logging for incident response and auditing.
-
Supports compliance efforts through detailed traffic analysis.
-
High false positive rate if rules are too broad or not tuned to the environment.
-
Performance impact on high-throughput networks without hardware optimization.
-
Regular ruleset maintenance is essential to remain effective against evolving threats.
-
Signature-based detection is less effective against unknown or zero-day exploits.
-
Misconfigured or outdated rules can lead to missed detections or operational issues.
Part 1: Deploy Suricata IDS on [project-x-sec-work]
Power on [project-x-sec-work].
Perform an update:
sudo yum update -y
Let's also download the Nano editor.
sudo yum install nano
Now, add the suricata repository and download suricata.
sudo yum install epel-release yum-plugin-copr
sudo yum copr enable @oisf/suricata-7.0
sudo yum install suricata
By default, Suricata listens on the eth0 network interface. Security Onion uses the enp0s3 network interface.
You can issue an ip a to view the network interface to ensure you have enp0s3, if not, use the interface shown in the output.

We need to change this interface from eth0 to enp0s3.
We can do this under /etc/sysconfig/suricata.
sudo nano /etc/sysconfig/suricata
Change eth0 to enp0s3.
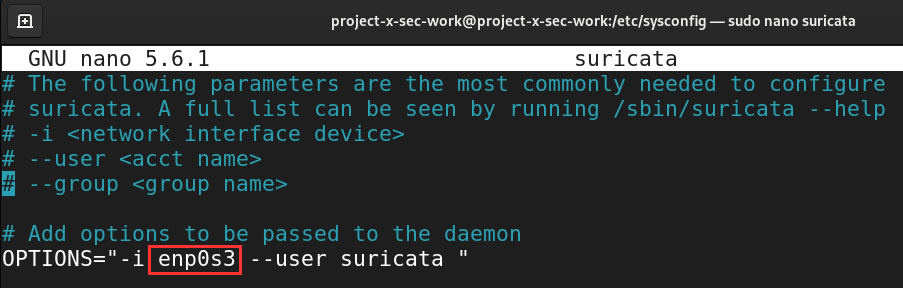
Exit Nano with CTRL + X, then Y key, Enter Key.
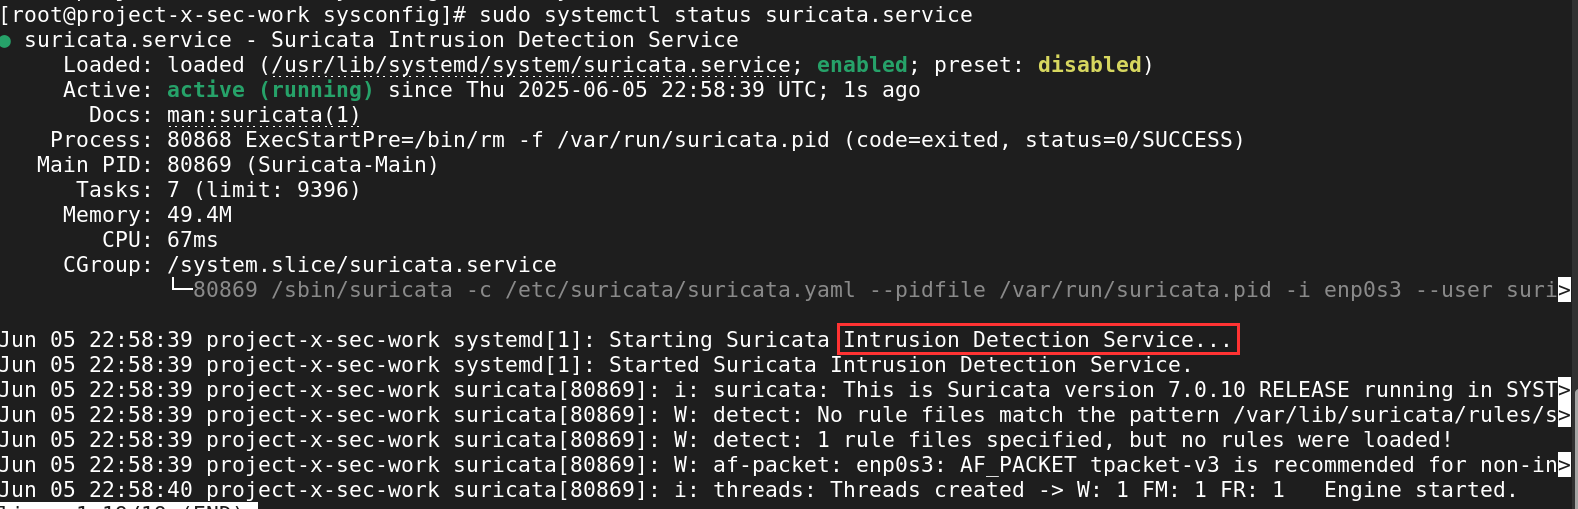
Now we should be able to spin up the Suricata service.
Enable and start the Suricata service.
sudo systemctl enable suricata.service
sudo systemctl start suricata.service
Check the status.
sudo systemctl status suricata.service
Success! As you can see, Suricata is currently in IDS mode. We will change this to IPS mode and add a few rules to block malicious traffic.
Part 2: Configure Suricata IPS
👉 Big Kudos to Critical Design Associate's blog post for overviewing configuration settings in Suricata.
Now let's configure Suricata into IPS mode.
While we configure Suricata, we will also enable a few log normalization settings to stage our Suricata log files for ingestion into Wazuh.
Navigate to Suricata's main configuration file, we must be root.
sudo su: Change to root.
cd /etc/suricata
nano suricata.yaml
Type CTRL + W, this is the search tool we can use in Nano.
First search, "community-id". Change this value to true.
The
community-idgenerates a unique hash for a network connection. This allows for tracking events associated with the same connection across different systems. This will allow us to track network connections in Wazuh.
Change community-id to true.
community-id: true

Next, search for "af-packet".
Change the - interface: to enp0s3
Here we are changing the default network interface to our
[project-x-sec-work]workstation to redirect Suricata to our network interface.

Refresh the Suricata service.
sudo systemctl restart suricata
The next few steps involve ruleset configurations.
-
sudo suricata-update: Fetches rulesets from external providers and updates the rules. -
sudo suricata-update --no-check-certificate update sources: Updates all of Suricata's ruleset providers. -
sudo suricata-update list-sources: Show a list of Suricata's ruleset providers.
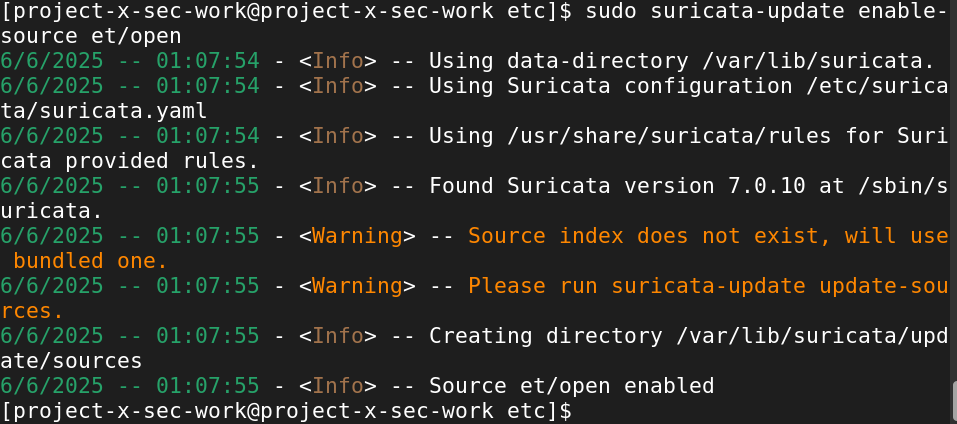
Let's gather an open-source ruleset that we can load into our Suricata IPS. These rules will be supplied and enter into monitoring mode. We will using the Proofpoint's ET Open Ruleset (et/open).
sudo suricata-update enable-source et/open
Rerun the rule update.
sudo suricata-update.
Let's ensure that there were no errors when loading the et/open ruleset.
sudo suricata -T -c /etc/suricata/suricata.yaml -v
Let's configure Suricata into IPS mode.
Navigate to suricata.yaml.
sudo nano /etc/suricata/suricata.yaml.
Type CTRL + W to search. Search for "af-packet".
Scroll to the end of the af-packet: block.
Add the following nfqueue: block.
Exit Nano with CTRL + X, then Y key, Enter Key.
What we are doing here is redirecting network packets to the Netfilter Queue (NFQUEUE). The NFQUEUE is a userspace program, which allows an application like Suricata to inspect and modify the network packets, before they are processed by kernel. This allows Suricata to make decisions about what packets are forwarded, dropped, or modified.
We need to set up the NFQUEUE inside the host-based firewall, IP Tables.
NFQUEUE: Non-Persistent Method with iptables
By default, IP Tables rules are not persistent. Once the machine is restarted, the IP Tables rules will reset to the default.
We can supply the following to redirect network packets to the NFQUEUE.
sudo iptables -I INPUT -j NFQUEUE --queue-num 0
sudo iptables -I FORWARD -j NFQUEUE --queue-num 0
sudo iptables -I OUTPUT -j NFQUEUE --queue-num 0
We can run Suricata in NFQUEUE IPS Mode.
sudo suricata -c /etc/suricata/suricata.yaml -q 0 -v
-
-q0: Tell Suricata to use NFQUEUE 0 -
-v: Verbose mode (optional)
Once our machine is restarted, we would have to supply these rules again. Not a very optimal solution, especially when we are lazy engineers.
NFQUEUE: Persistent Method With nftables
nftables provides in-kernel packet filtering and is the successor of iptables. nftables is default packet filtering framework used by Oracle Linux 9. Our [project-x-sec-work] is a running Security Onion on Oracle Linux 9.
We are going to use nftables to add a persistent firewall rules, so when we restart our workstation, Suricata will still intercept network traffic passing through the NFQUEUE.
Tables in nftables are container for rules. Think of a table as a "rulebook" where ACCEPT, DROP, MATCH logic is applied to network traffic.
Inside the table, we have chains, rules, and set/maps.
-
Chains: Define the when and how rules are applied.
-
Rules: The actual MATCH, ACCEPT, DROP logic applied to the rules.
-
Set/Maps: Optional collections for matching multiple chains and rules.
Let's create a new table called "filter". We are going to apply rules to both IPv4 and IPv6 address families, so we will use the inet option, which includes both address families.
Open a new terminal.
Create the table with:
sudo nft add table inet filter

Now we can add chains and rules to these respective chains.
sudo nft add chain inet filter input '{ type filter hook input priority 0; policy accept; }'
Here we are adding a rule to the input chain. The input chain means packets that are destined for local machine. We add a priority of 0, which is the order of chains. And the default policy if no rule matches is to accept the packet.

sudo nft add chain inet filter forward '{ type filter hook forward priority 0; policy accept; }'
Here we do the some thing, except we are using the forward chain. This means packet passing through the machine.

Let's add these NFQUEUE rules into both chains.
sudo nft add rule inet filter input queue num 0
sudo nft add rule inet filter forward queue num 0

And finally, let's enable nftables on startup.
sudo systemctl enable nftables
We can us the nft command-line program to interface with nftables, as we have seen from above commands. We can list the ruleset to see our additions to the nftables "filter" table.
sudo nft list ruleset
Now when we reboot the machine the NFQUEUE rules will be added inside the input and forward chains, this allows Suricata to do the heavy lifting.
Part 3: Create Test Rule
We are going to create a custom rule to see if traffic will get dropped. For testing purposes, we can drop any ICMP packets, which means dropping any network packets that are attempting to ping our host.
Here is the rule we will use:
drop icmp any any -> any any (msg:"ICMP Request Blocked"; sid:2; rev:1;)
Let's create this rule in a new file called local.rules, in the following file location.
sudo nano /var/lib/suricata/rules/local.rules
Add the above rule to this file.
Exit Nano with CTRL + X, then Y key, Enter Key.
We need to add our custom rule to Suricata's configuration file, so that it knows where to locate our custom rules.
Navigate back to suricata.yaml.
sudo nano /etc/suricata/suricata.yaml
Type CTRL + W to search.
Search for "rule-files".
Add the following under the rule-files block.
- /var/lib/suricata/rules/local.rules.
Exit Nano with CTRL + X, then Y key, Enter Key.
sudo systemctl restart suricata
sudo suricata -c /etc/suricata/suricata.yaml -q 0 -v
Now if we go to any other device and issue a ping, we should see our traffic blocked.
Suricata, by default, appends it's alerts to the fast.log file.
tail /var/log/suricata/fast.log
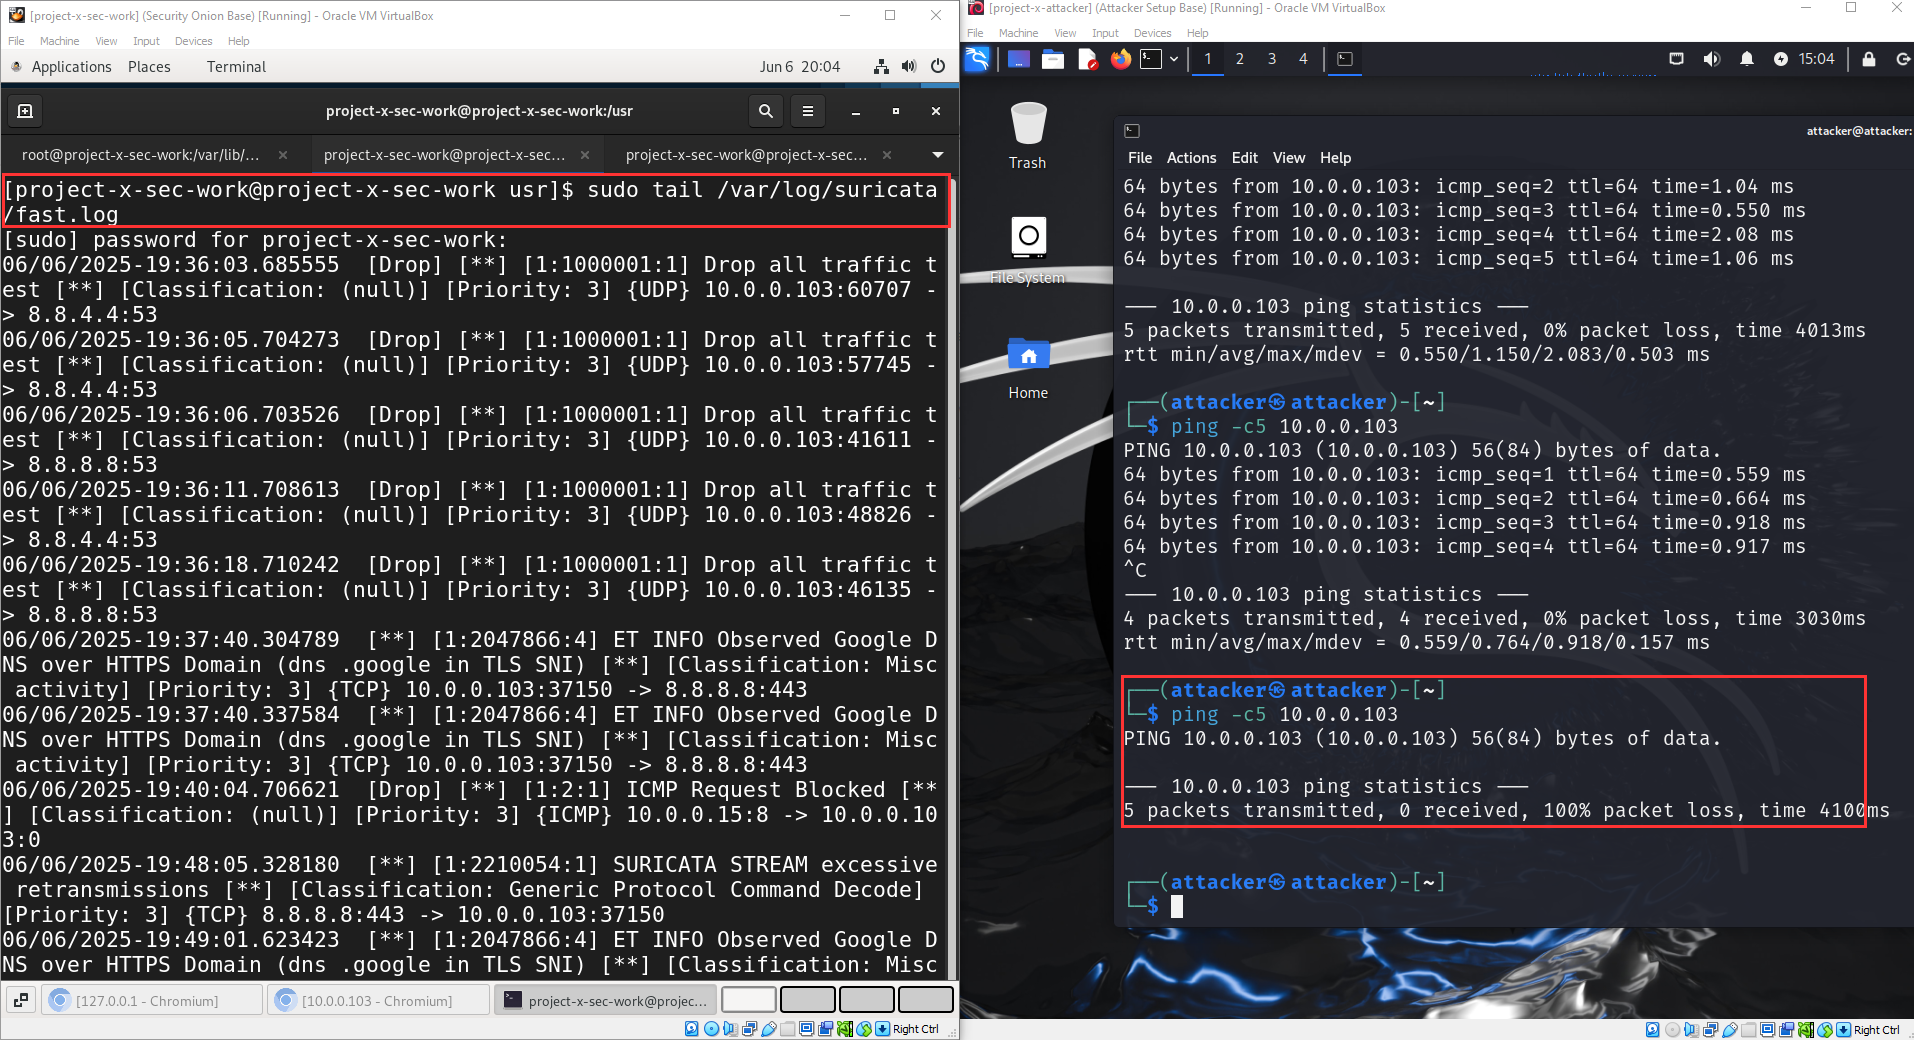
Success! As you can see, this custom rule blocked our attempt coming from [project-x-attacker].
📷 Take a Snapshot!