Layer 2, Layer 3/4, and Layer 7 Security Monitoring
Prerequisites
- VirtualBox or VMware Workstation Pro Installed.
- Virtual Machine
[project-x-win-client]is turned on and configured. - Virtual Machine
[project-x-attacker]is turned on. - Virtual Machine
[project-x-corp-fw]is turned on.
Network Topology

Network Monitoring & Prevention
A core pillar to effective security in an organization is the network. Outside of the physical domain, every other type of cyber attack interfaces with the network — whether that's locally (like within your home network or a branch office) or externally through a publicly accessible web server.
Because of this, network monitoring, defense, and prevention is not optional — it's essential to understand what’s happening in your environment.
To make sense of what and where network monitoring is necessary, it helps to break it down by the OSI model — particularly focusing on Layer 2 (Data Link), Layer 4 (Transport), and Layer 7 (Application).
Layer 2
This is the layer responsible for MAC addresses, Ethernet frames, and switch-level communication. It deals with the physical transmission of data between nodes on the same network.
Layer 3/4
Layer 3 and Layer 4 often overlap with each other.
Layer 3 Handles IP addressing, routing, and packet forwarding — including protocols like IP, ICMP, and routing protocols (OSPF, BGP).
Layer 4 manages end-to-end communication via TCP and UDP. This is where ports live (e.g., TCP/80, UDP/53).
Layer 7
This is the user-facing layer where protocols like HTTP, DNS, SMTP, FTP operate. It’s where most modern cyber attacks target because it’s closest to data and users.
Each of these layers present its own sets of implications. Effective security has a top-to-bottom, bottom-to-top approach to network monitoring.
🤔 Why not the other layers of the OSI model?: Layers 1, 5, and 6 are still important. When abstracting the most important types of network monitoring concepts and tools, they commonly are bundled into one of the 4 above OSI levels. Most modern technologies and tools bundle all these layers together as one product suite, as we will see with Suricata.
Suricata can perform Layer 2, 3/4, and 7 monitoring based off the placement and rules. Suricata can effectively serve as a comprehensive network monitoring and prevention tool.
Setup Suricata on pfSense (pfSuricata)
Our pfSense router has become the central system for routing and stateful network packet filtering. This has allowed us to build network segmentation inside the ProjectX network. Since pfSense is effectively serving as a network manager, we can also place additional capabilities such as intrusion prevention.
If you performed the optional exercise of installing Suricata onto the [project-x-sec-work], you will know how powerful and effective Suricata can be in preventing network access when we did a block all for ping or ICMP requests.
pfSense provides additional packages to help extend the base functionality of the router, including Suricata.
Why aren't we using Suricata on
[project-x-sec-work]?: This is a possibility. We could place Suricata as a bridge, in between the pfSense router, and our workstation VMs. However, this introduces a level of complexity with IP routing. We would need to provision two network interfaces inside[project-x-sec-work], establish a bridge, then connect our workstation fleets to one network interface and the pfSense router to the other interface, all while still allowing pfSense to handle IP allocation. Feel free to do this as an self-study exercise!
Since we have two instances of Suricata, one that is installed on [project-x-sec-work] and a new one being installed on pfSense. We will refer to the pfSense Suricata installation as pfSuricata. pfSuricata is not actually a thing.
Download Suricata Package
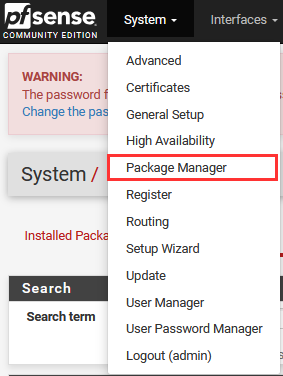
Navigate to "System" ➔ "Package Manager".
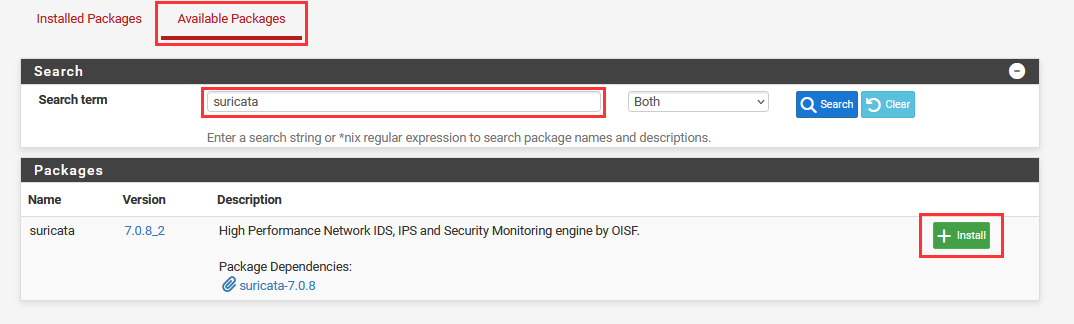
Select "Available Packages" ➔ Type "Suricata" ➔ "+ Install".
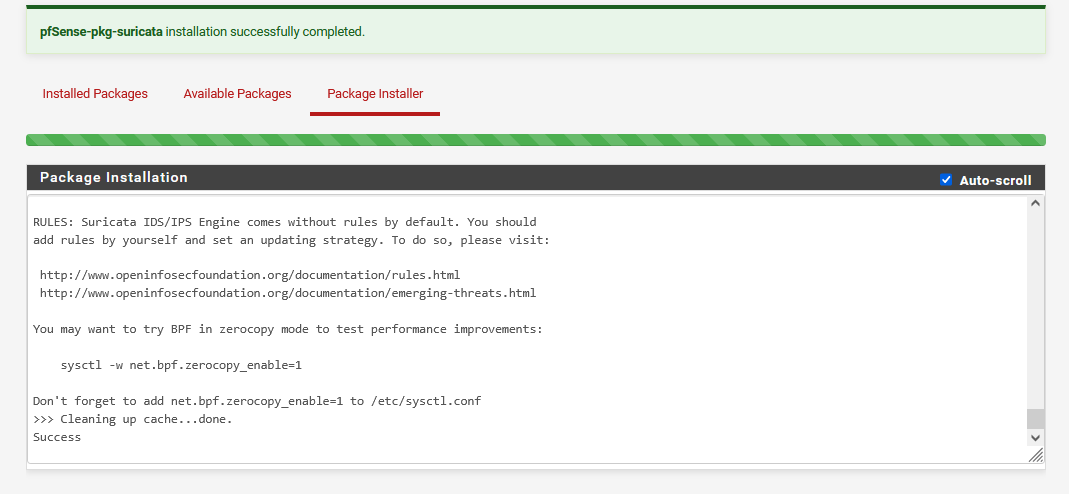
Wait for "Package Installation" to output "Success".
Navigate to "System" ➔ "Advanced" ➔ "Networking".
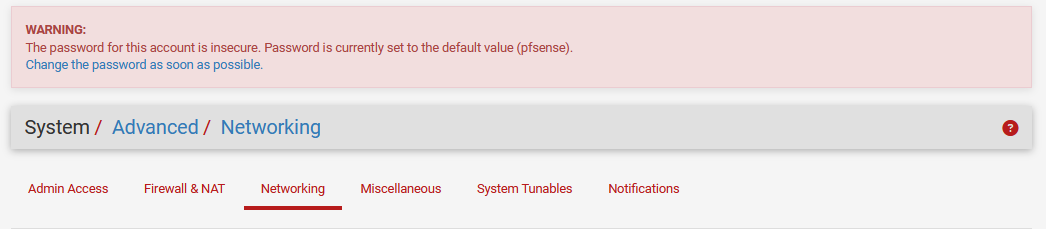
As part of enabling Suricata, we have to disable Hardware Checksum Offloading, shown in the WARNING! dialogue box. Hardware Checksum Offloading allows the computer's network interface card to take over the task of calculating and verifying checksums for network packets, instead of the CPU.

Scroll down until you see "Network Interfaces" ➔ Uncheck the following.
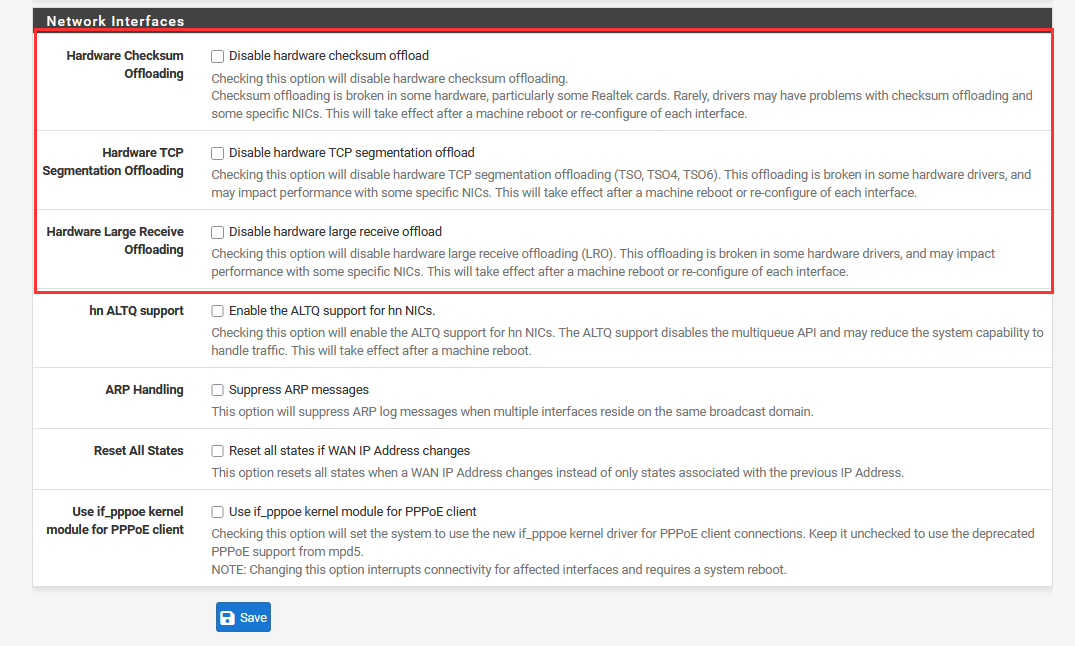
Reboot the system.
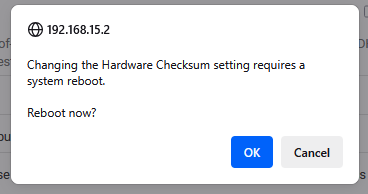
Log back into the pfSense console.
👉 Refer to the “Project Overview” guide for more information on default usernames and passwords.
Setup pfSuricata to IPS Mode
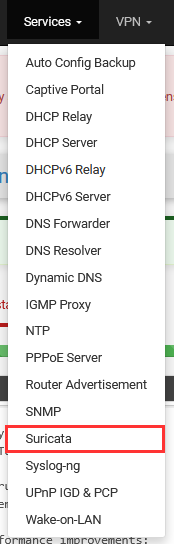
Navigate to "Services" ➔ "Suricata".
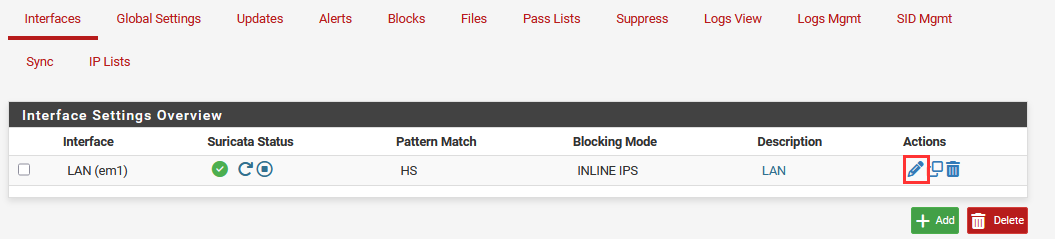
You will now see Suricata enabled. Here we can see Suricata is up and running with the ✅. We can initiate a restart or stop of the Suricata package if needed.
You can also see that "Blocking Mode" is "DISABLED". This means Suricata is serving as an Intrustion Detection System (IDS), only detecting activity by default. We will change this to Intrusion Prevention Mode.

Go to the pencil icon to change the Suricata configuration.
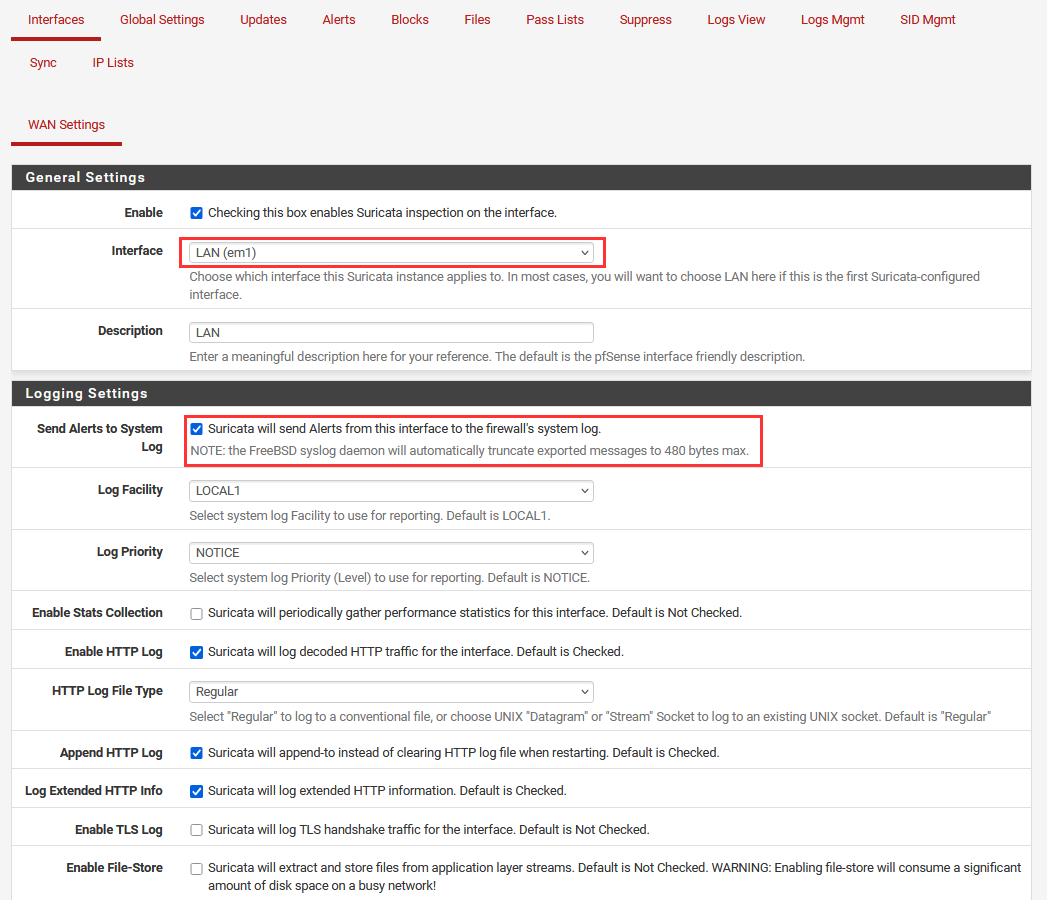
Under "General Settings", make sure the Interface is set to "LAN".
Under "Logging Settings", Select "Send Alerts to System Log.""
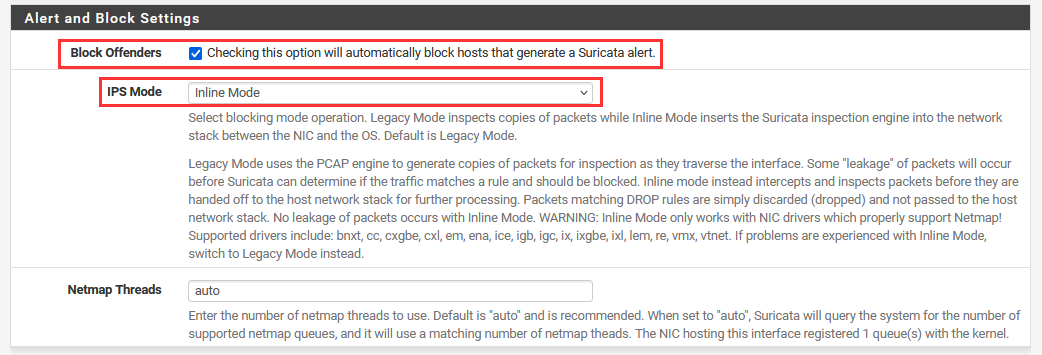
Scroll down to the "Alert and Blocking Settings".
Check the "Checking this option will automatically block hosts that generate a Suricata alert.".
Choose "Inline Mode" for IPS Mode.
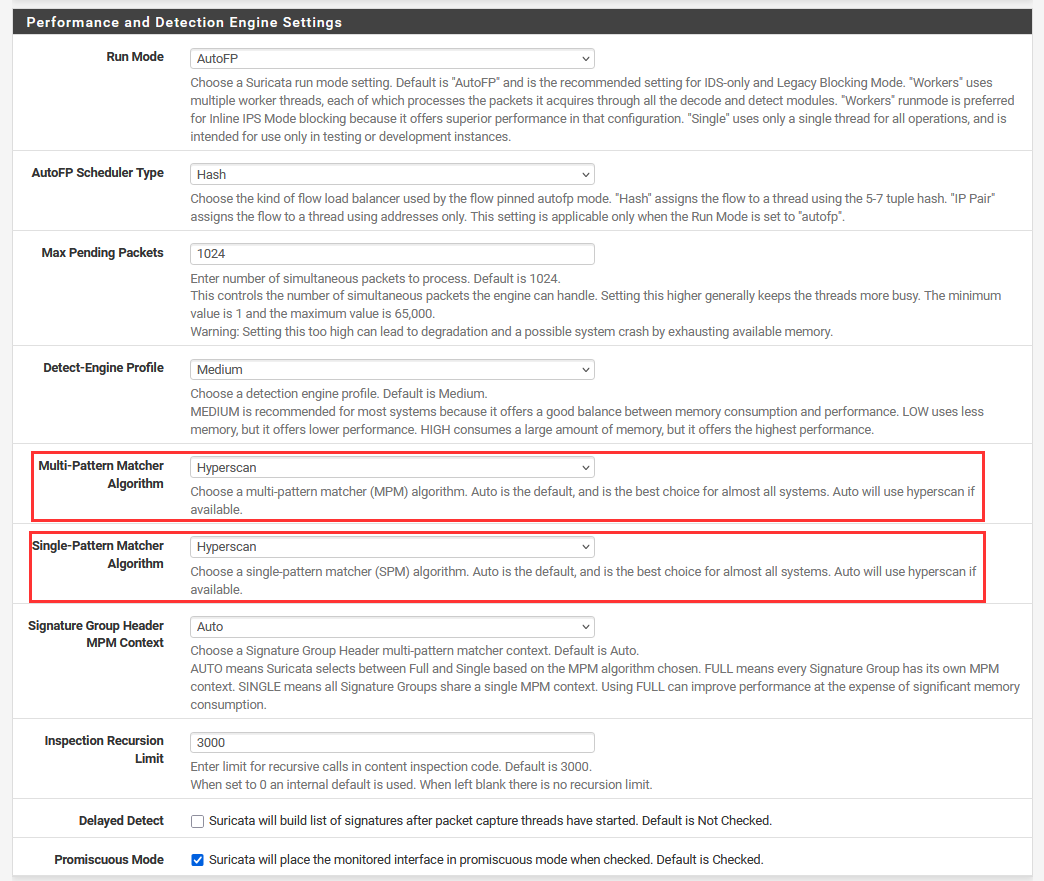
Scroll down to "Performance and Detection Engine Settings".
Change Single & Multi-Pattern Matcher Algorithm to "Hyperscan".
Scroll all the way down ➔ "Save".
What is and why Hyperscan>: Performs pattern matching acceleration. This allows Suricata to detect malicious network activity by accelerating the process of scanning network traffic. The traditional pattern matching engine can lead to latency in network connections.
Download Open-Source Detection Rules
Navigate to "Global Settings".
Select the following rules to download and add to Suricata.
-
Install ETOpen Emerging Threats rules.
-
Install Snort GPLv2 Community rules
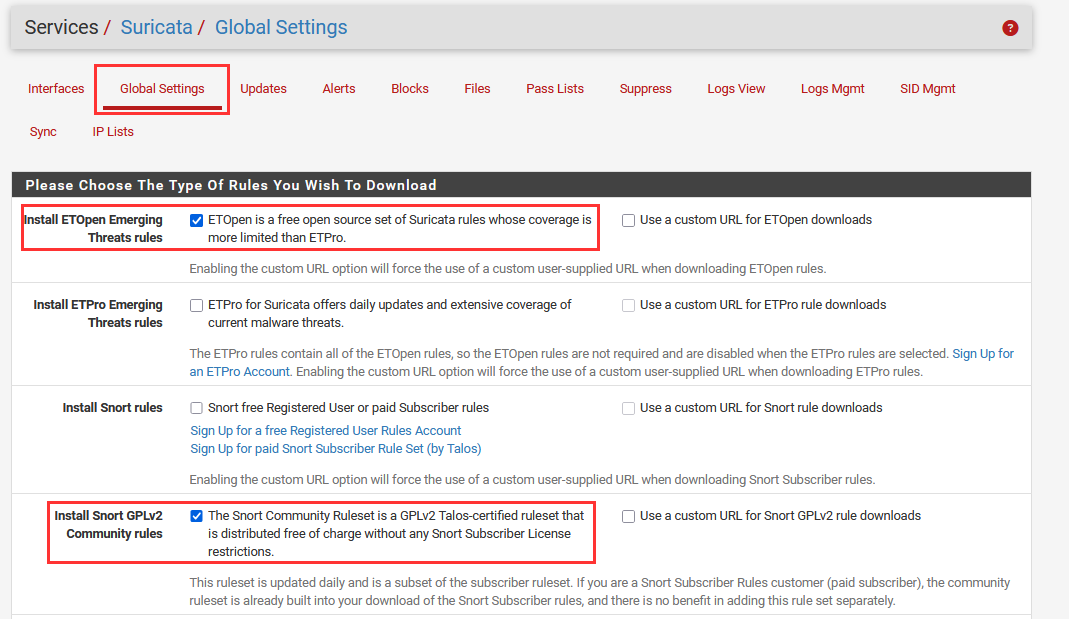
Scroll all the way down ➔ "Save"
Open-Source Rules: Similar to what we did in the Suricata section, we can download open-source ruleset repositories, which come preloaded with a lot of useful default rules. These rules provide a baseline for us. Thank you open-source!
Custom Rule Blocking
Navigate to "Interfaces" ➔ Select Pencil Icon ➔ "Lan Rules".
Choose "custom.rules" as the category.
We can add the same block ICMP all rule we used when setting up Suricata.
drop icmp any any -> any any (msg:"ICMP Request Blocked"; sid:2; rev:1;).
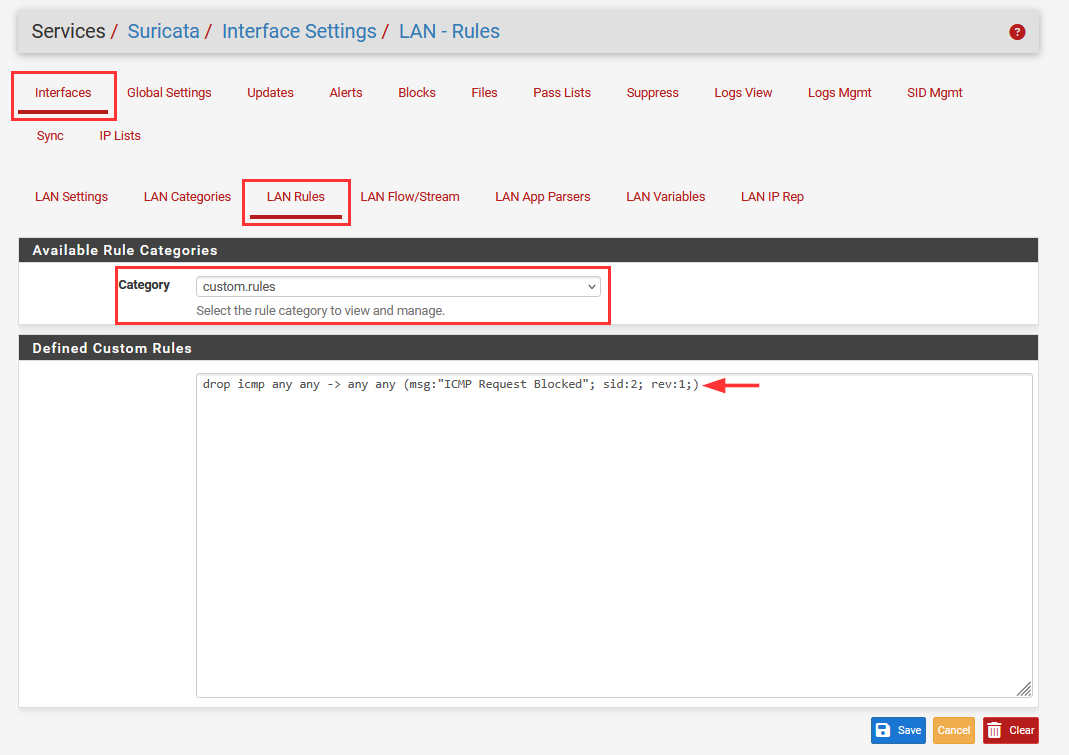
Select "Save".
Navigate to [project-x-linux-client]. Attempt to ping the [project-x-corp-svr] host.
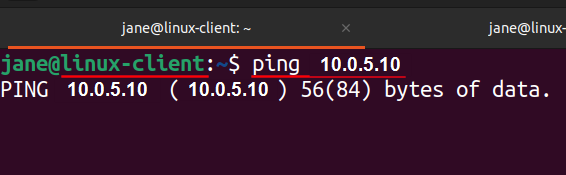
Ping requests will be blocked.
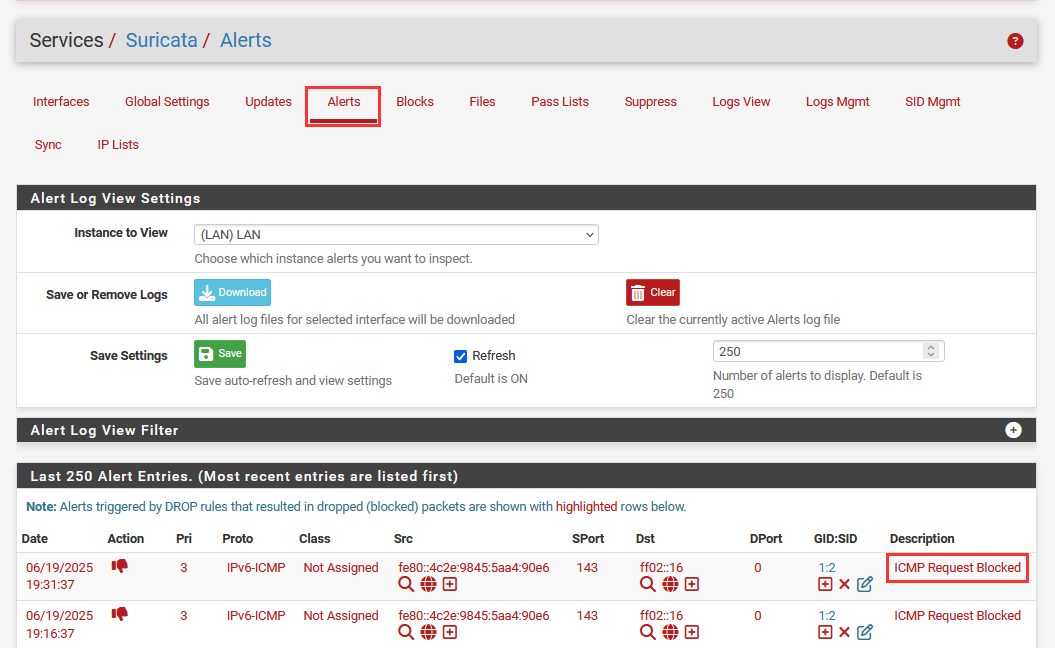
Navigate back to pfSense.
Select "Alerts".
You should see the "ICMP Request Blocked", as denoted by our custom rule.
Navigate to "Interfaces" ➔ "Lan Rules".
Choose "custom.rules" as the category.
Delete the custom rule, we have confirmed our custom rules work in addition to the default rules already preloaded.
Now we are going to add some custom rules to detect and prevent our ARP Cache Poisoning attack, our IP DoS Attack, and our FTP Attack.
👉 Testing: It's always a good idea to test the integration when setting up systems or network devices before applying additional configurations. Testing provides a stop check to ensure what we have configured so far, works. This will save time later on when a configuration does not work and we have to back track.
Network Layer Prevention with pfSuricata
Remember our attacks? ARP cache poisoning, DoS attacks on our web-svr container, and exploiting outdated network software via FTP?
It's time to put the hammer down on our attacker persona and prevent these attacks.
Suricata (pfSuricata) can monitor and prevent attacks on several network layers, including Layer 2, 4, and 7, as mentioned in the overview.
Let's write a few custom Suricata rules on each of these layers to prevent each type of attack. Suricata is quite powerful.
Layer 2 (ARP Spoofing)
👉: Make sure
[project-x-attacker]is attached to the DMZ network segment with a dynamic IP address.
ARP cache poisoning is a bit difficult to prevent, especially with the type of attack we deployed since the victim machine and the attacker machine were on the same network subnet.
Arpwatch
Arpwatch is a package that can be installed on pfSense. Arpwatch is a network monitoring tool that keeps track of Address Resolution Protocol (ARP) traffic, logging pairings of IP addresses and their corresponding MAC addresses, along with timestamps.
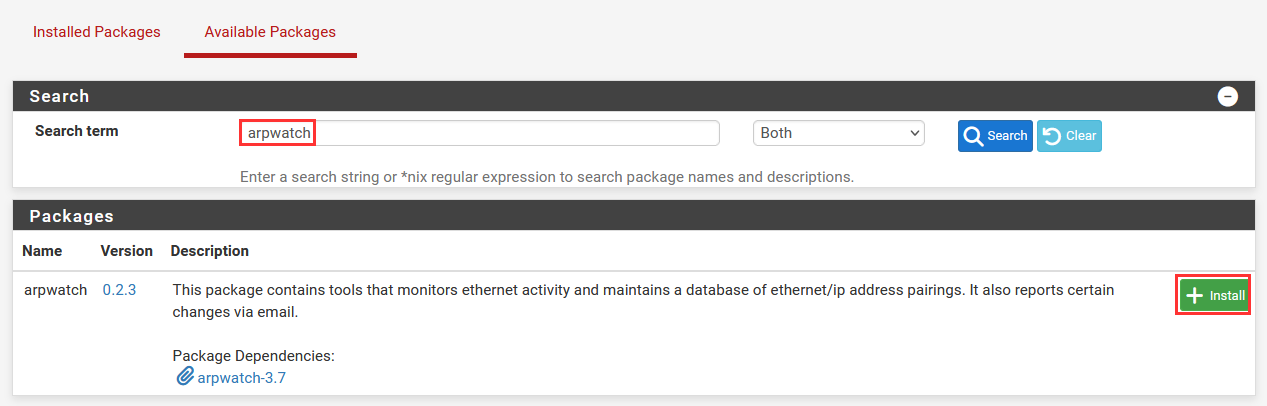
Let's download Arpwatch.
Navigate to "System" ➔ "Package Manager".
Look up "arpwatch" ➔ "+ Install" ➔ "Confirm". Wait for Arpwatch to install.
Navigate to "Services" ➔ "Arpwatch".
Here we can enable Arpwatch, select the Interface, and add a email address for when our MAC addresses change.
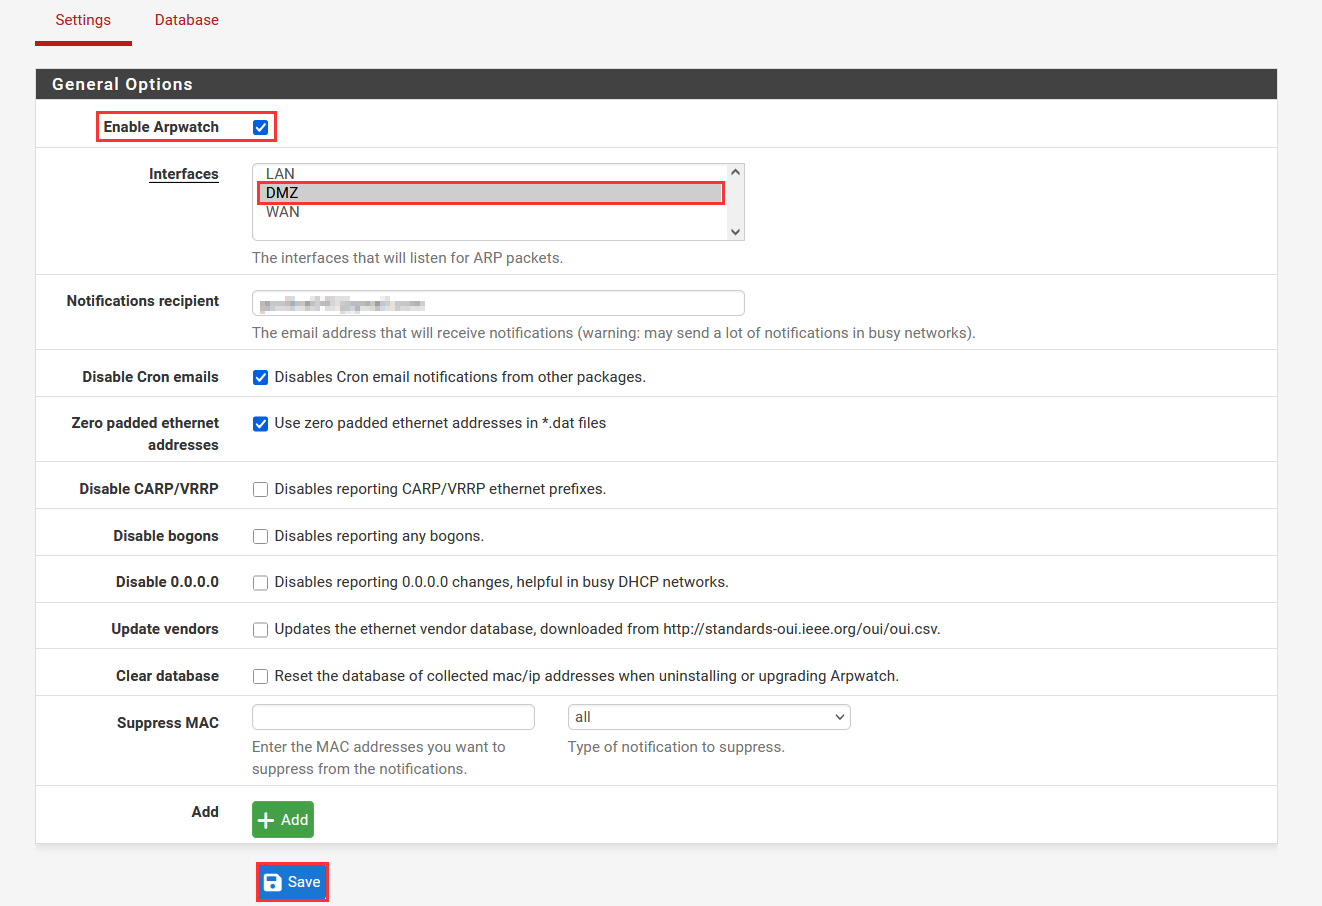
If we navigate to the "Database" tab, we will be able to see the IP to MAC address mappings.
Right now, these should be routed to the proper MAC to IP address.
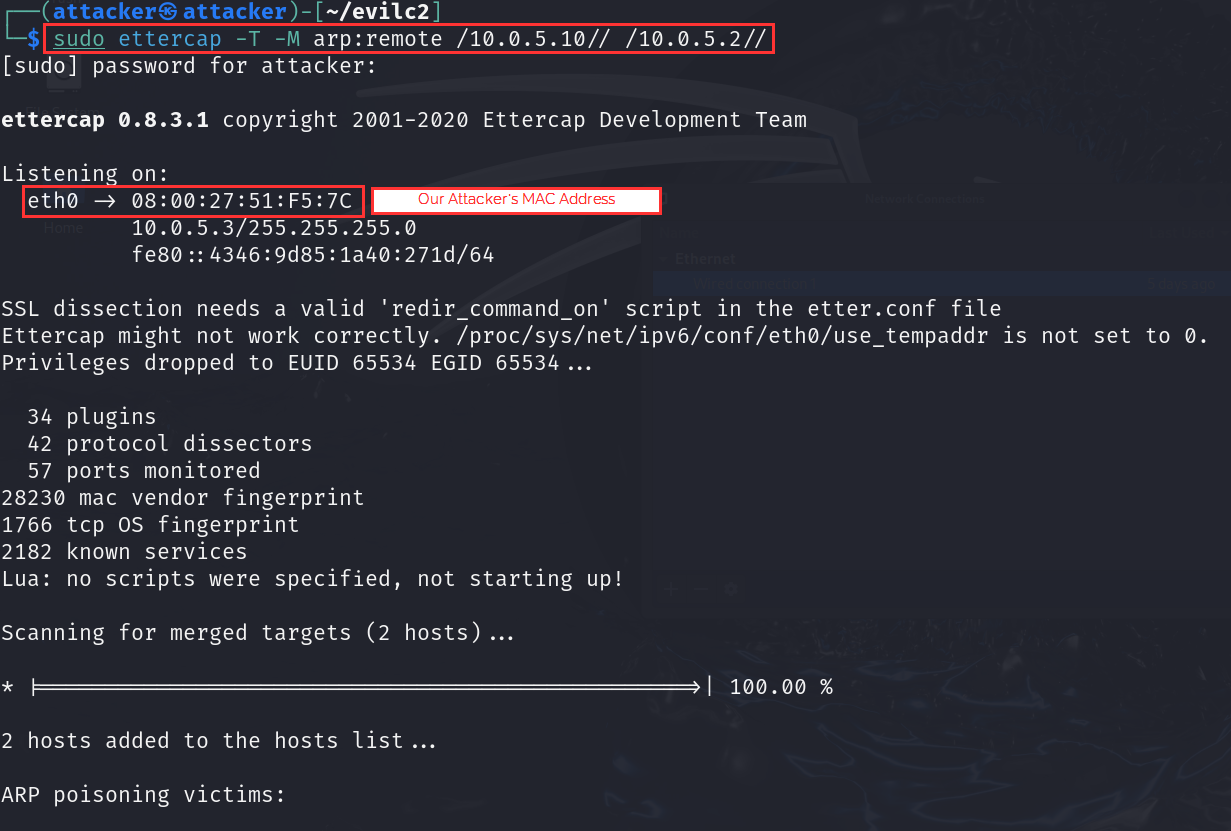
Navigate to [project-x-attacker] New Terminal.
Let's redeploy our ARP poisoning attack, this time we will use the command-line tool ettercap for quick test.
Type in the following command: sudo ettercap -T -M arp:remote /10.0.5.10// /10.0.5.2//
- Allow this to run for a couple minutes.
If we navigate back to our "Database" tab, we now should see two listings for our victim IP address of 10.0.5.10. One of the listing is mapped to our attacker MAC address.
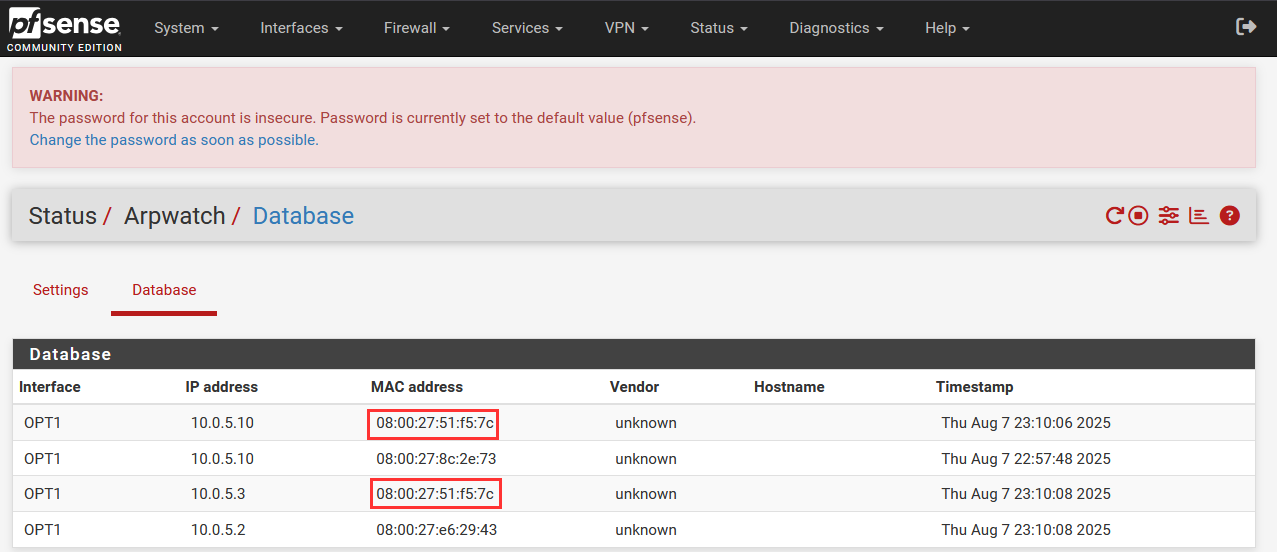
We weren't able to receive an email for this change, but this showcases the stateful tracking of MAC to IP address mappings.
If we go to [project-x-corp-svr], we should see the ARP table has our gateway mapped to our MAC address.
arp -a

pfSuricata ARP Rule
pfSuricata is not set up in between these two devices, meaning that it won't have visibility and control into preventing ARP cache poisoning.
If Suricata was placed in between, we could detect falsified ARP replies.
In terms of rule development, what can we do here?
If you can recall from the ARP cache poisoning attack, a traditional ARP poison attempts to impersonate the network gateway IP address. The target machine impersonates the gateway, so that all ARP requests and replies traverse to the attacker machine instead of the real gateway.
So one way we could prevent this is by allowlisting only the real pfSense MAC address, which hosts our network gateway IP address of 192.168.15.2.
drop ether any any -> any any (msg:"DROP: ARP spoofing - fake gateway"; \
  ether proto 0x0806; \
  content:"|00 02|"; offset:6; depth:2; \
  content:"|C0 A8 0F 02|"; offset:28; depth:4; \
  content:!"|08:00:27:66:28:19|"; offset:22; depth:6; \
  sid:1000012; rev:1;)
This rule will ensure ARP replies will be supplied to the requesting machines because the MAC to IP mapping matches the rule.
Layer 4 (IP DoS)
Next is IP DoS attack that were performed on our web-svr container using hping3.
We used the default TCP mode to flood the web server with too many requests.
pfSuricata perform network packet matching based on various parameters.
drop ip any any -> 10.0.5.10 any (msg:"DROP: IP Packets Going to corp-svr"; sid:1000003; rev:1;)
Here is the most restrictive and unpractical of rules. For any request, drop all packets to 10.0.5.10. This would be a good rule for testing purposes only. We still want our employees to navigate to the Project X portal.
drop ip any any -> 10.0.5.10 any (msg:"DROP: DoS - Too many packets from attacker"; threshold:type both, track by_src, count 100, seconds 1; sid:1000006; rev:1;)
Here is the most efficient rule. We perform pattern matching by tracking how many IP packets are sent over a 1 second interval. If the count exceeds 100, then the network traffic is blocked.
Navigating back to our [project-x-attacker] machine, we can supply hping3 again.
If we supply the following:
sudo hping3 -i u10 -S -p 80 -c 250000 10.0.5.10

You will notice after hping3 has completed that our DoS attack was mitigated.
Suricata can do some perform some awesome dynamic rule matching.

Layer 7 (FTP Attack)
Finally is our Layer 7 prevention.
For this type of rule, we are going to use Suricata as a firewall.
Check out the rule below.
drop tcp ![192.168.15.5] any -> 10.0.5.10 21 (msg:"DROP: Unauthorized FTP access attempt"; sid:1000007; rev:1;)
Here we are saying drop any packets or requests that does not match the IP address of 192.168.15.5 on port 21 to 10.0.5.10. What we are allowing here is only one workstation [project-x-linux-client]. We don't need every host or device to reach out to our FTP server, so we can restrict with blocking all requests except the IPs we want.
If we try to ftp into 10.0.5.10 from the attacker machine...

The request should be blocked.

This would be a mitigating control against our outdated vsftp server. Since access is only restricted to one host, only that host (and the FTP server) would be "vulnerable" to the outdated software. The exploit could still be dropped and the attacker would be able to get into the FTP server if they got access to the allowed hosts.
Therefore, we would still want to update. This would be a "first" line defense.
Success! We have successfully provisioned Layer 2, 4, and 7 network monitoring and prevention.