Active Directory Security - Intro to GPO
Prerequisites
- VirtualBox or VMware Workstation Pro Installed.
- Virtual Machine
[project-x-win-client]is turned on and configured. - Virtual Machine
[project-x-dc]is turned on and configured. - Virtual Machine
[project-x-corp-fw]is turned on. - Optional for Testing - Virtual Machine
[project-x-attacker]is turned on.
Network Topology

Overview
In this guide, we are going to be performing a lot of changes to [project-x-dc] and our general Active Directory environment.
Changes include:
- Change IP and network information for
[project-x-dc]since we have deployed a new network topology. - Add an Organizational Unit (OU) to logically combine our workstations and users for centralized management.
- Change the DNS settings for
[project-x-win-client]. - Create five custom GPOs.
- Apply GPOs to our OU.
A Word on DNS: We have lots of DNS now. In E101, we configured our DNS management through our Domain Controller. Workstations connected to Active Directory routed through the DC first. We have changed this. At this point of NA101, our
[project-x-fw]VM, pfSense, is effectively serving as a router. We have the router configured to send DNS information over to any host residing within ourCORP-LANnetwork segment. Active Directory uses DNS to manage and communicate with its computers. We are going to set the workstations client to use the[project-x-dc]. Our DNS capabilities will still be managed by our pfSense router. However, our workstation clients will first communicate with the Domain Controller. And remember, we also have ourdnscontainer... This is our internal DNS server. Don't worry about that one.
Active Directory Group Policy Objects (GPO) Overview
Group Policy Objects or GPOs, are configurations of settings used to control what can occur on the Windows machine. GPOs are deployed on enterprise networks to help network administrators gain control over the users' and computers' working environment in Active Directory.
GPOs are the settings that can be applied to its target group.
We could restrict access to Windows applications such as PowerShell, block access to certain directories, such as the %TEMP% directory, or enforce password security requirements for new, onboarding employees.
Types of GPO
There are a few types of GPO.
Local Group Policy Objects: These settings will only be applied to the local computer and all user accounts that can log into this local computer. Policy settings will be enforced on this local computer only.
Non-local Group Policy Objects: GPOs are applied to multiple Active Directory objects, these could be a group of computers, a group of users, or both. Policy settings will be enforced when these objects are linked to a site, domain, or organizational unit (OU).
Starter Group Policy Objects: These are non-local GPOs that provide templates for creating custom GPO for administrators. These help admins build a group of settings that are pre-configured. These promote consistency between custom GPOs. So that when it comes to creating new custom GPOs, it will inherit the default template.
Organizational Unit (OUs)
Organizational Units (OUs) are logical containers or groups used to organize and manage objects in Active Directory. During Enterprise 101, we created a few objects. Computer objects [project-x-windows-client] and [project-x-linux-client] were added. And a few accounts, John Doe and Jane Doe.
OUs allow us to group these objects types (computer, users, groups) into one logical unit, where we can apply policies (GPOs) and centralized management in one place.
We will create an OU, ProjectX Workstations, which will allow us to apply GPO policies to our workstation hosts.
GPO Profiles
We are going to set 5 Group Policy Objects, each of these accomplishes a different purpose to help lock down and minimize the capabilities within our environment.
Account Lockout Policy
Lock account after 3–5 failed login attempts.

Reset lockout counter after 15 minutes.

Duration of lockout: 15–30 minutes.
The user should know their password. Sometimes a typo here or there may occur, so giving three to five attempts adds a buffer for when this happens.
Remember we we cracked the hash for [email protected]? The password was smile.
Let's say the attacker didn't crack the hash. Instead of getting hashes, they had a large list of common passwords. If they got access (physical or most likely remote access) to [project-x-win-client], they would have to supply each password as a guess. Locking them out after 15 - 30 minutes slows the attacker.
We can enable logging on our workstations, ingest Windows Logon attempt logs, which would allow our SOC analysts to see something is going on, allowing them to take the necessary actions to lock down and isolate the machine in time.
UAC (User Account Control)
Elevation prompts for standard users.

Secure desktop prompt enabled
Our employees should not need general Administrator access for their everyday activities. We can use the User Account Control (UAC) to prompt users to enter a local or domain Administration account for activities that do require administrator access.
This helps isolate what a normal user account can do. Never give full administrative rights to users, they most likely aren't needed.
PowerShell Logging
Module logging.

Script block logging.

Transcription logging.
Remember our C2 exercise, where we dropped our victim.py file onto our victim machine? We used our terminal to accomplish this. PowerShell and the commandline are used very often to execute malicious payloads, achieve persistence, and exfiltrate data.
PowerShell logging can help us gain visibility into how are employees are using PowerShell, while monitoring for malicious payloads, scripts, and exectuables. PowerShell should always having logging enabled.
Limit RDP
Allow RDP only from specific IPs/subnets.

Enable NLA (Network Level Authentication).

Disable clipboard and drive redirection in RDP.
During Enterprise 101, we used the Remote Desktop Protocol (RDP) to log into [project-x-win-client], where we eventually moved laterally into additional machines.
Instead of giving allow access to every machine, we can limit who can log into RDP through subnets.
Let's say John has RDP enabled on his corporate machine because he wants to log in while at home, but he has a desktop in his office. When given the authorization to do this, we can get John's home IP address and allow only that machine to RDP into his corporate machine.
Software Restriction Policies (SRP) or AppLocker
Block EXEs from %AppData%, %TEMP%, USB drives.
A common technique used by malware is to drop staging files or payloads into temporary directories. This helps achieve defense evasion for the attackers.
Legitimate applications may also use these directories when downloading their applications. In this GPO, we could supply of allow listed applications that can drop their exectuables into these file locations and block everything else.
Change Network IP Information
Since we have changed our network topology, introducing pfSense as our main interface for routing and firewalls, we will need to add our [project-x-dc] VM into the CORP-LAN segment with a routable IP. We also need to turn off DHCP capabilities, features we enabled during Enterprise 101. DHCP leases to the client workstations are now being leased and managed from pfSense.
We are going to set a static IP address, similar to what we did for our [project-x-sec-box] machine. Servers typically have static IP addresses set, so let's set one for our Domain Controller.
Power on [project-x-dc].
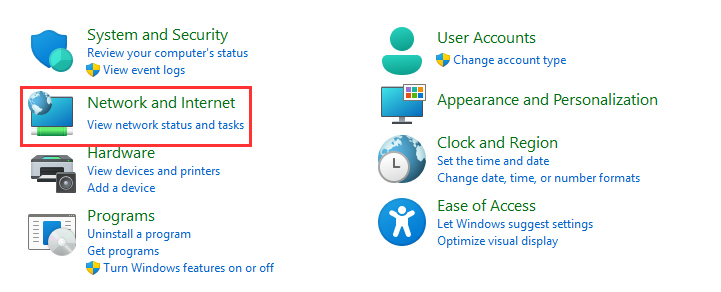
Navigate to the search bar "Control Panel".

Go to "Network and Internet"
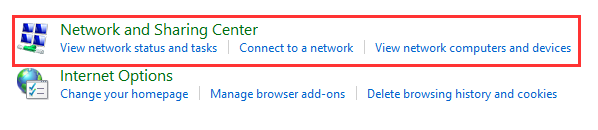
"Network and Sharing Center".
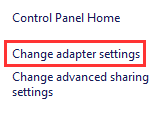
"Change adapter settings".
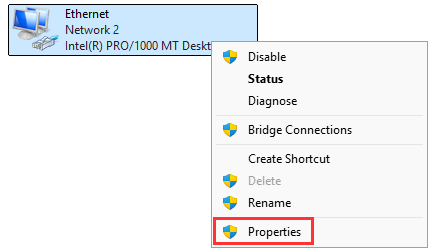
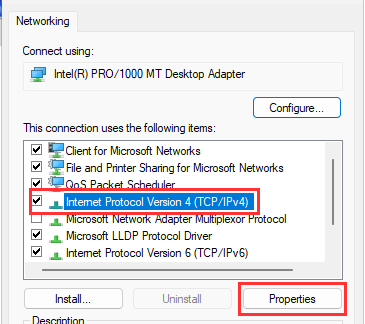
Right-click Ethernet ➔ "Properties".
Choose "Internet Protocol Version 4" ➔ "Properties"
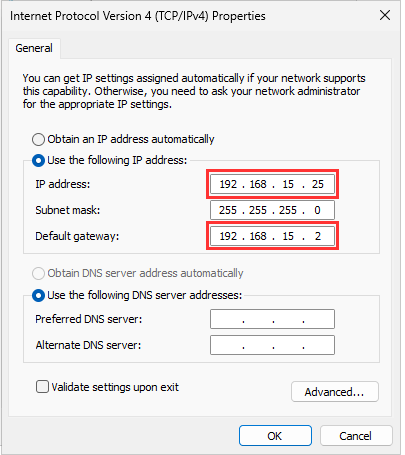
Change the following:
-
IP Address: 192.168.15.25
-
Default Gateway: 192.168.15.2
"Ok".
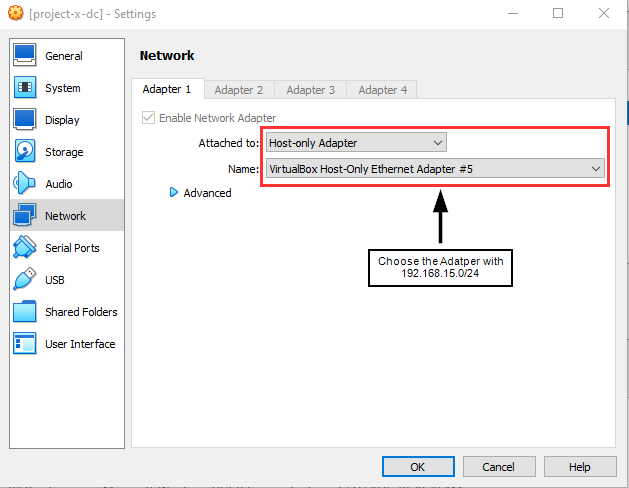
Navigate to VirtualBox Menu "Machine" ➔ "Settings" ➔ "Network".
Change to the "Host-only Adapter" and the Ethernet Adapter ## with the 192.168.15.0/24 network.
Navigate back to a new command prompt:
ping 192.168.15.2
You should be able to reach the LAN's default gateway.
Remove DHCP Service
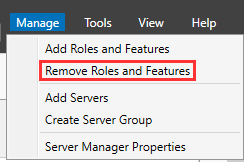
Navigate to "Manage" ➔ "Remove Roles and Features".
Select "Next" until reaching "Server Roles".
Choose "DHCP Server" ➔ "Remove".
A box will appear, select "Remove Features".
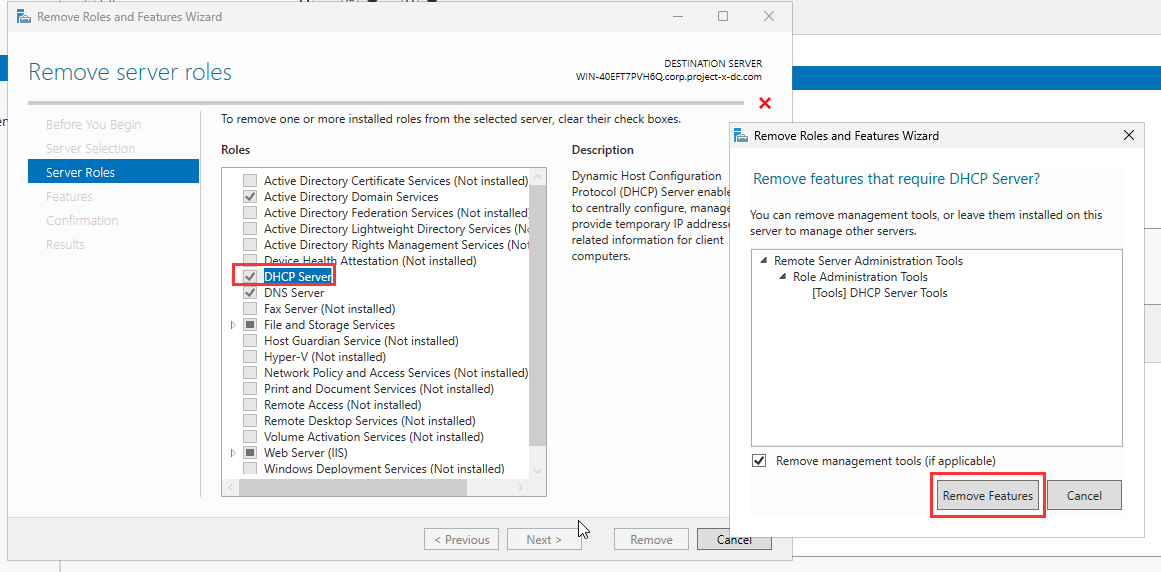
You will now no longer see DHCP as a service after you refresh Server Manager.
Create Workstations OU
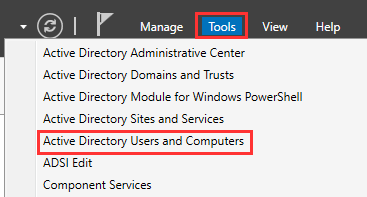
Navigate to "Tools" ➔ "Active Directory Users and Computers".
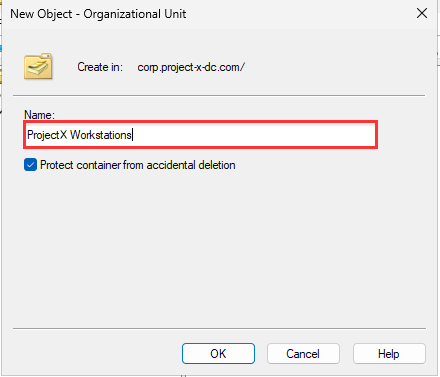
Right-click corp.project-x-dc.com "New" "Organizational Unit".
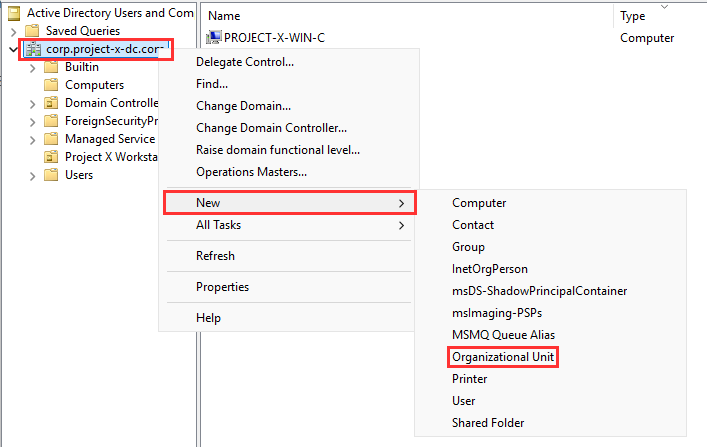
Name the OU "Project X Workstations" ➔ "OK".
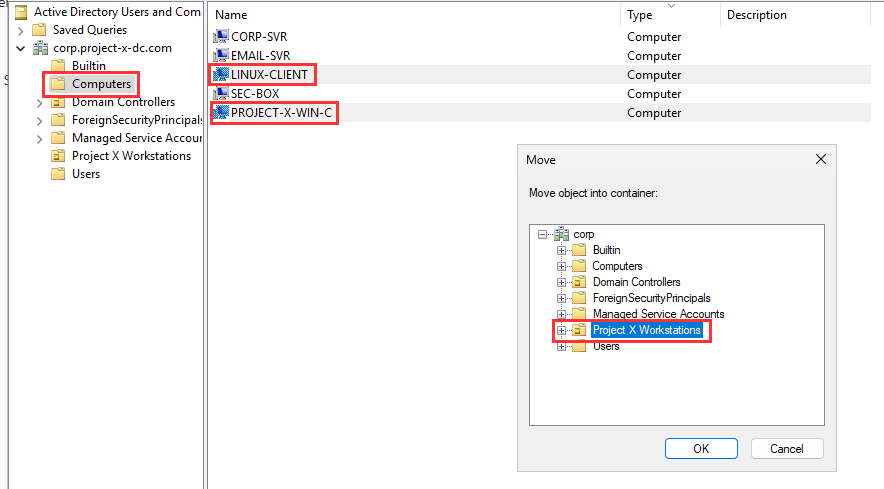
Navigate to the "Computers" folder, select "LINUX-CLIENT" and "PROJECT-X-WIN-C" Right-click ➔ "Move" ➔ Select "Project X Workstations".
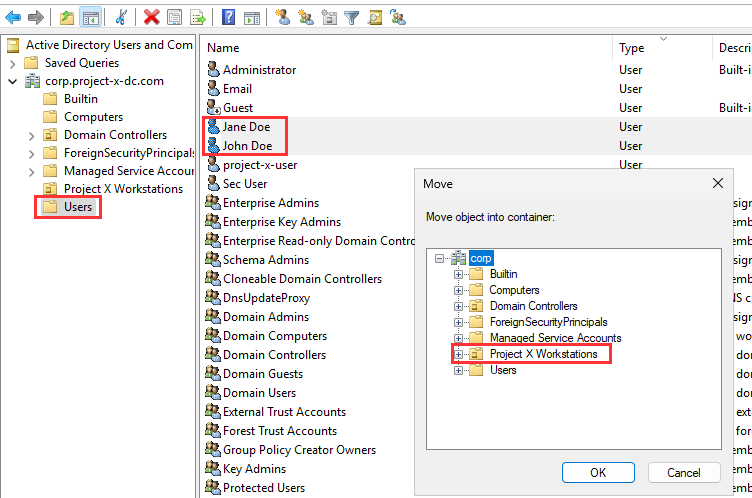
Navigate to the "Users" folder, select "Jane Doe" and "John Doe" Right-click ➔ "Move" Select ➔ "Project X Workstations".
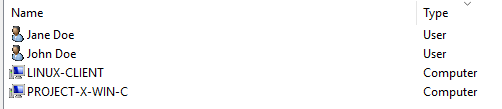
Now you should have all four objects inside the Project X Workstations OU.
[project-x-win-client] Settings Change
DNS
Let's set [project-x-win-client]'s DNS to our Active Directory Domain Controller's new IP address.
Power on the VM.
Navigate to the search bar "Control Panel".
Go to "Network and Internet"
"Network and Sharing Center".
"Change adapter settings".
Right-click Ethernet ➔ "Properties".
Choose "Internet Protocol Version 4" ➔ "Properties"
We will leave the dynamic IP address setting checked.
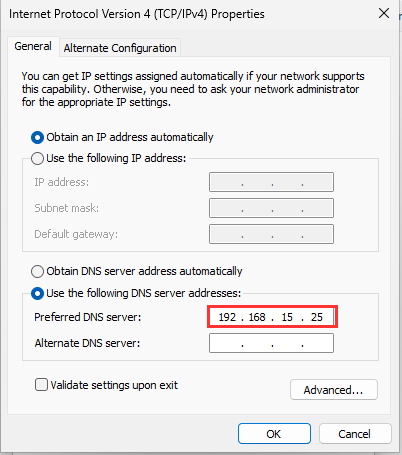
Add the following IP address under the DNS settings
- 192.168.15.25
Add Folder
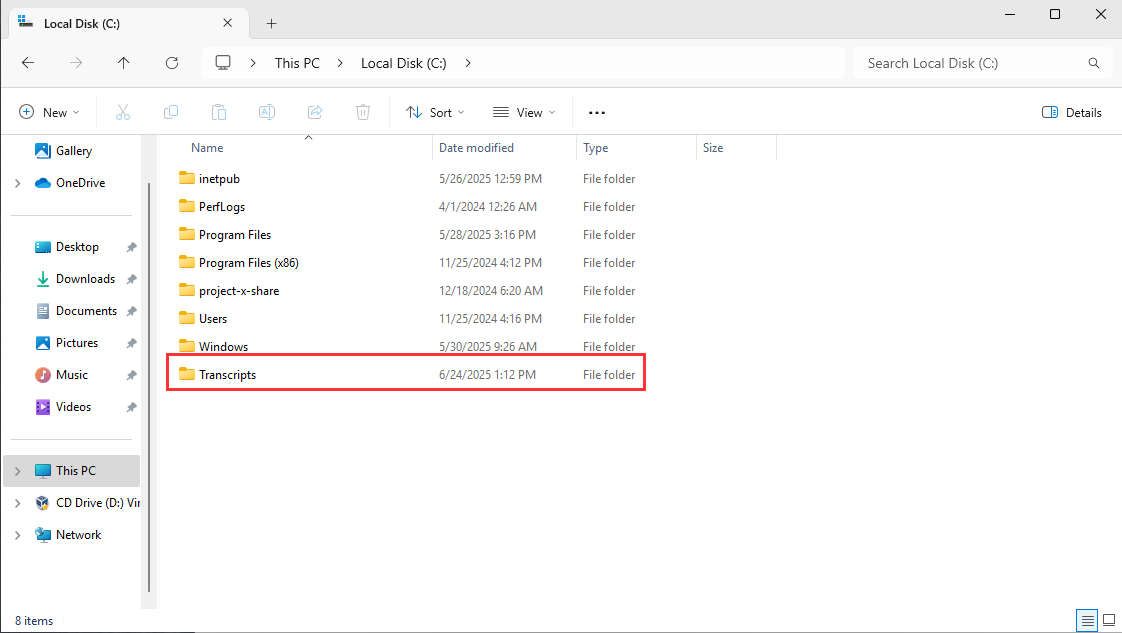
Open a new "File Explorer" Window.
"This PC".
"Local Disk (C:)".
Right-click "New Folder" ➔ Title Folder "Transcripts".
Note
For the first GPO, we will showcase step-by-step screenshots to familiarize yourself with the UI navigation. The remaining four GPO will not have screenshots. All five follow a similar navigation workflow.
Testing GPO.
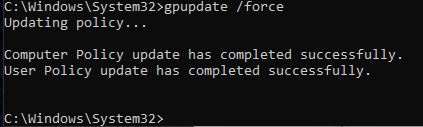
Whenever we test the GPO, we must force an update with gpforce /update on a Windows command line.
GPO: Set Account Lockout Policy
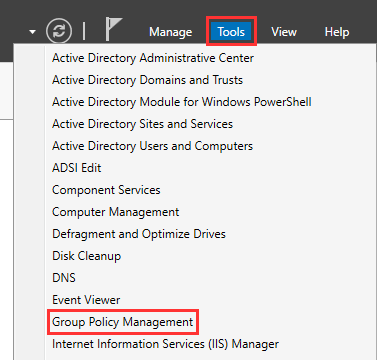
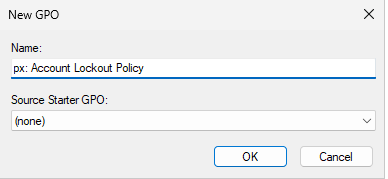
Open Group Policy Management Console under "Tools" ➔ "Group Policy Management."
Right-click the ProjectX Workstations OU ➔ Create a GPO ➔ Name it: px:Security - Account Lockout Policy

Right-click the GPO ➔ Edit

GPO Location: Computer Configuration > Policies > Windows Settings > Security Settings > Account Policies > Account Lockout Policy
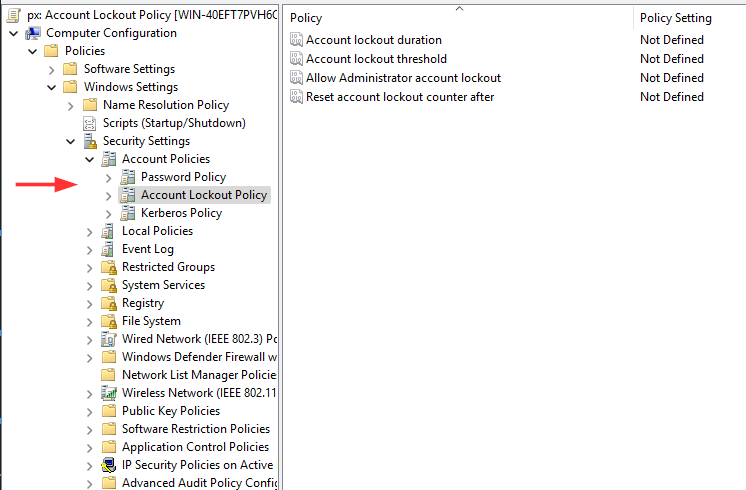
Double click each of the individual setting to open the properties page.
Navigate to:
Account lockout threshold: Set to 5 attempts

Account lockout duration: Set to 15 minutes

Reset account lockout counter after: Set to 15 minutes

Close GPO Editor.
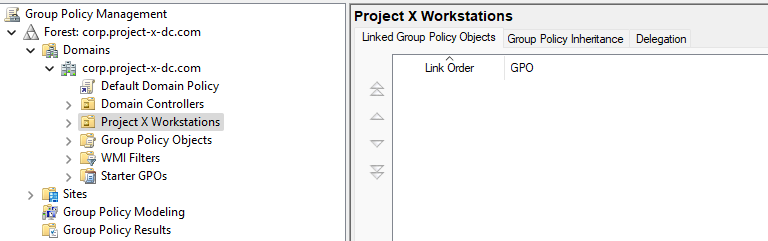
Navigate back to the Group Policy Management Console ➔ Select "ProjectX Workstations".
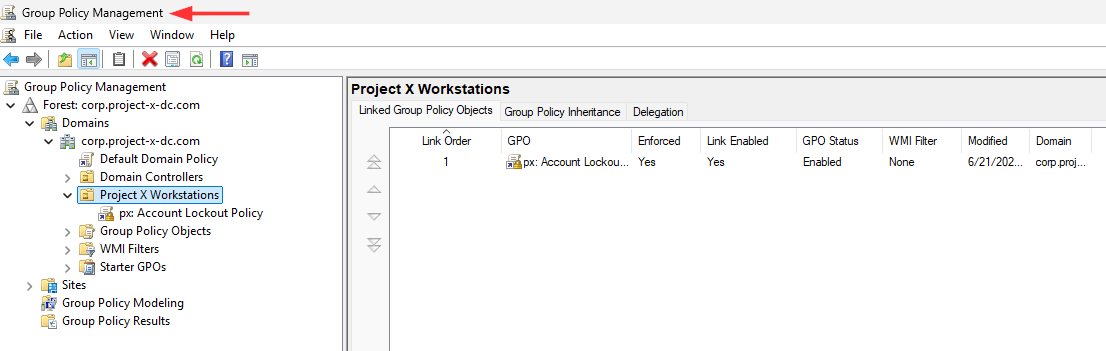
Right-click the individual tab ➔ "Enforced".
The px: Account Lockout Policy GPO has now been linked to the OU.
Testing
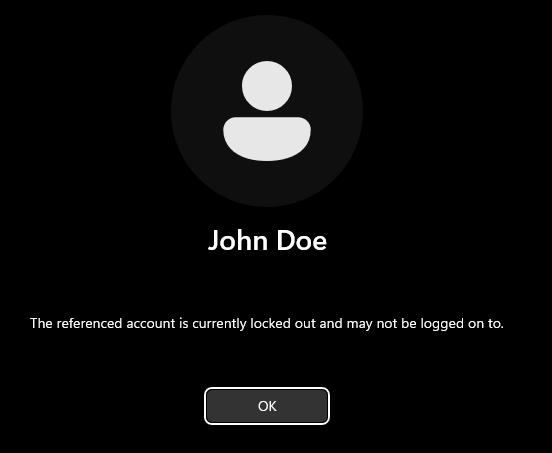
If we log out of our [project-x-win-client] machine and supply 5 random password attempts, we should now be locked out for 15 minutes.
GPO: User Access Control (UAC)
Create/Edit a GPO ➔ Name it: px:User Access Control
GPO Location: Computer Configuration > Policies > Windows Settings > Security Settings > Local Policies > Security Options
Navigate to:
User Account Control: Behavior of the elevation prompt for standard users ➔ Prompt for credentials on the secure desktop

User Account Control: Switch to the secure desktop when prompting for elevation ➔ Enabled

(Optional but helpful) UAC: Run all admins in Admin Approval Mode ➔ Enabled
GPO: PowerShell Logging
Create/Edit a GPO ➔ Name it: px:User PowerShell Logging
GPO Location: Computer Configuration > Policies > Administrative Templates > Windows Components > Windows PowerShell
Navigate to:
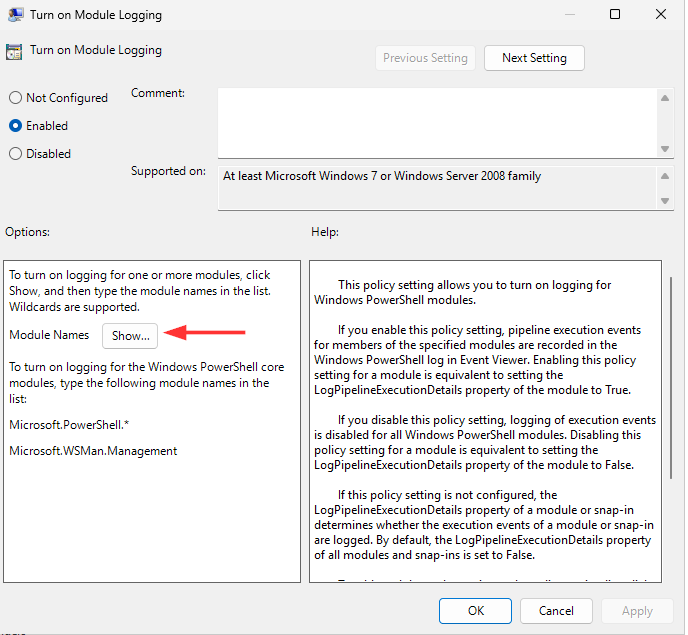
Turn on Module Logging > Enabled
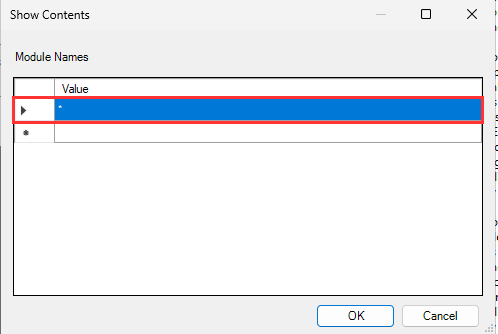
Click Show... and enter * to log all modules
Turn on PowerShell Script Block Logging > Enabled
Turn on PowerShell Transcription > Enabled
Set output directory: C:\Transcripts

Ensure the
C:\Transcriptsfolder exists and has appropriate permissions on client machines.
GPO: Limit RDP Access
Allow only specific IPs via Windows Firewall (on the client):
Create/Edit a GPO ➔ Name it: px:Limit RDP
GPO Location: Computer Configuration > Policies > Windows Settings > Security Settings > Windows Defender Firewall with Advanced Security
Navigate to:
Inbound Rules > New Rule > Type: Predefined > Remote Desktop

Click Next, leave all checked.

Choose "Allow the connection if it is secure".

Click Next. Check "Authorized users" Add.. [email protected]

Click Next.

Check "Authorized users" Add..  PROJECT-X-WIN-C. (or windows client name)

Finish.
GPO: Software Restriction Policies (SRP) or AppLocker
Create/Edit a GPO ➔ Name it: px:Limit %TEMP%
GPO Location: Computer Configuration > Policies > Windows Settings > Security Settings > Software Restriction Policies
Navigate to:
Right-click Software Restriction Policies > New Software Restriction Policies

CLick into "Security Levels" Folder.

    Double-click Disallowed, "Set as Default"

    Right-click Additional Rules "New Path Rule".

Path Rules to Add: %TEMP%\*.exe Disallowed
GPO Policies
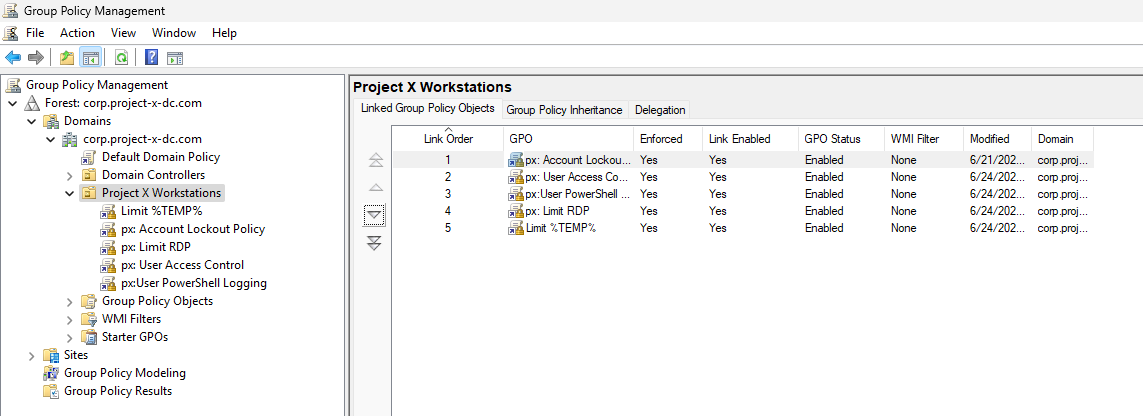
We will now have five GPO policies applied. Each policy provides a set of checks and restrictions to help harden our corporate attack surface.