Setup Postfix Mail Transfer Agent (MTA)
Prerequisites
- Virtualbox installed.
- Virtual Machine with Ubuntu 22.04 ISO Server has been provisioned, configured, and fully setup.
- Windows Server 2025 with Active Directory Domain Services (ADDS) configured.
Network Topology

Postfix Overview
Postfix is a widely used open-source mail transfer agent (MTA) that routes and delivers email messages. Postfix is commonly used on Unix-like systems, including Linux distributions, as a server-side solution for managing email.
Postfix acts as an intermediary in the email delivery process. It receives email from a user
or an application, processes it, and delivers it to the intended recipient. It supports various
protocols and standards such as Simple Mail Transfer Protocol (SMTP).
It is estimated that 25% of public email servers run Postfix.
Postfix can be used in various scenarios, including as an SMTP server, mail forwarder, spam
f
ilter, relay server (SMTP Relay), and more.
We will be configuring Postfix as a very simple SMTP server to send and deliver email to our
simulated workstations (…-win-client & …linux-client).
Security Implications
Running an email server introduces several security considerations:
Common Threats
- Open Relay Exploitation: If improperly configured, your server can be used by spammers to send large volumes of email, damaging your IP reputation.
- Brute Force Attacks: Attackers often attempt to compromise accounts via brute force or credential stuffing. Leveraging the reputation of the email server, they can send large volumes of email.
- Spam and Phishing: Attackers may spoof your domain or use your server for phishing campaigns.
- Data Breaches: Poorly secured servers can expose sensitive emails, proprietary data, and critical business information.
- Malware Delivery: Your server could inadvertently become a vehicle for spreading malware if attachments are not scanned.
Setup Postfix
This guide is inspired by DigitalOcean’s How to Install and Configure Postfix, feel free to read more about setup and configuration options.
- Perform an update on local apt package cache:
Install the postfix package, passing the environmental variable allows the installation wizard to prompt for some additional options.
The installation process will raise several interactive prompts. Use the following settings below:
- General type of mail configuration?: Internet Site.
- System mail name: email-svr.
- Root and postmaster mail recipient: email-svr
- Other destinations to accept mail for: Default settings.
- Force synchronous updates on mail queue: No.
- Local Networks: Default.
- Mailbox size limit: 0 (disables any size restriction).
- Local address extension character: +.
- Internet protocols to use: All.
When prompted to restart services, accept the defaults, choose “OK”.
- Many of Postfix’s configuration settings are defined in /etc/postfix/main.cf. Postfix provides the postconf command to query and set configuration settings for this file.
Set the location for the Ubuntu user’s mailbox.
Set the location of the virtual_alias_maps table, which maps arbitrary email accounts to Linux system accounts.
Next, create the virtual file, then we can begin mapping email accounts to user accounts to Linux system.
Enter any email address we would like accept:
[email protected] email-svr
Here we are routing any email that comes from the email-svr address to local email-svr account.
Save and close with CTRL+X, Y, then ENTER.
Apply the mapping:
Allow connections to the service Postfix with UFW:
Postfix is configured and ready to accept external connections. We need to make a few changes to Ubuntu server’s set up before sending email.
- To interact with mail being delivered, we will use the s-nail package. s-nail will look for a variable called MAIL to find mail for your user. Let’s ensure the MAIL variable is set regardless of how the account is accessed:
Adjust a few settings in the /etc/s-nail.rc at the bottom of the file:
Save and close the file.
- Change the hostname to smtp.corp.project-x-dc.com in /etc/hostname.
Delete all contents in the file, then add:
Save and close with CTRL+X, Y, then ENTER.
Change IP address to a static IP address. Create a new file with a priority of 01 (highest priority).
Add the following statements (note the white spacing and indentation).
network:
     ethernets:
         enp0s3:
             dhcp4: false
             addresses: - 10.0.0.8/24
             gateway4: 10.0.0.1
             nameservers:
             addresses: - 10.0.0.5 - 8.8.8.8
version: 2
Save and close with CTRL+X, Y, then ENTER.
Apply the changes with (you may see some errors related to the outdated gateway4 statement, this is okay):
Reboot the machine with:
- Navigate to the /postfix/main.cf configuration file:
Add the following (highlighted):
🛠️ Troubleshooting Tips
- Make sure the spacing is correct within
main.cffile.
- Go to [project-x-dc] domain controller.
Navigate to Tools ➔ “DNS”.
Go to “Forward Lookup Zones” ➔ Right-click “corp.project-x-dc.com” ➔ “New Host”
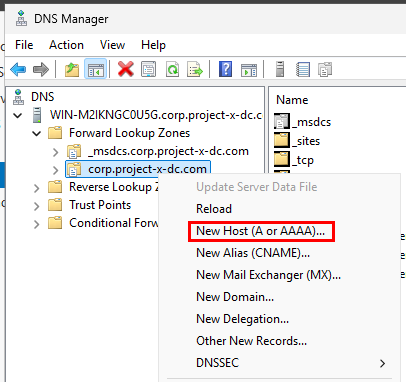
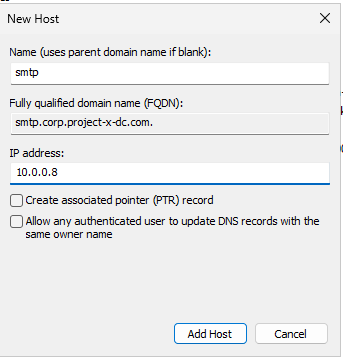
Add the following configuration. “Add Host”.
- Go to /home/email-svr and create a new empty directory called Maildir.
Go back to [project-x-email-svr], Send a test email.
You may get a response such as Can't canonicalize "/home/email-svr /Maildir". This is okay.
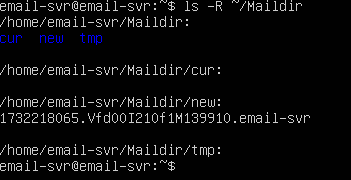
Make sure the directory was created by looking at the ~/Maildir directory:
A new directory structure will have been created (cur, new, tmp).
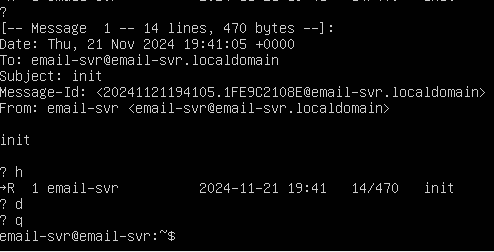
- Open the client with s-nail command.
You should see an inbox with the init message.

Get back to the message list with:
Delete the message:
Get back to the terminal:
Let’s test whether s-nail can send email messages. Let’s first create a test message in a test_message file.
Save and close the file. We can then use the cat command, followed by s-nail process to send the file:
cat ~/test_message | s-nail -s 'Test email subject line' -r
[email protected] email-svr@email-svr
The -s option supplies the Email Subject. The -r allows you to modify the “from” field.

Navigate to the inbox with s-nail.
View your sent messages:
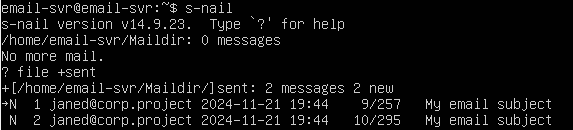
Success! You can now send and receive mail on email-svr.