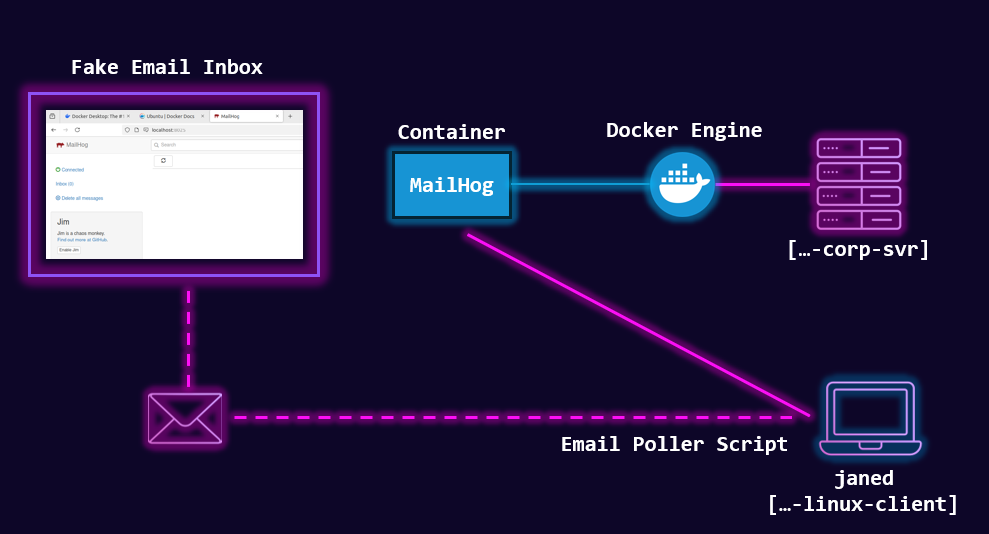
Email Server - MailHog
Prerequisites
- VirtualBox or VMware Workstation Pro installed.
[project-x-corp-svr]has been configured.- Docker has been installed.
- Windows Server 2025 with Active Directory Domain Services (ADDS) configured and turned on.
Network Topology
Note
In previous iterations of Enterprise 101, we used a dedicated Ubuntu Linux 22.04 server with an email service called Postfix installed. Postfix is a great, versatile tool. It introduced a few issues while our initial set of students were going through the exercises. We decided to rip and replace Postfix with Mailhog, which provides a UI and simulates an "email inbox".
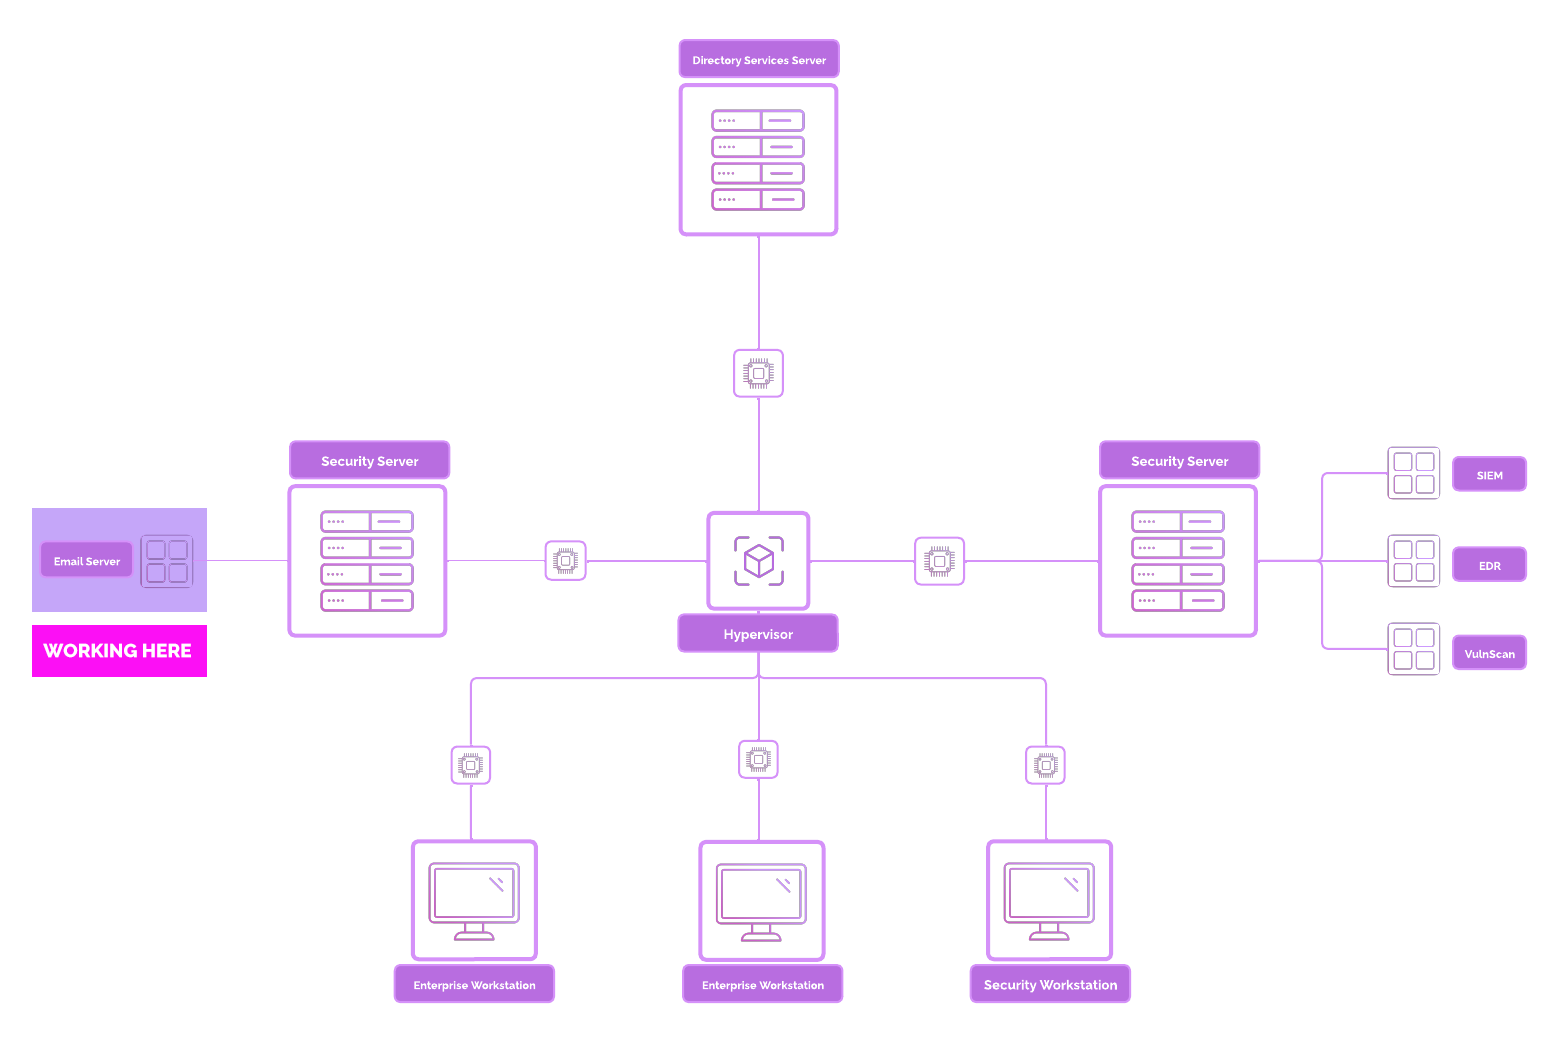
CORP-SVR: Email Server
The first service we will run on [project-x-corp-svr] will be an email server.
An email server is a system designed to send, receive, store, and manage email communication for users. It uses protocols such as:
- SMTP (Simple Mail Transfer Protocol) for sending emails
- IMAP (Internet Message Access Protocol) or POP3 (Post Office Protocol) for receiving and managing email messages
We will configure MailHog for sending and routing emails to our workstation fleet.
Email servers are less common today due to the rise of managed services like Gmail, Microsoft 365, and ProtonMail and there is good reason... Running your own email server is quite difficult todo now-a-days. You have to build a good reputation, fend off spam, and be recognized by other email servers.
Setting up an email server provides insight into email security and self-hosted infrastructure. We could use a few throw away email accounts or temporary email services, but we are homelabbers, so we lab.
In-depth Topology
Here is what we will be setting up.
MailHog Overview
MailHog is a lightweight email testing tool that acts as a fake SMTP server. It captures all outgoing emails sent by applications, without delivering them to real inboxes. You can inspect emails via a web interface or API.
This makes it ideal for:
-
Simulating corporate email infrastructure.
-
Testing phishing or email-based attacks.
-
Debugging apps that send emails.
-
Avoiding spam filters or external mail services.
We will be using MailHog to simulate an business email server, which will be used as part of our phishing exercise in the Cyber Attack module.
MailHog Specifics
- SMTP Server: Listens on port
1025by default- Apps can send mail via
localhost:1025
- Apps can send mail via
- Web UI: Accessible on port
8025- View messages, headers, attachments
- API: For scripting/test automation
You can use curl or browsers to interact with the UI or API.
Configure MailHog
MailHog provides an official docker image ready to use from Docker Hub. This makes it easy for us to pull the image and run Mailhog through a Docker container. This will be our first of many Docker containers we will run, each dedicated to serve a purpose.
Using Docker Compose, which is recommended for repeatability, we can create a new docker-compose.yml file and create the mailhog service.
Navigate to the open terminal. Go to the /home folder with cd /home.
Create a new directory and navigate inside called mailhog: sudo mkdir mailhog && cd.
Create a new Docker Compose file with: sudo nano docker-compose.yml.
Paste in the following code snippet.
version: "3"
services:
  mailhog:
    image: mailhog/mailhog
    container_name: mailhog
    ports:
      - "1025:1025"
      - "8025:8025"
Exit Nano with CTRL + X, then Y key, Enter Key.
We can now run this with sudo docker compose up -d.
- -d: Runs in detached mode.
Add the following URL into a new Firefox Browser Session: http://localhost:8025
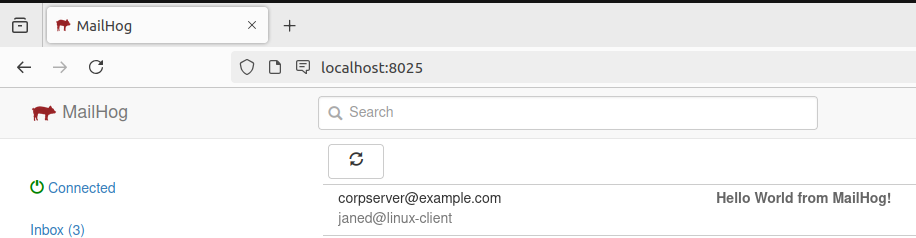
We should now see the MailHog UI.
Let's create a test email.
Navigate back to the terminal under the /home directory. Create a new file titled sudo nano test_message.py.
This email message uses Python's smtplib and email.message libraries to construct a test email. smtplib allows us to send the email message to our localhost, which is the Docker container running MailHog.
Paste in the following code for this test message:
import smtplib
from email.message import EmailMessage

msg = EmailMessage()
msg.set_content("This is a test email from Ubuntu VM.")
msg["Subject"] = "Hello World from MailHog!"
msg["From"] = "[email protected]"
msg["To"] = "[email protected]"

with smtplib.SMTP("localhost", 1025) as server:
    server.send_message(msg)
Exit Nano with CTRL + X, then Y key, Enter Key.
Make sure this python script has executable permissions with: sudo chmod +x test_message.py.
Run this python script with: sudo python3 test_message.py.
We should now see a message in the UI, success!
Create An Email Poller Script
Now that we have this basic Mailhog SMTP server setup, let's simulate an email polling service.
This will allow us to get new email message notifications inside the [project-x-linux-client] host. This will be used as part of our Cyber Attack exercise later in the course.
Turn on the [projext-x-linux-client] VM if you have not yet started it.
Navigate to a new terminal session under janed@linux-client.
Let's download a few packages. curl will be used to fetch our email server URL. jq is used to filter JSON strings.
- sudo apt install curl jq
Go to the home directory: cd /home.
Create a new Bash script with Nano: sudo nano email_poller.sh.
Add the following Bash script.
#!/bin/bash

MAILHOG_IP="10.0.0.8"
TO_EMAIL="janed"
POLL_INTERVAL=30  # seconds

echo "📡 Janed's Mail Watcher started... polling every $POLL_INTERVAL seconds"
echo "🔎 Watching for new mail sent to: $TO_EMAIL@"

# Keep track of seen message IDs
SEEN_IDS_FILE="/tmp/mailhog_seen_ids_janed.txt"
touch "$SEEN_IDS_FILE"

while true; do
  # Fetch current message list
  curl -s http://$MAILHOG_IP:8025/api/v2/messages | jq -c '.items[]' | while read -r msg; do
    TO=$(echo "$msg" | jq -r '.To[].Mailbox')
    ID=$(echo "$msg" | jq -r '.ID')

    if [[ "$TO" == "$TO_EMAIL" && ! $(grep -Fx "$ID" "$SEEN_IDS_FILE") ]]; then
      SUBJECT=$(echo "$msg" | jq -r '.Content.Headers.Subject[0]')
      BODY=$(echo "$msg" | jq -r '.Content.Body')

      echo -e "\n📬 New Email Received!"
      echo "Subject: $SUBJECT"
      echo "From: $(echo "$msg" | jq -r '.Content.Headers.From[0]')"
      echo "Date: $(echo "$msg" | jq -r '.Created')"
      echo -e "Message:\n$BODY"
      echo "-----------------------------------"

      echo "$ID" >> "$SEEN_IDS_FILE"
    fi
  done

  sleep "$POLL_INTERVAL"
done
Exit Nano with CTRL + X, then Y key, Enter Key.
Make email_poller.sh script exectuable: chmod +x email_poller.sh.
We can run this script in the background with: sudo ./email_poller.sh &.
- Stop the script if needed with:
pkill -f email_poller
📷 Take Snapshot!