Prerequisites
ProjectX-Prod-VPChas been created with subnets configuredprojectx-prod-jumpboxEC2 instance exists and is accessibleMy-Desktop-Key-Pairkey pair exists- AWS CLI configured with appropriate credentials
Network Topology
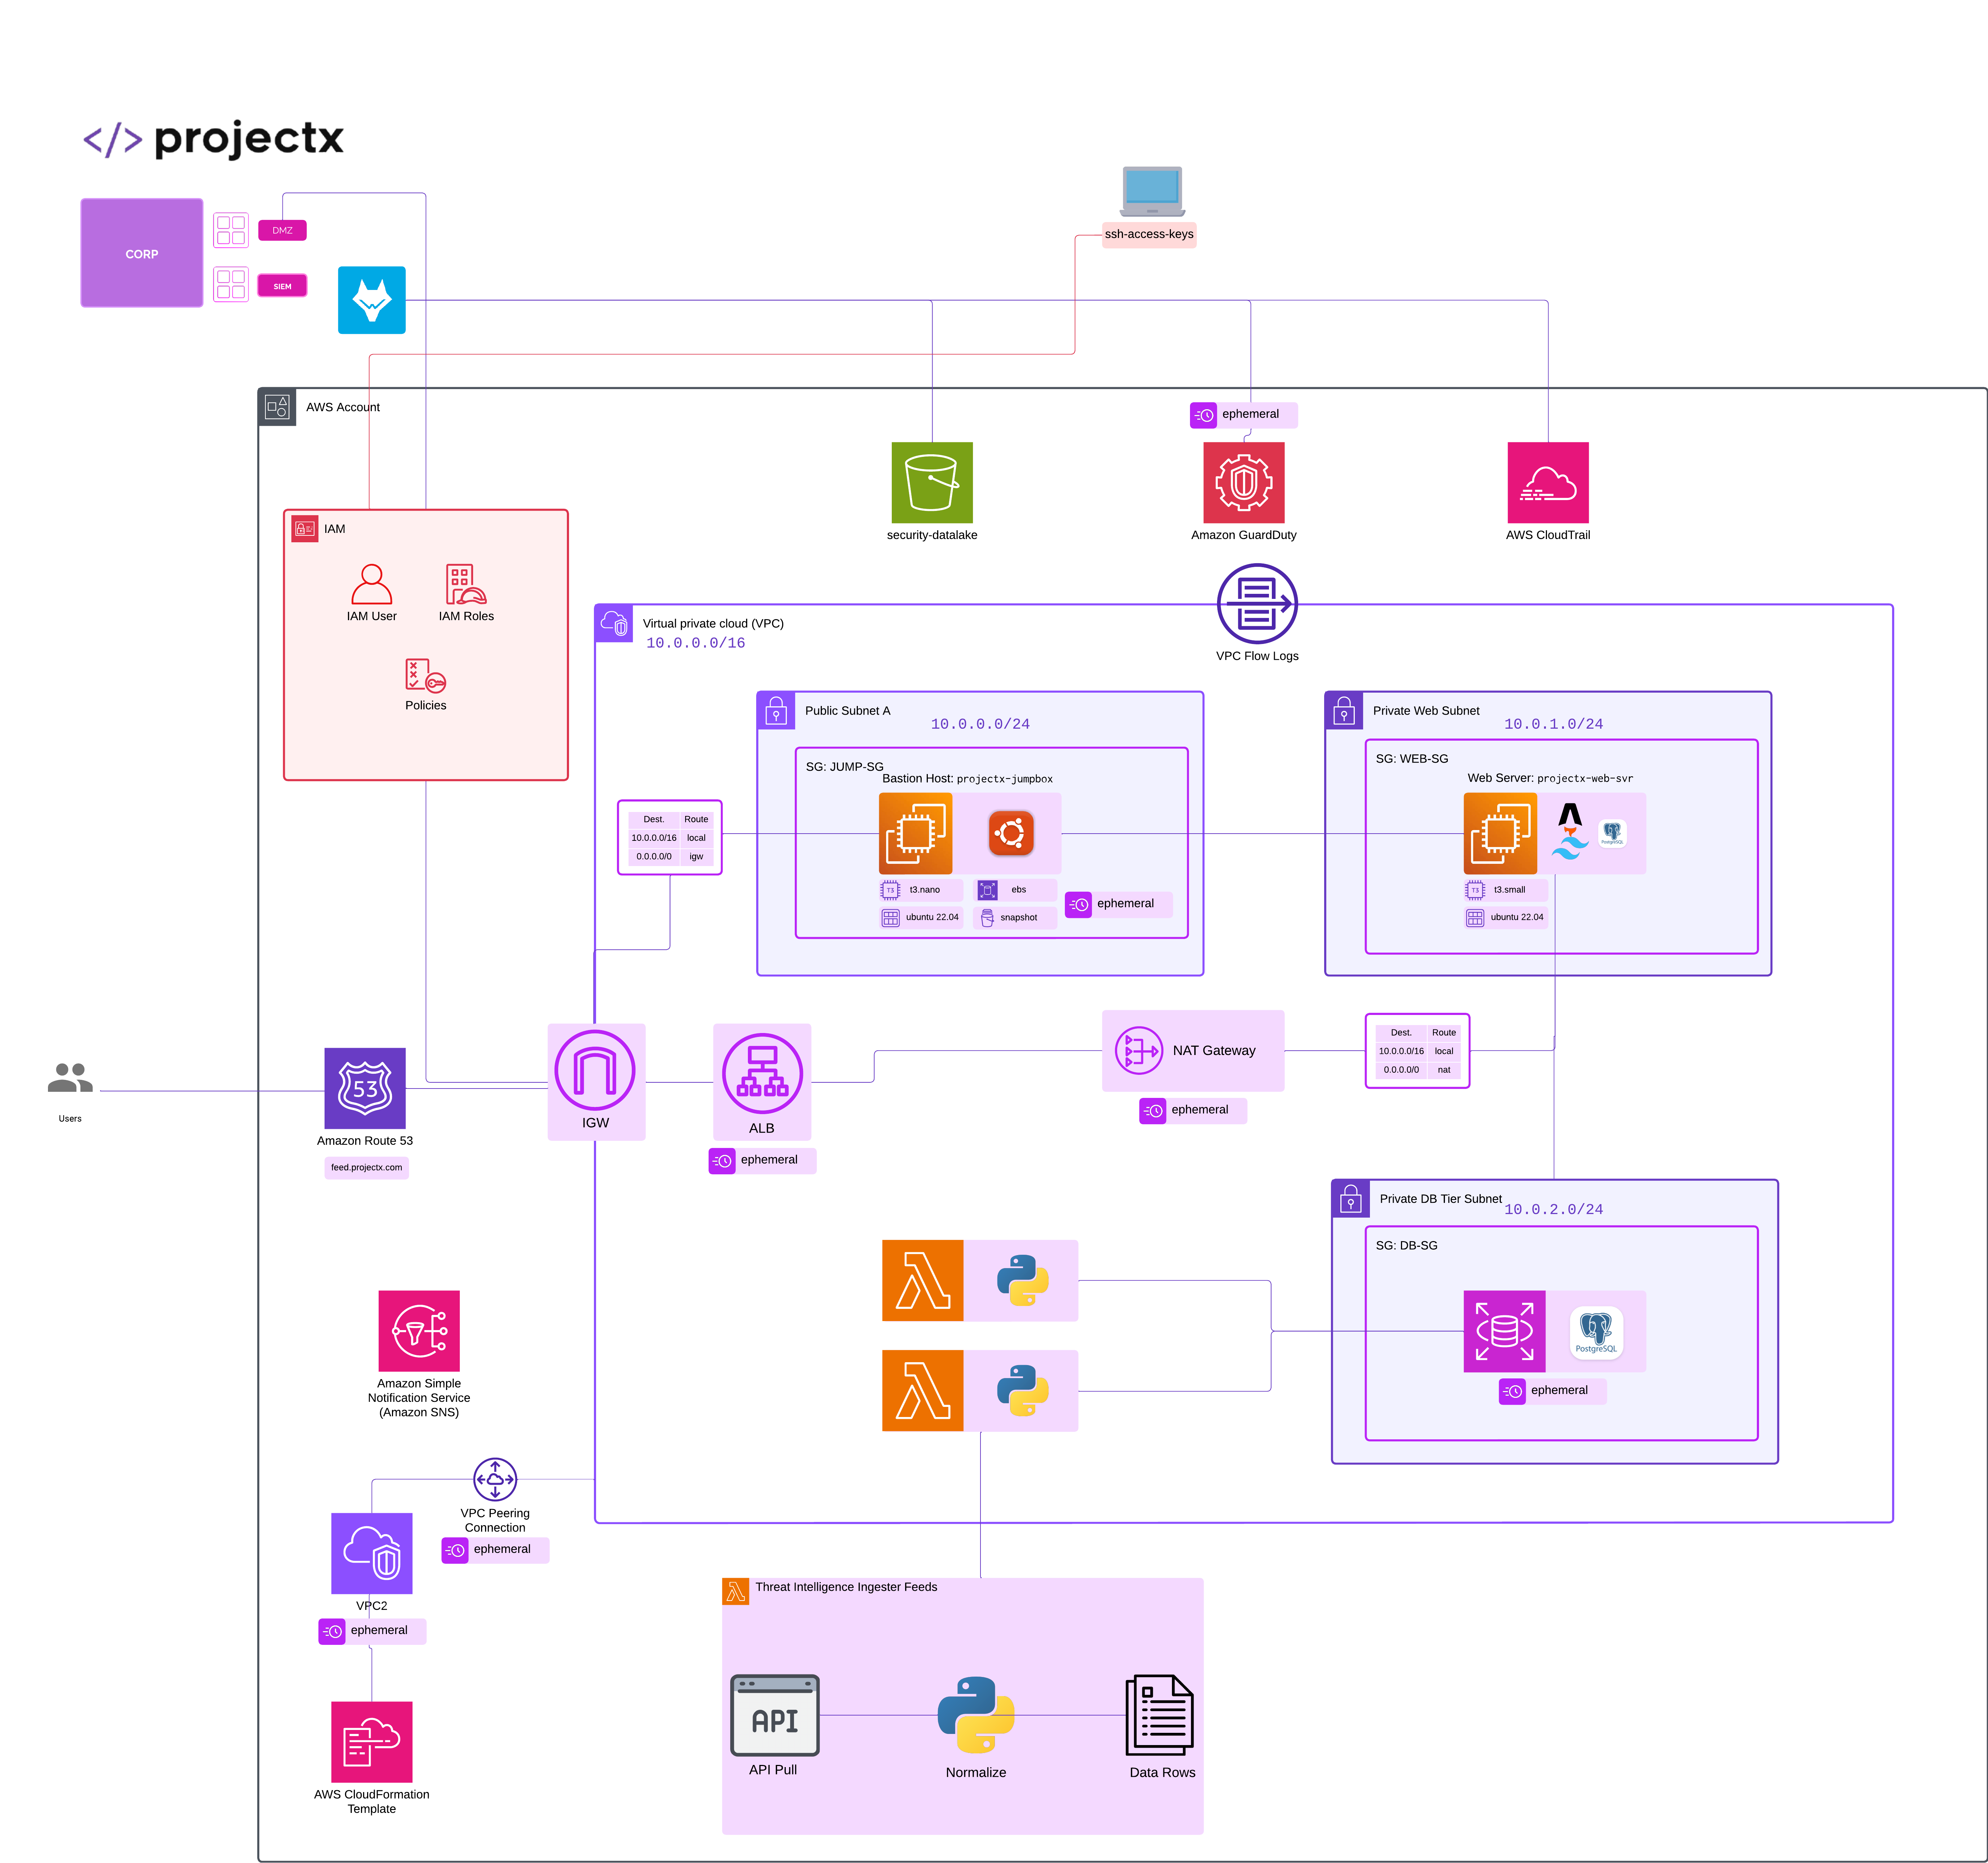
Overview
This guide walks through deploying a dedicated web server instance (projectx-prod-websvr) that will eventually host our threat intelligence application. The web server will be deployed in a private subnet for enhanced security, accessible only through the bastion host (projectx-prod-jumpbox).
After deployment, we'll configure the server with Astro and Tailwind CSS to prepare it for application hosting.
Deploy projectx-prod-websvr
Set AWS Region
👉 Ensure you're working in the us-east-2 (Ohio) region.
Launch EC2 Instance
Navigate to EC2 AWS Service.
Select "Launch instance".
Configure Instance Details
Name and Tags
- Name:
projectx-prod-websvr
Application and OS Images
- AMI: Ubuntu Server 24.04 LTS (HVM), SSD Volume Type
Instance Type
- Instance type:
t3.small
Key Pair
- Key pair: Select
My-Desktop-Key-Pair
Network Settings
Select "Edit" to configure network settings.
Configure:
- VPC: Select
projectx-prod-vpc(orProjectX-Prod-VPC) - Subnet: Select
Private Web Subnet - Auto-assign Public IP: Disable (since this is a private subnet)
Security Group
Select "Create security group".
- Security group name:
projectx-prod-websvr-sg - Description: Security group for projectx-prod-websvr
Configure inbound rules:
- SSH (22): Allow from
projectx-prod-jumpbox-sg(or the security group of your jumpbox) - Type: SSH
- Source: Custom → Select the security group of
projectx-prod-jumpbox
👉 Since the web server is in a private subnet, we only allow SSH from the jumpbox security group. This ensures the web server is not directly accessible from the internet.
Configure Storage
Leave storage settings as default (8 GiB gp3).
Advanced Details
Leave all other settings as default.
Launch Instance
Review your configuration:
- Name:
projectx-prod-websvr - AMI: Ubuntu Server 24.04 LTS
- Instance type:
t3.small - Key pair:
My-Desktop-Key-Pair - VPC:
projectx-prod-vpc - Subnet:
ProjectX-Prod-Private-Web-Subnet - Security group:
projectx-prod-websvr-sg
Select "Launch instance".
Wait for the instance to reach "Running" status.
👉 Note the Private IPv4 address of the instance. You'll need this to connect through the jumpbox.
Connect to Web Server via Jumpbox
Since projectx-prod-websvr is in a private subnet, we must connect through the bastion host (projectx-prod-jumpbox).
Step 1: Connect to Jumpbox
First, connect to projectx-prod-jumpbox using your preferred method (SSH or EC2 Instance Connect)
SSH Method
From your local machine:
On Windows PowerShell:
Replace <jumpbox-public-ip> with the public IP address of projectx-prod-jumpbox.
Step 2: SSH from Jumpbox to Web Server
Once connected to the jumpbox, SSH into the web server using its private IP address:
Replace <websvr-private-ip> with the private IPv4 address of projectx-prod-websvr.
👉 If the private key is not on the jumpbox, you can either:
1. Copy the key to the jumpbox using scp from your local machine
2. Use SSH agent forwarding (more secure)
Using SSH Agent Forwarding (Recommended)
From your local machine, connect with agent forwarding:
Then from the jumpbox, you can SSH without specifying the key:
👉 First connection will prompt you to accept the host fingerprint. Type yes and press Enter.
You should now be logged into projectx-prod-websvr.
Install Development Tools
Update System
Update the package list and upgrade existing packages:
Install Node.js and npm
Astro requires Node.js. Install Node.js 20.x (LTS) using NodeSource:
Verify installation:
You should see Node.js version 20.x and npm version 10.x or higher.
Install Additional Tools
Install useful development tools:
Install Astro
Astro is a modern web framework for building fast, content-focused websites.
Create Project Directory
Create a directory for your threat intelligence application:
Initialize Astro Project
Initialize a new Astro project:
When prompted:
- Template: Choose
EmptyorBlog(recommended:Emptyfor a custom setup) - TypeScript: Yes (recommended)
- Install dependencies: Yes
- Git repository: Optional (you can initialize later)
👉 Follow the interactive prompts. For a minimal setup, you can accept defaults.
Verify Astro Installation
Check that Astro is installed:
You should see Astro listed in your dependencies.
Install Tailwind CSS
Tailwind CSS is a utility-first CSS framework for rapidly building custom designs.
Install Tailwind CSS
From your project directory (~/threat-intel-app), install Tailwind CSS and its dependencies:
Initialize Tailwind Configuration
Generate Tailwind configuration files:
This creates:
- tailwind.config.mjs - Tailwind configuration
- postcss.config.mjs - PostCSS configuration
Configure Tailwind for Astro
Edit tailwind.config.mjs to include your content paths:
Update the content array to include Astro files:
/** @type {import('tailwindcss').Config} */
export default {
  content: ['./src/**/*.{astro,html,js,jsx,md,mdx,svelte,ts,tsx,vue}'],
  theme: {
    extend: {},
  },
  plugins: [],
}
Save and exit (Ctrl+X, then Y, then Enter).
Add Tailwind Directives to CSS
Create or edit src/styles/global.css (or your main CSS file):
Add Tailwind directives:
Save and exit.
Import CSS in Astro Layout
Edit your main layout file (typically src/layouts/Layout.astro or src/pages/index.astro):
Add the CSS import at the top:
Or if you're using a page directly, add it to src/pages/index.astro:
---
import '../styles/global.css';
---

<html>
  <head>
    <title>Threat Intelligence Application</title>
  </head>
  <body>
    <h1 class="text-3xl font-bold">Welcome</h1>
  </body>
</html>
Verify Tailwind CSS Installation
Test that Tailwind is working by starting the development server:
👉 If you see any errors, check that:
1. Tailwind CSS is installed: npm list tailwindcss
2. Configuration files exist: ls tailwind.config.mjs postcss.config.mjs
3. CSS file includes Tailwind directives
4. CSS is imported in your layout or page
You can stop the server with Ctrl+C.
Verify Installation
Check Installed Packages
Verify all tools are installed correctly:
Test Astro Development Server
Start the development server:
The server should start and display a local URL (typically http://localhost:4321).
👉 Since this is a private instance, you'll need to set up port forwarding or use a reverse proxy to access the development server from your local machine. For now, the server is running and ready for development.
Stop the server with Ctrl+C.
Success!